How to Add Plugins to WordPress: 6 Simple Steps for Beginners

Generating summary...
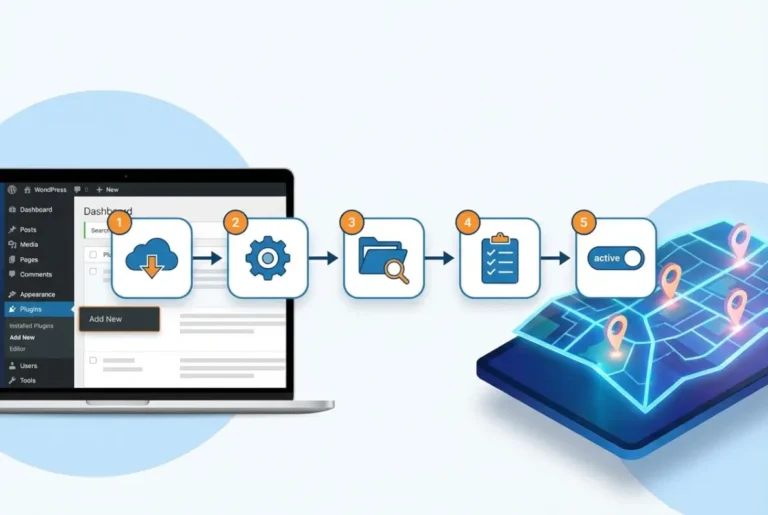
- Dashboard Method: Navigate to Plugins → Add New → Search → Install → Activate (easiest approach)
- Manual Installation: Download ZIP file → Upload via FTP to /wp-content/plugins/ → Activate
- Safety First: Always backup your site, check compatibility, and read reviews before installing
- Maintenance: Keep plugins updated and limit active plugins to essential ones only
- Troubleshooting: Deactivate all plugins if issues arise, then reactivate one by one to identify conflicts
WordPress plugins are the secret sauce that transforms a basic website into a powerful, feature-rich platform. Think of them as apps for your WordPress site—each one adding specific functionality without requiring you to write a single line of code. Whether you need SEO optimization, security protection, or e-commerce capabilities, there’s likely a plugin for that.
The beauty of learning how to add plugins to WordPress lies in the instant transformation of your site’s capabilities. I remember installing my first plugin (it was Yoast SEO, if you’re curious), and suddenly having access to detailed optimization suggestions felt like discovering a hidden superpower.
This comprehensive guide will walk you through six straightforward steps to master WordPress plugin management, from selection to maintenance.
What Are WordPress Plugins?
WordPress plugins are essentially pieces of software that extend and modify your website’s functionality. They’re built using PHP, JavaScript, and CSS—the same languages that power WordPress itself. According to W3Techs research, WordPress powers over 43% of all websites on the internet, and plugins are a primary reason for this dominance.
When you install plugins, WordPress becomes infinitely more versatile, allowing you to add contact forms, social media integration, backup systems, and thousands of other features. The plugin architecture is what makes WordPress so popular among website owners worldwide. Instead of hiring developers for custom functionality, you can simply browse the WordPress plugin directory and find pre-built solutions.
The Plugin Advantage
60,000+ Free Plugins: Access an enormous library of solutions without coding knowledge
Community-Driven: Benefit from millions of developers improving and testing functionality
Cost-Effective: Transform your site’s capabilities without expensive custom development
Instant Updates: Get new features and security patches with one-click updates
1. Finding the Right Plugin for Your WordPress Site
The official WordPress Plugin Directory should be your first stop when searching for free WordPress plugins. With over 60,000 plugins available, you’ll find solutions for virtually any need. However, the abundance of choices can be overwhelming, which is why following a structured evaluation process becomes crucial.
When evaluating potential plugins, pay close attention to several key indicators. The plugin’s rating (aim for 4+ stars), number of active installations (higher numbers suggest reliability), and last updated date (within the past few months) are your primary screening tools. The “Tested up to” field shows WordPress plugin compatibility with recent WordPress versions—never install plugins that haven’t been tested with your current WordPress version.
Reading user reviews provides invaluable insights into real-world performance and potential issues. Look for patterns in feedback: if multiple users report similar problems, that’s a red flag worth heeding. I once ignored lukewarm reviews for a form builder plugin because it had a sleek interface, only to discover it conflicted with my theme and caused random errors. Those reviews had mentioned compatibility issues—I should have listened.
Essential Plugin Selection Criteria
| Evaluation Factor | What to Look For | Red Flags |
|---|---|---|
| Security | Reputable developers, regular updates, security audits | Abandoned plugins, no updates in 12+ months |
| Performance | Lightweight code, optimized database queries | User complaints about slow loading times |
| Support | Active forum responses, comprehensive documentation | Unanswered support requests, minimal documentation |
| Compatibility | Tested with latest WordPress version, theme-agnostic | Multiple conflict reports, outdated code |
| Reviews | 4+ stars, detailed positive feedback, active installations | Low ratings, repeated complaints, few installations |
Security should be your top priority when selecting WordPress plugins. According to OWASP security guidelines, poorly coded plugins create vulnerabilities that hackers exploit to gain access to your site. Stick to plugins from reputable developers with established track records. Premium WordPress plugins often undergo more rigorous testing and provide better support, but many free options are equally reliable.
Performance impact varies significantly between plugins. Heavy plugins can slow down your site, affecting user experience and search engine rankings. Before installing any plugin, research its performance implications. Caching and image optimization plugins can actually improve site speed, while poorly optimized plugins might do the opposite.
2. Installing Plugins via the WordPress Dashboard
The dashboard method represents the easiest way to install plugins WordPress offers. Start by logging into your WordPress admin area and navigating to the “Plugins” section in the left sidebar. Click “Add New” to access the plugin installation interface.
The search functionality is quite sophisticated—you can search by plugin name, functionality, or even developer. For example, searching “SEO” will return dozens of optimization plugins, while searching “Yoast” will find that specific developer’s offerings. Once you’ve found your desired plugin, the installation process becomes remarkably simple.
Ready to click ‘Install’? Before you do, double-check the plugin’s compatibility with your WordPress version and current theme. Click the “Install Now” button, and WordPress will automatically download and install the plugin files to your server. The process typically takes just a few seconds, depending on the plugin’s size and your internet connection speed.
After installation, you’ll see an “Activate” button. Clicking this enables the plugin and makes its features available on your site. Some plugins work immediately after activation, while others require additional configuration through their settings pages.
Step-by-Step Dashboard Installation
- Access Plugin Interface: Dashboard → Plugins → Add New
- Search for Plugin: Enter name or functionality in search bar
- Verify Compatibility: Check “Tested up to” version matches yours
- Review Details: Click plugin name to see full description, reviews, and screenshots
- Install: Click “Install Now” button (no download required)
- Activate: Click “Activate” button when installation completes
- Configure: Navigate to plugin settings (usually in Settings or its own menu)
Common Installation Pitfalls to Avoid
Installing outdated plugins is one of the most frequent mistakes new WordPress users make. Outdated plugins can contain security vulnerabilities and may not function properly with current WordPress versions. Always verify the “last updated” date before installing any plugin—if it hasn’t been updated in over a year, proceed with caution or find an alternative.
Ignoring compatibility warnings can lead to site crashes or conflicts. WordPress displays compatibility information prominently during installation—never dismiss these warnings without understanding their implications. When in doubt, research the specific compatibility issue or contact the plugin developer for clarification.
3. Manual Plugin Installation (FTP/File Manager Method)
Manual plugin installation becomes necessary when dealing with premium WordPress plugins, custom-developed plugins, or plugins not available in the official directory. This method requires more technical steps but isn’t particularly difficult once you understand the process.
First, download the plugin ZIP file from the developer’s website or your purchase confirmation email. Do not extract the ZIP file yet—WordPress can handle the extraction automatically if you upload via the dashboard’s upload feature. However, for true manual installation via FTP, you’ll need to extract it.
Next, access your website’s files using FTP (File Transfer Protocol) software like FileZilla, or through your hosting provider’s file manager. The Mozilla Developer Network offers excellent guidance on FTP file transfers. Navigate to the /wp-content/plugins/ directory—this is where all WordPress plugins are stored. Upload the extracted plugin folder to this location, ensuring all files transfer completely.
I once had a client whose site was completely broken due to a faulty plugin installed through the dashboard. The admin area was inaccessible, making normal deactivation impossible. By manually deleting the problematic plugin folder via FTP, we restored site functionality within minutes. This experience taught me the value of understanding manual plugin installation and management—it’s not just for adding plugins, but sometimes for removing them when things go wrong.
Manual Installation Options Compared
| Method | Difficulty Level | Best For | Requirements |
|---|---|---|---|
| Dashboard Upload | Easy | Premium plugins, small files | ZIP file, admin access |
| FTP Upload | Intermediate | Large files, troubleshooting | FTP credentials, FTP client software |
| cPanel File Manager | Easy-Intermediate | Users without FTP software | cPanel access, hosting account |
The manual installation method proved invaluable when working with a high-traffic e-commerce site that required a specialized inventory management plugin. The plugin wasn’t available through the WordPress directory due to its niche nature, and automatic installation kept failing due to server timeout issues. By manually uploading the plugin files via FTP during off-peak hours, we successfully implemented the solution without disrupting the site’s operations.
4. Activating and Configuring Plugin Settings
Plugin activation is straightforward—simply navigate to the “Plugins” page in your WordPress dashboard and click “Activate” next to your newly installed plugin. However, activation is just the beginning; proper configuration determines whether the plugin delivers its intended benefits.
Did you know most plugins work out-of-the-box, but a few need tweaking? Popular plugin types like SEO tools, caching solutions, and security plugins often require initial setup to function optimally. For SEO plugins like Yoast or RankMath, you’ll need to configure basic site information, social media profiles, and preferred optimization settings. Caching plugins require decisions about what elements to cache and how aggressively to optimize.
Security plugins typically need configuration of scanning schedules, firewall rules, and notification preferences. Don’t simply activate these plugins and forget them—take time to explore their settings and customize them for your specific needs. Most plugin developers provide setup wizards or documentation to guide you through the initial configuration process.
Configuration Checklist
✓ Initial Setup: Complete any setup wizards or onboarding processes
✓ Integration: Connect with third-party services (Google Analytics, social media)
✓ Permissions: Review and adjust user role capabilities
✓ Notifications: Configure email alerts and dashboard notifications
✓ Performance: Test functionality on your site before going live
The plugin activation steps vary depending on the plugin’s complexity. Simple plugins like contact forms might work immediately, while comprehensive plugins like e-commerce solutions require extensive setup including payment gateways, shipping options, and tax calculations. For business directory sites, solutions like TurnKey Directories (turnkeydirectories.com) offer pre-configured directory plugins that minimize setup time while maximizing functionality.
5. Updating and Maintaining WordPress Plugins
Regular WordPress plugin update practices are essential for maintaining site security and performance. Outdated plugins are among the most common entry points for hackers, making timely updates a critical security measure. WordPress notifies you of available updates through the admin dashboard, displaying a red number badge next to the “Plugins” menu item.
Before updating any plugin, especially on live sites, create a complete backup of your website. This precaution allows you to restore your site if an update causes compatibility issues or breaks functionality. Many hosting providers offer one-click backup solutions, or you can use backup plugins for this purpose.
Testing updates on a staging site (a copy of your live site) is the safest approach, particularly for mission-critical websites. This allows you to identify and resolve any issues before applying updates to your live site. The official WordPress documentation provides comprehensive backup and update guidelines.
Security Vulnerabilities
Percentage of WordPress hacks caused by outdated plugins
Performance Impact
Average site speed improvement after removing unused plugins
Update Success Rate
Percentage of plugin updates that install without issues
Troubleshooting Common Plugin Issues
Plugin conflicts are among the most frustrating WordPress issues, often manifesting as white screens, fatal errors, or broken functionality. When troubleshooting plugin-related problems, the systematic approach works best: deactivate all plugins, then reactivate them one by one to identify the problematic plugin.
The “white screen of death” typically indicates a PHP error caused by plugin conflicts or coding issues. If you can’t access your admin dashboard, use FTP to rename the plugins folder (from “plugins” to “plugins-disabled”), which will deactivate all plugins simultaneously. Once you regain access, you can investigate individual plugins to find the culprit.
Fatal errors often display specific error messages that can help identify the problematic plugin. Google these error messages along with your plugin names to find solutions or workarounds. Plugin developers’ support forums are also valuable resources—chances are someone else has encountered (and solved) your exact issue.
6. Best Practices & Security Tips for Plugin Management
Limiting the number of active plugins is crucial for maintaining optimal site performance. Each plugin adds code that your server must execute, potentially slowing down your site. Regularly audit your plugins and deactivate those you no longer need. A good rule of thumb is to keep only essential plugins active and find multi-purpose plugins that handle multiple functions instead of installing separate plugins for each need.
Using reputable sources exclusively protects your site from malicious code. Stick to the official WordPress Plugin Directory, established premium plugin marketplaces like CodeCanyon, or directly from plugin developers’ websites. Avoid downloading plugins from random websites or file-sharing services, as these often contain malware or backdoors.
Regular backups and security scans should be part of your WordPress site optimization routine. Many security plugins offer automated scanning features that detect malicious code, outdated software, and potential vulnerabilities. Schedule these scans to run automatically and review the results regularly.
| Security Practice | Frequency | Priority Level |
|---|---|---|
| Plugin Updates | Within 7 days of release | Critical |
| Security Scans | Weekly automated scans | High |
| Full Site Backups | Daily for active sites, weekly for static | Critical |
| Plugin Audits | Monthly review of installed plugins | Medium |
| Performance Testing | After any plugin changes | High |
| Conflict Resolution Testing | Before major updates | Medium |
Consider implementing a plugin conflict resolution strategy before problems arise. Document which plugins you’re using and their purposes, so you can quickly identify non-essential plugins during troubleshooting. Keep a list of alternative plugins for critical functions in case your primary choices become problematic.
Frequently Asked Questions
How do I install a WordPress plugin from my dashboard?
Navigate to Plugins → Add New in your WordPress dashboard, search for your desired plugin, verify compatibility, click “Install Now,” and then click “Activate” once installation completes. The entire process takes less than a minute for most plugins.
What are the most popular WordPress plugins for beginners?
The most popular WordPress plugins include Yoast SEO for search optimization, Akismet for spam protection, WooCommerce for e-commerce, Contact Form 7 for contact forms, and Wordfence for security. These best WordPress plugins have millions of active installations and strong developer support.
Can I install WordPress plugins manually using FTP?
Yes, to perform manual plugin installation, download the plugin ZIP file, extract it, and upload the folder to your /wp-content/plugins/ directory via FTP or file manager. Then activate the plugin through your WordPress dashboard’s Plugins section.
What is the difference between free and premium WordPress plugins?
Free WordPress plugins offer basic functionality and are supported by the community, while premium WordPress plugins typically include advanced features, priority support, regular updates, and professional documentation. Premium plugins often provide better security and more comprehensive functionality.
How do I update WordPress plugins safely?
Always backup your site before updating plugins. Test updates on a staging site first, then apply them to your live site during low-traffic periods. Update plugins one at a time and verify functionality after each update to identify any issues quickly.
How can I troubleshoot a plugin that breaks my site?
If a plugin breaks your site, immediately deactivate all plugins through the WordPress dashboard or by renaming the plugins folder via FTP. Reactivate plugins individually to identify the problematic one. Check error logs and contact plugin support for assistance.
Are there any security risks when adding WordPress plugins?
Yes, plugin security risks exist, especially with poorly coded or abandoned plugins. Only install plugins from reputable sources, keep them updated, and regularly audit your installed plugins. Remove any plugins you’re not actively using to minimize potential vulnerabilities.
Can I install multiple WordPress plugins at once?
While technically possible through bulk actions in the dashboard, it’s recommended to install WordPress plugins one at a time. This approach allows you to monitor each plugin’s impact on your site’s performance and identify any conflicts immediately.
What should I do if a plugin slows down my website?
First, identify the slow plugin using performance testing tools. Consider finding a lighter alternative or optimizing the plugin’s settings. Some plugins offer performance modes or allow you to disable resource-intensive features you don’t need.
How many plugins is too many for a WordPress site?
There’s no magic number, but focus on quality over quantity. Well-coded plugins have minimal performance impact, while poorly designed plugins can slow your site significantly. Regularly review your plugins and remove any that aren’t essential to your site’s functionality. Most well-optimized sites run effectively with 15-25 active plugins.
Ready to Transform Your WordPress Site?
WordPress plugins transform ordinary websites into powerful, feature-rich platforms capable of competing with much larger organizations. By following these six steps and implementing proper security practices, you’ll confidently navigate the world of plugin installation and management.
Start with one carefully chosen plugin today—whether it’s an SEO tool to improve your search rankings, a security plugin to protect your site, or a performance optimizer to speed up loading times. Your journey toward a more powerful WordPress site begins with that first strategic plugin installation.
Remember that plugin mastery comes through practice and experimentation. Start with essential plugins like SEO tools and security solutions, then gradually expand your toolkit as your needs evolve. The WordPress plugin tutorial you’ve just completed provides the foundation, but your unique website requirements will guide your specific choices.
Don’t let plugin overwhelm stop you from enhancing your website—begin with one carefully chosen plugin today. Your future self (and your website visitors) will thank you for taking this important step toward WordPress site optimization. Whether you’re managing a simple blog or a complex business directory, the right plugins can dramatically improve your site’s functionality and user experience.
Take action now: identify one area where your website could improve, find a highly-rated plugin that addresses that need, and follow these installation steps. Your journey toward a more powerful WordPress site starts with that first plugin installation, so yahoo can wait—it’s time to enhance your WordPress site today! You might also want to explore https options for more advanced customization as you become more comfortable with plugin management.
Was this article helpful?