How to Import Listings from IDX to WordPress: 6 Simple Steps

Generating summary...
Real estate websites live and die by their listing data. If you’re running a WordPress-powered real estate site, you’ve probably wrestled with the challenge of keeping property listings fresh, accurate, and fully integrated with your local Multiple Listing Service (MLS). The good news? IDX (Internet Data Exchange) technology has matured into a remarkably powerful solution that brings real-time MLS data directly into your WordPress site—no manual copy-paste marathons required.
Here’s what most tutorials won’t tell you upfront: importing IDX listings isn’t just about displaying properties. It’s about transforming your site into a lead-generation machine that ranks in search engines, updates automatically, and provides the kind of rich, searchable experience that converts browsers into buyers. The real magic happens when you move beyond simple iframe embeds (which Google barely recognizes) and embrace native WordPress integration that makes every listing page an SEO asset.
In this guide, I’ll walk you through six strategic steps to import IDX listings into WordPress—covering everything from choosing the right plugin architecture to optimizing performance and compliance. Whether you’re a solo agent building your first site or a brokerage managing hundreds of listings across multiple MLS feeds, this approach will help you unlock the full potential of your real estate data.
TL;DR – Quick Takeaways
- IDX feeds unlock real-time MLS data – Direct integration beats iframe embeds for SEO and user experience every time
- Plugin choice matters immensely – SimplyRETS, IMPress for IDX Broker, and Showcase IDX each serve different use cases and MLS coverage
- API credentials are your gateway – Secure RETS or RESO Web API access from your MLS before starting any technical work
- Native WordPress output is SEO gold – Properly configured IDX creates indexable, rankable listing pages that drive organic traffic
- Performance and compliance can’t be afterthoughts – Balance update frequency with caching strategies while respecting MLS display rules
- Lead capture integration multiplies value – Connect IDX pages to your CRM to transform listing views into actionable leads
Understanding IDX, MLS, and WordPress Integration
Let’s start with the fundamentals, because confusion about terminology is one of the biggest roadblocks I see agents and developers hit. IDX (Internet Data Exchange) is essentially a set of rules and technologies that allow real estate professionals to display MLS listings from their local board on their own websites. Think of it as a data-sharing agreement backed by technical standards that pipe live property information directly to your site.
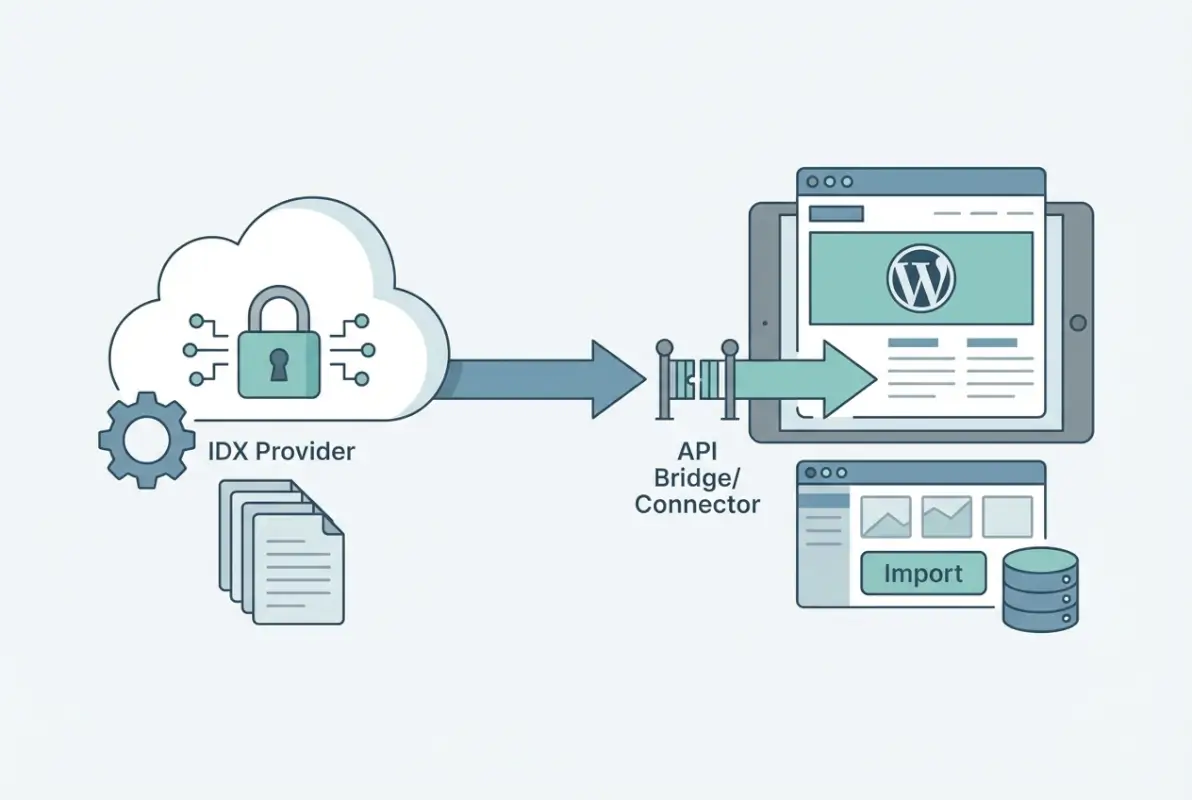
The MLS (Multiple Listing Service) is the source database—a cooperative system where brokers share listing information. IDX is the bridge technology that makes a subset of that data available for public display on member websites. Without IDX, you’d be limited to manually entering your own listings or relying on third-party portals that control the user experience (and capture the leads).
What is IDX and why use it on WordPress?
WordPress powers a significant chunk of real estate websites for good reason: it’s flexible, SEO-friendly, and has a mature ecosystem of themes and plugins. When you integrate IDX with WordPress, you’re bringing together the world’s most popular content management system with real-time MLS data. The result is a site where every property listing becomes a unique page with its own URL, meta tags, and ranking potential.
The alternative—simply embedding an iframe from an IDX provider—is tempting because it’s quick. But here’s the catch: search engines treat iframes as black boxes. They can’t crawl the content inside, which means you’re essentially hiding your most valuable pages from Google. Native WordPress IDX integration, by contrast, renders listings as actual HTML on your domain, making them fully indexable and potentially capable of ranking for long-tail keywords like “3 bedroom ranch in Riverside under 400k.”
IDX vs. iFrame-based solutions: pros and cons
| Aspect | Native IDX Integration | iFrame Embed |
|---|---|---|
| SEO Value | High – Full page indexing | Low – Black box to crawlers |
| Customization | Complete control over design | Limited to provider’s interface |
| Setup Complexity | Moderate – Requires configuration | Easy – Copy and paste code |
| Performance | Optimizable with caching | Dependent on external server |
| Lead Capture | Direct integration with your CRM | Often requires separate forms |
I remember working with a brokerage that had been using an iframe solution for years. Their listings looked fine, but they were generating almost zero organic traffic from property searches. After migrating to a native WordPress IDX plugin, their indexed listing pages jumped from essentially zero to over 500 in three months, and they started ranking for neighborhood-specific searches they’d never captured before.
Key terms to know (RETS/RESO API, MLS, API keys, feeds)
Here’s a quick glossary to get you oriented:
- RETS (Real Estate Transaction Standard): The older protocol for transferring MLS data. Still widely used but being phased out in favor of RESO Web API.
- RESO Web API: The modern, RESTful standard for MLS data exchange. Faster, more flexible, and increasingly becoming the default across North American MLS systems.
- API Keys: Security credentials that authenticate your website’s access to MLS data feeds. Think of them as passwords that prove you have permission to pull listings.
- Data Feed: The continuous stream of listing updates (new properties, price changes, status updates) that flows from the MLS to your WordPress site.
- Syndication vs. IDX: Syndication pushes your listings to external sites (like Zillow); IDX pulls the broader MLS inventory to your own site.
Current market context (tech adoption in real estate; top tools driving leads)
The real estate technology landscape has evolved dramatically. According to the National Association of REALTORS®, the majority of homebuyers now begin their search online, and agents who leverage technology effectively generate significantly more leads than those relying solely on traditional methods. IDX integration has shifted from “nice to have” to “table stakes” for competitive real estate websites.
WordPress IDX plugins have matured in response, with providers emphasizing not just data display but comprehensive lead-generation ecosystems. Modern solutions bundle listing search with CRM integration, automated drip campaigns, and sophisticated analytics. The focus has shifted from simply showing properties to creating conversion-optimized experiences that capture visitor information and nurture prospects through the buying journey. For more on optimizing your online presence, check out strategies for how to get your business listing on the first page of google seo tips.
Step 1 — Choose the Right IDX Solution for WordPress
Selecting your IDX plugin is arguably the most consequential decision in this entire process. Get it right and you’ll have a foundation that scales beautifully as your business grows; get it wrong and you’ll be migrating data and rebuilding templates within six months. The good news is that the WordPress IDX ecosystem has consolidated around a few excellent options, each with distinct strengths.
Your choice should be driven by three primary factors: your MLS coverage area, your technical comfort level, and your long-term feature requirements. A solo agent in a single MLS territory has very different needs than a regional brokerage pulling from multiple boards. Similarly, if you’re comfortable with custom CSS and PHP, you can leverage more flexible but technical solutions; if you prefer visual page builders and preset templates, you’ll want something more turnkey.
Compare main WordPress IDX options (SimplyRETS, IMPress for IDX Broker, Showcase IDX, IDX Plugin family)
SimplyRETS stands out for developers and tech-savvy agents who want maximum control. It’s a clean, developer-friendly plugin that connects to the SimplyRETS API service. The interface is straightforward, the code is well-documented, and it plays nicely with page builders like Elementor. However, you’ll need to do more template customization work yourself compared to more opinionated solutions. The SimplyRETS WordPress plugin has earned solid reviews for reliability.
IMPress for IDX Broker is the WordPress plugin companion to IDX Broker’s comprehensive service. If you’re already an IDX Broker customer (or considering becoming one), IMPress is your natural choice. It handles the heavy lifting of data management on IDX Broker’s servers and pulls that into WordPress for display. The big advantage here is that IDX Broker deals with MLS compliance and data normalization across hundreds of MLS boards. The tradeoff is that you’re dependent on their service (and pricing structure). The IMPress GitHub repository provides transparent access to the codebase.
Showcase IDX has built a reputation for emphasizing SEO-friendly output and clean, modern listing designs. It’s a good middle ground—more features than bare-bones solutions but less complex than enterprise platforms. Showcase IDX focuses heavily on making sure listing pages are indexable and rank well, which aligns perfectly with the goals of this guide. You can explore it via the Showcase IDX plugin page.
| Plugin | Best For | MLS Coverage | SEO Focus | Complexity |
|---|---|---|---|---|
| SimplyRETS | Developers, custom builds | Growing network | High (with customization) | Moderate-High |
| IMPress/IDX Broker | Multi-MLS brokerages | 800+ MLS boards | High (built-in) | Low-Moderate |
| Showcase IDX | SEO-focused agents | Broad coverage | Very High | Moderate |
| IDX Plugin | Budget-conscious solos | Major MLS regions | Moderate | Low |
Considerations by MLS coverage, update frequency, SEO, and performance
MLS coverage is non-negotiable—your plugin needs to support your local board(s). Before you fall in love with any solution, verify that it has active connections to your specific MLS. Some providers maintain direct relationships with hundreds of boards; others focus on depth in specific regions. Contact the plugin vendor and ask explicitly: “Do you support [Your MLS Name] and what’s the update frequency?”
Update frequency varies significantly. Some feeds refresh every 15 minutes; others update hourly or even daily. For competitive markets where properties move fast, near-real-time updates can be a genuine differentiator. However, more frequent updates can also mean higher server load and potential performance implications (which we’ll address in Step 4).
SEO architecture should be baked into the plugin’s DNA. Look for solutions that generate unique URLs for each listing (example.com/listings/123-main-street), support custom meta descriptions and title tags, output structured data (Schema.org markup for real estate listings), and create XML sitemaps for listing pages. The best plugins treat every property as a full WordPress post or custom post type, giving you access to all of WordPress’s native SEO tools.
Performance matters more than most agents realize. If each listing page loads slowly, you’ll hemorrhage visitors (and Google will downrank you). Evaluate whether the plugin supports image optimization, lazy loading, and intelligent caching. Does it load all listing data on every page view, or does it cache results intelligently?
Quick-start criteria (license, API access, hosting compatibility)
Before you commit, confirm these technical prerequisites:
- Active real estate license: Most MLS boards require proof of licensure before granting IDX access.
- MLS membership: You’ll typically need to be a member in good standing with your local board.
- API approval: Some MLS systems require a separate application process for API access, which can take days or weeks.
- Hosting requirements: Ensure your WordPress host supports the plugin’s PHP version requirements (usually PHP 7.4+) and has adequate memory limits (256MB minimum, 512MB recommended).
- SSL certificate: Most MLS feeds require secure HTTPS connections for data transmission.
Recommended starting points based on current plugin ecosystems and community usage
If you’re a solo agent or small team just getting started, I’d recommend beginning with either Showcase IDX or IMPress for IDX Broker. Both offer relatively painless setup processes and comprehensive documentation. If you’re technical or working with a developer, SimplyRETS gives you more flexibility to create truly custom experiences. For teams managing multiple MLS feeds or large geographic territories, IDX Broker’s coverage and data normalization capabilities are hard to beat.
The key is to match the tool to your actual needs—not your aspirational needs six months from now. Start with a solid foundation that handles your current MLS and traffic, then scale up features as your business demands them. If you’re building out a comprehensive online presence, you might also want to learn how to get your business listed on directories essential steps to complement your IDX strategy.
Step 2 — Prepare MLS Access and API Credentials
This is where the rubber meets the road, and frankly, where many agents get stuck. Securing MLS access and API credentials is partly administrative paperwork and partly technical configuration. The good news is that once you’ve done it once, you’ll understand the process for any future MLS connections. The challenge is that every MLS board has slightly different procedures and security requirements.
Think of this step as obtaining the keys to the data kingdom. Without proper credentials, your WordPress site can’t authenticate with the MLS servers to pull listing data. Some MLS systems make this straightforward with self-service portals; others require submitting applications and waiting for manual approval. Budget at least a week for this process, sometimes longer for more bureaucratic MLS organizations.
Obtain MLS access and credentials (RETS/RESO Web API)
Start by logging into your MLS member portal and looking for sections labeled “IDX,” “API Access,” “Data Feeds,” or “Developer Tools.” If you can’t find anything obvious, contact your MLS support desk and ask specifically: “I need to connect my WordPress website to pull IDX listings via API. What’s the process for obtaining RETS or RESO Web API credentials?”
You’ll typically need to provide:
- Your license number and brokerage affiliation
- The domain name where listings will be displayed
- Confirmation that you’ve read and agree to the MLS display rules
- Sometimes a brief description of how you’ll use the data
The MLS will then generate credentials—usually a username, password, and endpoint URL (the server address where your site will connect to pull data). For RESO Web API connections, you’ll receive an API key or OAuth token instead of traditional username/password pairs. Store these credentials securely; they’re as sensitive as your banking passwords.
Create a dedicated API app and generate keys
If your MLS supports application-based API access (common with RESO Web API systems), you’ll create a dedicated “app” within their developer portal. Think of this like creating an app in Facebook’s developer console—you’re registering your WordPress site as an authorized application that can request data.
During app creation, you’ll typically specify:
- Application name: Something descriptive like “YourBrokerage WordPress Site”
- Redirect URLs: Your domain (https://yourdomain.com)
- Scope or permissions: What data fields you need access to (residential properties, land, commercial, etc.)
- Rate limits: How frequently your site can query the API (requests per minute/hour)
Once approved, you’ll receive your API keys—often both a public key (client ID) and a secret key. The secret key should never be exposed in front-end code or publicly accessible files. Your IDX plugin will provide secure fields to store these credentials in the WordPress admin dashboard.
Security best practices (restrict API keys, rotate regularly)
Security around MLS data isn’t just good practice—it’s often a contractual requirement with your MLS. Here are essential safeguards:
- IP whitelisting: If your MLS supports it, restrict API access to your web server’s IP address.
- Key rotation: Change API credentials every 6-12 months (set a calendar reminder).
- Minimal permissions: Only request access to data fields you actually need (don’t pull agent private remarks if you’re only displaying public listings).
- Monitor usage: Regularly check your API usage logs for unusual patterns that might indicate compromised credentials.
- Separate staging credentials: If you have a development or staging site, use separate API keys so you can revoke them without affecting production.
I’ve seen situations where stolen API credentials were used to scrape entire MLS databases, resulting in the agent losing their IDX privileges entirely. It’s not worth cutting corners on security.
What to do if your MLS restricts access
Some MLS systems don’t offer direct API access to individual agents, instead requiring you to go through an approved IDX vendor. If you hit this roadblock, your options are:
- Use a vendor-mediated solution: Services like IDX Broker have existing relationships with hundreds of MLS boards. You subscribe to their service, they handle the MLS connection on their end, and your WordPress plugin connects to their API instead of directly to the MLS.
- Work with your broker: Some brokerages negotiate master IDX agreements that cover all their agents. Ask if your brokerage already has an IDX solution you can plug into.
- Join a cooperative: In some regions, agents can join technology cooperatives that pool resources to maintain MLS connections.
- Advocate for change: If your MLS is particularly restrictive, consider bringing the issue up with your board representatives. The trend in the industry is toward more open data access, not less.
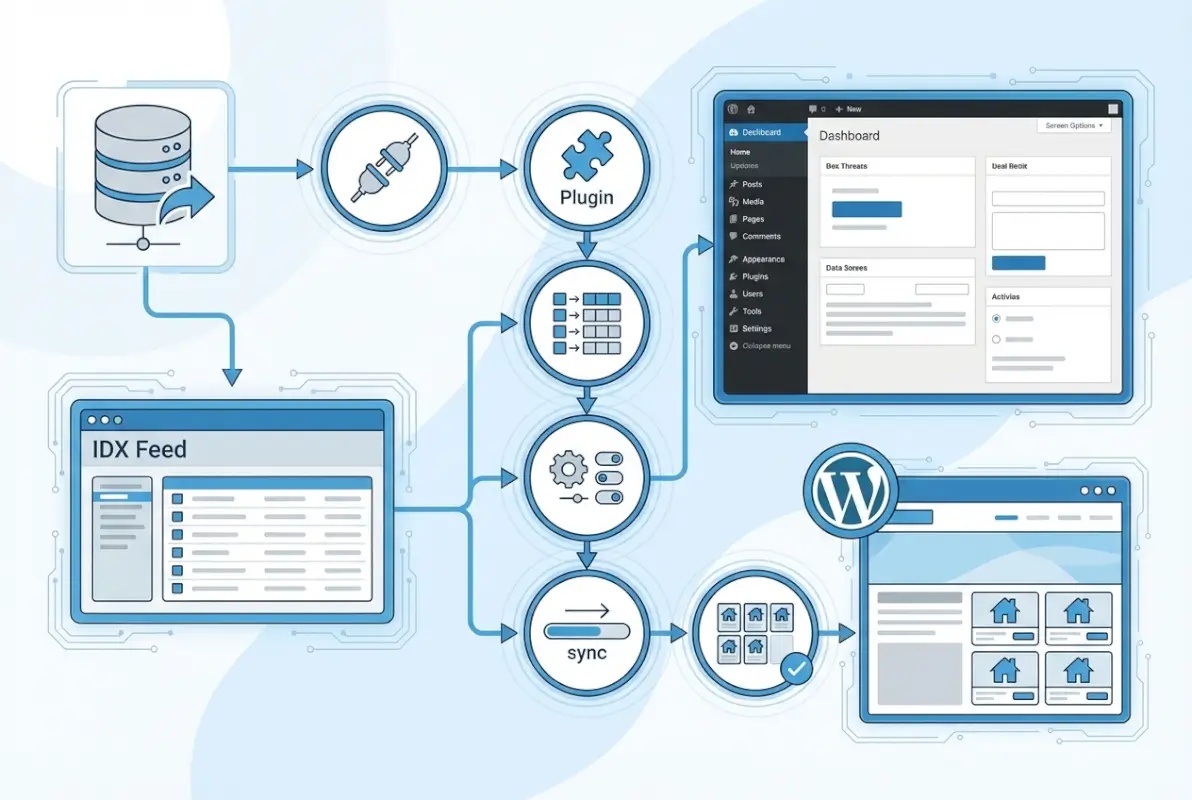
Step 3 — Install and Activate the IDX Plugin on WordPress
Now we get to the fun part—actually installing your chosen IDX plugin on WordPress. If you’ve ever installed any WordPress plugin, this process will feel familiar. The difference is that IDX plugins typically require more post-installation configuration than your average contact form or SEO plugin. You’re not just adding a feature; you’re integrating an entire external data source into your site’s architecture.
The installation itself takes minutes, but thoughtful configuration can take hours. Don’t rush this step. How you configure your plugin now will determine your site’s listing URL structure, template hierarchy, and update cadence—things that are painful to change later once Google has indexed hundreds of listing pages.
Install from WordPress plugin repository vs. manual upload
Most major IDX plugins are available directly from the WordPress plugin repository, which is the preferred installation method for several reasons: automatic updates, security vetting by the WordPress team, and easy one-click installation from your dashboard.
To install from the repository:
- Log into WordPress admin
- Navigate to Plugins → Add New
- Search for your chosen plugin (e.g., “SimplyRETS” or “Showcase IDX”)
- Click “Install Now”
- Once installed, click “Activate”
Some premium IDX solutions require manual upload because they’re not free plugins in the public repository. For these:
- Download the plugin .zip file from the vendor’s website
- In WordPress admin, go to Plugins → Add New → Upload Plugin
- Choose the .zip file and click “Install Now”
- Activate after installation completes
If you’re using IMPress for IDX Broker, for example, you’ll install the free plugin from the repository, but you’ll need an active IDX Broker account for it to function. The plugin is essentially a display layer that connects to your IDX Broker data feeds.
Activate and configure plugin basics (account connection, listing page templates)
After activation, you’ll see a new menu item in your WordPress admin—usually labeled with the plugin name (e.g., “SimplyRETS” or “IDX Settings”). Click into it and you’ll face a configuration screen asking for your API credentials (the ones you secured in Step 2).
Enter your credentials carefully—one wrong character and the connection will fail. Most plugins offer a “Test Connection” button that verifies your credentials work before saving. Use it. There’s nothing more frustrating than troubleshooting a non-working setup only to discover a typo in your API key.
Next, you’ll configure some foundational settings:
- Listing page slug: The URL structure for listings (e.g., /properties/ or /listings/). Choose something logical and SEO-friendly.
- Default template: How individual listing pages should display. Most plugins offer 2-3 preset templates; you can customize later.
- Search results per page: How many listings to show in search results (typically 10-20).
- Update frequency: How often to refresh listing data (every 15 minutes, hourly, etc.).
- Property types: Which MLS categories to import (residential, land, commercial, rental, etc.).
Required PHP and hosting considerations for IDX plugins
IDX plugins can be resource-intensive because they’re constantly syncing and rendering data from external sources. Before going live, verify your hosting environment meets these requirements:
- PHP version: Minimum PHP 7.4, ideally PHP 8.0+ for better performance
- Memory limit: At least 256MB, preferably 512MB for sites with large listing volumes
- Max execution time: 60 seconds or more (some data syncs can take time)
- CURL support: Required for API connections
- SSL certificate: Not optional—MLS connections require HTTPS
Shared hosting plans often work for small-volume sites (under 100 active listings), but if you’re displaying thousands of properties or expect significant traffic, consider managed WordPress hosting from providers like WP Engine, Kinsta, or Flywheel. These platforms are optimized for exactly this kind of dynamic, data-heavy WordPress site. Similar performance considerations apply when you get directory first page google seo strategies working alongside IDX.
Example setup flows from popular plugins (IMPress for IDX Broker, SimplyRETS, ShowCase IDX)
IMPress for IDX Broker setup:
- Install IMPress plugin from WordPress repository
- Navigate to IDX Broker → Settings
- Enter your IDX Broker API key (found in your IDX Broker control panel)
- Click “Connect to IDX Broker”
- Choose which IDX Broker pages/widgets to display in WordPress
- Configure your WordPress page structure (create pages for Search, Featured, Sold, etc.)
- Customize design using IMPress’s built-in template controls or custom CSS
SimplyRETS setup:
- Install SimplyRETS plugin from WordPress repository
- Go to Settings → SimplyRETS
- Enter your SimplyRETS username and API key
- Test the connection
- Configure base URLs for listings and search results
- Use SimplyRETS shortcodes or widgets to embed search forms and results on pages
- Customize templates by copying plugin template files to your theme directory
Showcase IDX setup:
- Install Showcase IDX plugin
- Navigate to Showcase IDX Settings
- Enter your Showcase IDX account credentials
- Import initial listing data (this may take several minutes)
- Configure SEO settings (meta tags, sitemap generation)
- Create landing pages using Showcase’s page builder
- Set up lead capture forms with your CRM integration
Step 4 — Configure Data Feeds and Listing Display
Here’s where your IDX implementation starts to come alive. You’ve got the plugin installed and connected to your MLS feed, now you need to configure exactly what data displays, how it’s formatted, and how often it updates. This step is part technical configuration and part strategic decision-making about your site’s user experience.

The configuration choices you make here directly impact both your site’s performance and its SEO potential. Display too much data too frequently and your server crawls; update too infrequently and listings go stale. The sweet spot varies by market, listing volume, and hosting capabilities, which is why this step requires some experimentation and monitoring.
Choose feed type: RETS vs. RESO Web API vs. widget-based feeds
Your feed type is usually determined by what your MLS supports, but if you have options, here’s how to think about the tradeoffs:
RETS connections are the legacy standard. They work reliably but can be slower and more bandwidth-intensive. RETS pulls data in XML format, which requires more processing to transform into web-ready display. If your MLS only offers RETS, it’s perfectly functional—just not cutting-edge.
RESO Web API is the modern approach, using RESTful JSON data exchange. It’s faster, more efficient, and typically allows for more granular queries (like “show me only 3-bedroom homes in ZIP code 12345 that changed price in the last 24 hours”). If your MLS supports RESO Web API, use it.
Widget-based feeds are sometimes offered as an alternative where the IDX provider (like IDX Broker) handles all the data processing on their servers, then your plugin pulls pre-rendered widgets or pre-formatted listing cards. This reduces load on your WordPress server but gives you less control over display customization.
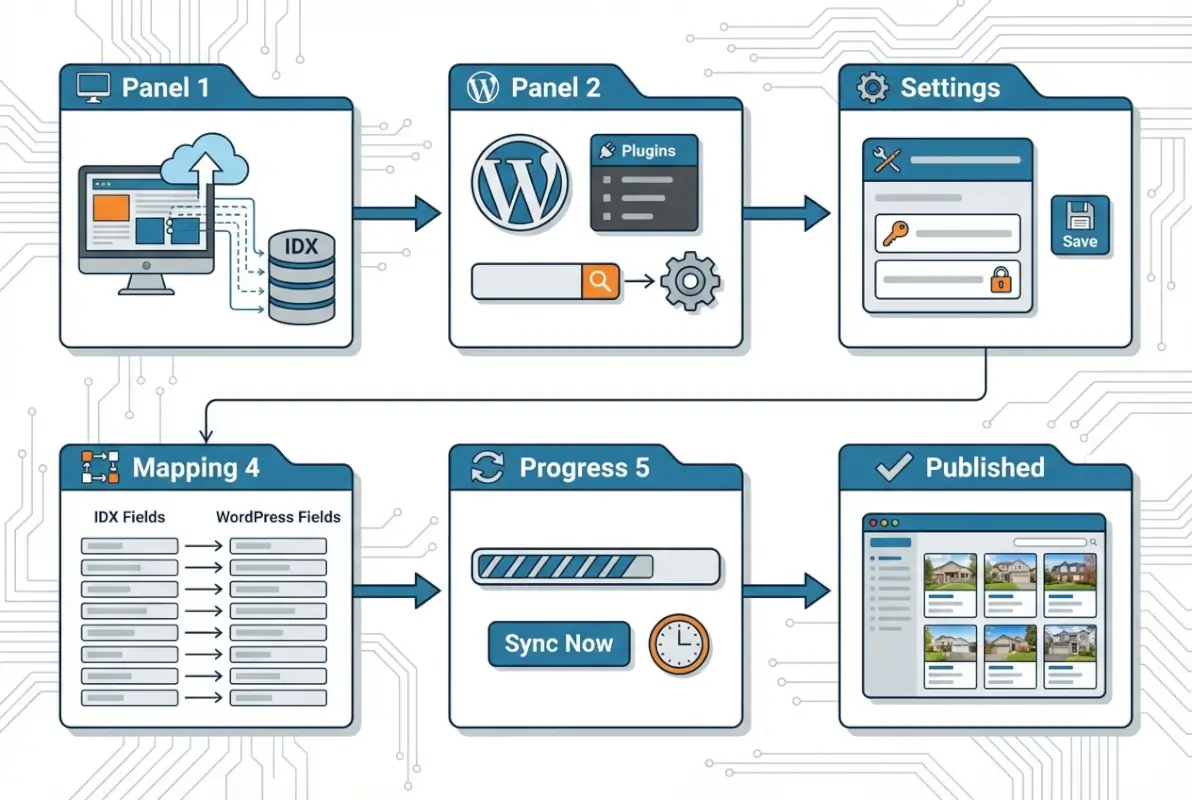
Map MLS fields to WordPress listing fields (price, beds/baths, location, photos)
MLS databases contain dozens (sometimes hundreds) of fields for each property. Your job is to decide which ones matter for your site’s display and map them to your WordPress listing structure. Most plugins handle the core fields automatically:
- Address (street, city, state, ZIP) → Listing location
- Price (list price, sold price) → Prominently displayed
- Bedrooms, bathrooms, square footage → Key stats
- MLS number → Unique identifier
- Status (active, pending, sold) → Display/filter logic
- Photos → Gallery arrays
- Description → Main listing content
- Agent information → Contact details
Where it gets interesting is the extended fields—things like HOA fees, property tax history, school district ratings, lot size, garage spaces, etc. Displaying more fields makes listings more informative but also more cluttered. I typically recommend focusing on the 8-10 fields that buyers in your market care about most, then making extended details available in expandable sections or tabs.
Field mapping usually happens in your plugin’s settings panel. Look for a “Field Mapping” or “Data Configuration” section where you can specify which MLS field names correspond to which WordPress display elements. Some plugins auto-detect this; others require manual specification.
Create listing templates and single listing pages optimized for SEO
This is where design meets SEO strategy. Your listing pages need to be visually appealing AND structured for search engine visibility. Key elements of an SEO-optimized listing page:
- Descriptive title tag: “[Address] – [Beds]BR/[Baths]BA [Property Type] for Sale in [City]”
- Meta description: Auto-generated from listing description first 155 characters, customizable if needed
- H1 tag: The property address (unique to each listing)
- H2/H3 tags: Section headings like “Property Details,” “Neighborhood Information,” “Schools”
- Structured data: Schema.org markup for real estate listings (most good plugins inject this automatically)
- Image optimization: Alt text on photos, compressed file sizes, lazy loading
- Internal linking: Links to related listings, neighborhood pages, agent bio
Most IDX plugins provide template files you can customize. These are usually PHP files in the plugin directory that follow WordPress’s template hierarchy. To safely customize without losing changes during plugin updates, copy the template files into your theme directory (usually in a /simplyrets/ or /showcase-idx/ subdirectory) where they’ll override the plugin defaults.
If you’re not comfortable with PHP, many modern plugins also support page builder integration—you can design listing templates visually using Elementor, Beaver Builder, or similar tools.
Set update frequency and caching strategy to balance freshness and performance
Here’s a common mistake: setting your feed to update every 5 minutes because “fresher is better,” then wondering why your site is slow. More frequent updates mean more API calls, more database writes, more cache invalidations—all of which tax your server.
The optimal update frequency depends on your market dynamics:
- Hot markets (properties go under contract in days): Update every 15-30 minutes
- Moderate markets: Hourly updates are usually sufficient
- Slow markets: Every 2-4 hours is fine
Pair your update frequency with intelligent caching:
- Object caching: Store processed listing data in Redis or Memcached to avoid re-querying the database on every page load
- Page caching: Use a caching plugin (WP Rocket, W3 Total Cache) to serve static HTML to most visitors
- CDN for images: Offload listing photos to a CDN (Cloudflare, BunnyCDN) to improve load times
- Selective cache clearing: When listings update, only clear cache for affected pages rather than purging everything
Most IDX plugins have built-in caching mechanisms, but you’ll want to coordinate with your site’s overall caching strategy. If you’re using a caching plugin, check whether it has IDX-specific exclusion rules to prevent caching dynamic elements like search forms or saved searches.
Step 5 — Build Listings Pages and Advanced Features
Now we move beyond basic display into creating a complete, conversion-optimized real estate search experience. This step is where you transform from “I have listings on my site” to “I have a lead-generating machine that keeps visitors engaged and captures their information.” The features you implement here differentiate a mediocre IDX implementation from one that genuinely competes with the big portals.
Think about how buyers actually search for homes: they start broad (“3-bedroom homes in Austin under $500k”), then narrow down geographically (“homes near downtown”), then dive deep on individual properties. Your site architecture should mirror and support this user journey at every stage.
Create searchable property listings archive pages
Your listings archive is the hub of your IDX implementation—the page where visitors land to browse available properties. A well-designed archive page includes:
- Prominent search filters: Price range, bedrooms, bathrooms, property type, square footage
- Location filtering: City, ZIP code, neighborhood, school district, or map-based polygon drawing
- Sort options: Price (high/low), newest listings, open houses, recently reduced
- View toggles: List view, grid view, map view
- Save search functionality: Let visitors save criteria and receive email alerts for new matches
- Listings per page control: Option to show 10, 25, or 50 results
Most IDX plugins provide shortcodes or widgets to display search forms. Place these strategically—not just on a dedicated search page but also in your header, sidebar, or as a homepage hero element. Every page should offer an easy path into your listing inventory.
Don’t forget pagination and SEO considerations. Paginated listing pages should use rel=”next” and rel=”prev” tags to help search engines understand the relationship between pages. Your plugin may handle this automatically, but verify it’s working correctly by viewing source on page 2 or 3 of your search results.
Implement mapping/listing detail pages with rich content and schema
Interactive maps are expected features on modern real estate sites. Most IDX plugins integrate with Google Maps or Mapbox to display listings geographically. The key is making the map functional, not just decorative:
- Cluster markers when zoomed out to avoid overwhelming the user
- Popup cards on marker click showing thumbnail, price, beds/baths
- Draw-to-search functionality where users can outline custom areas
- Layer toggles for schools, amenities, commute times
Individual listing detail pages should be content-rich, not just data-rich. Yes, display all the MLS fields, but also add:
- Neighborhood context: “This home is in the highly-rated Riverside school district, walking distance to Central Park, and minutes from downtown dining.”
- Market insights: “Homes in this ZIP code typically sell within 22 days and receive an average of 3 offers.”
- Related listings: “Similar homes you might like” based on price range, location, or features
- Embedded video tours if available from MLS or agent
- Mortgage calculator to help buyers understand monthly payments
Schema.org structured data should be on every listing page. Most plugins inject this automatically, but verify it using Google’s Rich Results Test tool. You want to see structured data for RealEstateListing including address, price, bedrooms, bathrooms, and images.
| Feature | Basic Implementation | Advanced Implementation |
|---|---|---|
| Search | Price/bed/bath filters | + Polygon drawing, school filters, commute time |
| Maps | Static markers | + Clustering, popup previews, amenity layers |
| Details | MLS fields only | + Neighborhood content, market stats, mortgage calc |
| Lead Capture | Generic contact form | + Saved searches, showing requests, valuation tools |
Add lead capture and CRM integration (forms, drip campaigns)
Listings without lead capture are missed opportunities. Every page should have clear calls-to-action that lower the barrier to visitor engagement. Progressive disclosure works well here—start with low-commitment asks and escalate:
- Save this listing: Requires just an email address
- Schedule a showing: Collects email, phone, preferred dates
- Request more information: Captures name, email, specific questions
- Get pre-approved: More detailed form for serious buyers
The gold standard is CRM integration where captured leads automatically flow into your contact management system. Many IDX plugins offer direct integrations with popular real estate CRMs like Follow Up Boss, LionDesk, kvCORE, and BoomTown. Configure these integrations so that:
- New leads are instantly added to your CRM
- Lead source is tagged (e.g., “Website – Listing 123 Main St”)
- Automated drip campaigns trigger based on lead behavior
- Saved searches generate ongoing email alerts
If your CRM isn’t directly supported, most plugins can push leads via webhook to Zapier, which then routes them to virtually any CRM or email marketing platform. It’s worth the setup time—automated follow-up converts far better than manual outreach you “get around to eventually.” This is similar to how you’d optimize when looking at get listing featured zillow tips real estate agents approaches for visibility.
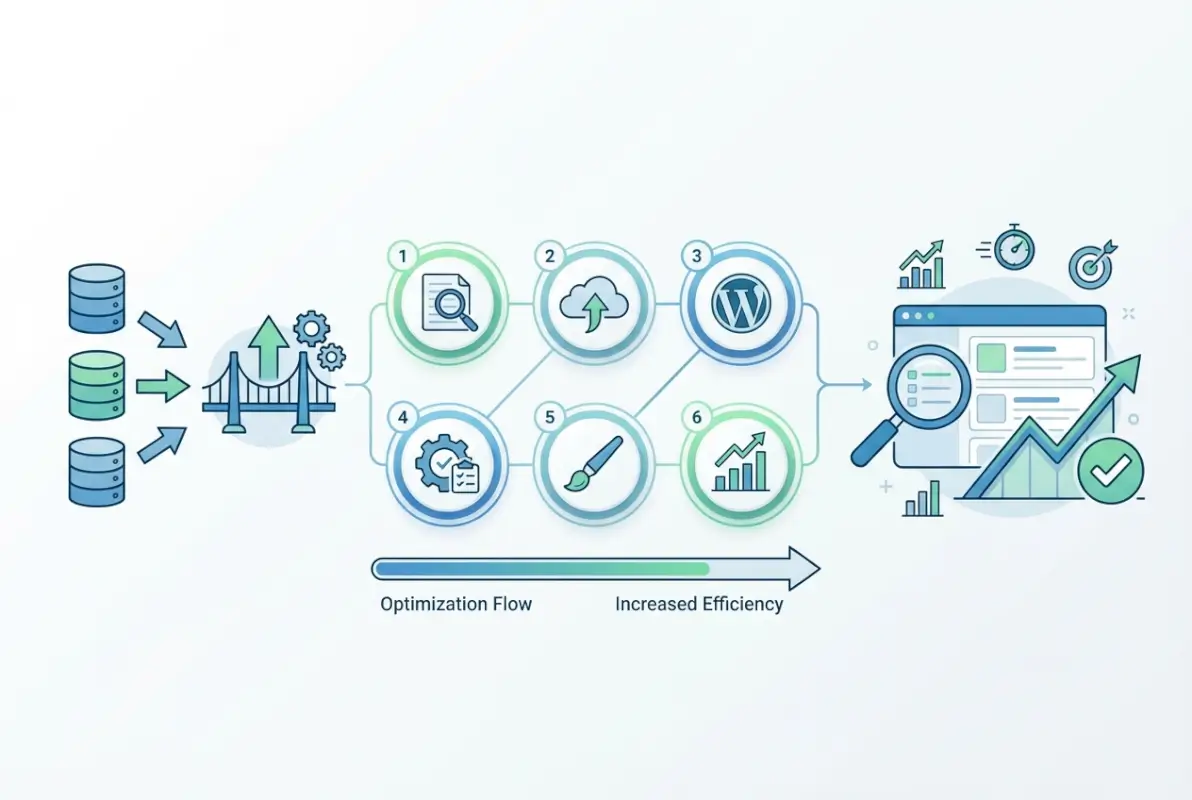
Improve performance with CDN image delivery and lazy loading
Listing photos are bandwidth hogs. A single property might have 30+ high-resolution images, and if you’re displaying 20 listings per search results page, you’re potentially loading 600 images. Without optimization, page load times balloon to 10+ seconds—an instant death sentence for user experience and SEO.
Here’s your performance optimization checklist:
- CDN integration: Serve all listing images through a content delivery network. Services like Cloudflare, BunnyCDN, or KeyCDN cache images on edge servers worldwide, dramatically reducing load times for international visitors.
- Image compression: Automatically compress photos without visible quality loss using services like ShortPixel or Imagify. Aim for under 100KB per image for listing cards, under 200KB for detail page gallery images.
- Lazy loading: Don’t load images until they’re about to scroll into view. Most modern browsers support native lazy loading via loading=”lazy” attribute; IDX plugins should implement this automatically.
- Responsive images: Serve appropriately-sized images based on device. A mobile visitor doesn’t need 2000px-wide photos—serve 800px versions instead using srcset attributes.
- Next-gen formats: Convert images to WebP or AVIF formats, which offer better compression than traditional JPEG. Most CDNs can do this automatically.
The performance gains compound. Faster pages = better user experience = lower bounce rates = better SEO rankings = more organic traffic = more leads. It’s worth investing effort here.
Step 6 — Test, Troubleshoot, and Optimize
You’ve configured everything, your listings are displaying beautifully, and you’re ready to go live. Not so fast—this step separates professionals from amateurs. Thorough testing catches issues before your first visitor does, and ongoing optimization ensures your IDX implementation keeps performing as your MLS data evolves and your traffic grows.
I can’t count the number of times I’ve seen IDX sites launch with obvious issues that five minutes of testing would have caught: broken image links, misformatted prices, incorrect status displays, or—worst of all—showing competitors’ listings instead of the agent’s own inventory prominently. Don’t let that be you.
Verify data accuracy against MLS source
Your first test is a basic accuracy check. Pick 5-10 random properties from your MLS and verify every detail displays correctly on your WordPress site:
- Does the address match exactly?
- Is the price formatted correctly (and up-to-date)?
- Do bedroom/bathroom counts match?
- Are all photos displaying (no broken images)?
- Is the status correct (active/pending/sold)?
- Does the property description display without formatting issues?
- Are agent contact details accurate?
Pay special attention to edge cases: properties with unusual characters in descriptions, listings with video tours, homes with 10+ photos, and recently status-changed properties. If your plugin handles these correctly, it’ll likely handle everything else too.
Also verify that MLS compliance requirements are being met. Most MLS boards have specific rules about:
- Displaying listing agent information
- Showing MLS logo and attribution
- Not displaying certain fields publicly (like agent private remarks)
- Respecting opt-out requests from agents who don’t want their listings on IDX
- Accurate status updates (removing sold/expired listings promptly)
Check your MLS’s IDX policy document (usually available on their website) and audit your site against every requirement. Non-compliance can result in losing your IDX privileges entirely.
Troubleshoot common issues (API limits, feed gaps, image loading)
API rate limits: If your plugin suddenly stops updating or shows errors about “too many requests,” you’ve hit your API rate limit. Check your MLS developer portal for your current limits and usage. Solutions include reducing update frequency, implementing more aggressive caching, or contacting your MLS to request higher limits.
Feed gaps or missing listings: If certain properties aren’t appearing, check whether they’re marked as IDX-enabled in the MLS. Some agents opt out of IDX display. Also verify your plugin’s property type filters—you might be excluding categories unintentionally.
Image loading failures: Broken images usually indicate either incorrect image URLs being passed from the MLS or CORS (Cross-Origin Resource Sharing) restrictions. Check your browser console for specific error messages. Some MLS systems require authentication headers on image requests, which your plugin should handle automatically but occasionally don’t.
Slow page loads: Use tools like GTmetrix or Google PageSpeed Insights to identify bottlenecks. Common culprits are unoptimized images, missing lazy loading, too many external script dependencies, or database queries not being cached.
Mobile display issues: Always test on actual mobile devices, not just browser responsive mode. Listing cards might stack awkwardly, search filters might be unusable, or maps might not be touch-responsive. Most modern IDX plugins are mobile-optimized out of the box, but custom template modifications can break responsiveness.
Ongoing optimization: caching, update cadence, and UX refinements
Your IDX implementation isn’t “set and forget”—it requires ongoing attention as your listing inventory grows and your traffic patterns change. Set up monitoring for:
- Page load times: Use Google Search Console or a monitoring service to track Core Web Vitals for
Was this article helpful?