How to Install Elementor Pro Plugin: 5 Simple Steps for WordPress
Generating summary...
If you’ve ever stared at your WordPress dashboard wondering how to unlock the full power of Elementor—the ability to design custom headers, build conversion-focused popups, or create WooCommerce checkout flows that actually convert—you’re in the right place. Installing Elementor Pro isn’t just about dropping a plugin file into your site; it’s about strategically activating a suite of professional tools that can transform your entire web presence. What most guides won’t tell you is that the installation process involves two distinct pathways, each with unique advantages depending on your hosting environment, and that proper license activation is where most people stumble. Here’s the truth: Elementor Pro sits on top of the free Elementor Core, and understanding this layered architecture is critical to avoiding the activation errors and performance issues that plague thousands of sites every month.
TL;DR – Quick Takeaways
- Two-layer architecture – Elementor Pro requires the free Elementor Core plugin installed first; Pro layers on top
- Two installation paths – Connect & Activate directly from WP admin, or manually upload the Pro zip file
- License activation is separate – Installing the plugin files doesn’t activate features; you must connect your license after installation
- Performance matters from day one – Use a lightweight theme like Hello, enable performance experiments, and configure asset loading
- Backup before you begin – Always create a full site backup before adding any premium plugin
Prerequisites and Planning: Setting the Foundation
Most people rush straight to the download button without checking if their WordPress environment can actually handle Elementor Pro. This oversight leads to white screens, broken layouts, and frustrated support tickets. Before you spend a dime on a Pro license, verify that your hosting meets the minimum requirements: PHP 7.4 or higher (8.0+ recommended), WordPress 6.0 or newer, at least 128MB memory limit (256MB preferred), and a modern MySQL or MariaDB database. These aren’t arbitrary numbers, they reflect the reality that Elementor’s visual editor is a sophisticated JavaScript application that demands proper server resources.

The free Elementor Core plugin serves as the foundation for everything Pro offers. Think of it like an operating system—Pro is the premium software suite that runs on top. Navigate to Plugins > Add New in your WordPress dashboard, search for “Elementor,” and install the plugin with over five million active installations. Activate it immediately, because you cannot proceed with Pro installation until Core is running. This baseline gives you access to basic widgets and the drag-and-drop editor, but none of the advanced features like Theme Builder or popup functionality.
Deciding Your Installation Method
Here’s where things get interesting. Elementor offers two distinct installation paths, and your choice depends on your workflow preferences and technical comfort level. The Connect & Activate method streamlines everything through your WordPress admin panel—after purchasing Pro, you’ll see an option in the Elementor menu to connect your account and automatically download and activate the plugin. This approach is ideal for non-technical users who want a guided experience. Alternatively, the manual upload method gives you direct control: download the Pro zip file from your Elementor account dashboard, then upload it through Plugins > Add New > Upload Plugin. I’ve found the manual method more reliable on shared hosting environments where automatic installations sometimes fail due to file permission restrictions.
Understanding the Licensing Pathway
Your Elementor Pro license is separate from the plugin files themselves. After purchasing from Elementor’s official pricing page, you’ll receive account credentials that unlock premium features. The license activation happens after installation, through a connection flow that validates your subscription tier (Essential, Advanced, Expert, or Agency). Keep your login credentials handy, because you’ll need them within minutes of completing the plugin installation. The system checks your license against Elementor’s servers to determine which features to unlock—skip this step and you’ll have Pro installed but none of its capabilities accessible.
Security and Backup Protocols
I learned this lesson the hard way years ago: always create a complete site backup before installing any premium plugin, especially one as deeply integrated as Elementor Pro. Use your hosting control panel’s backup tool, or install a plugin like UpdraftPlus or BackupBuddy. Export your database and download a copy of your wp-content folder at minimum. If something goes wrong during installation—a theme conflict, a server timeout, a corrupted file upload—you need the ability to restore your site to its pre-installation state within minutes, not hours. This isn’t paranoia; it’s standard operating procedure for any professional WordPress workflow.
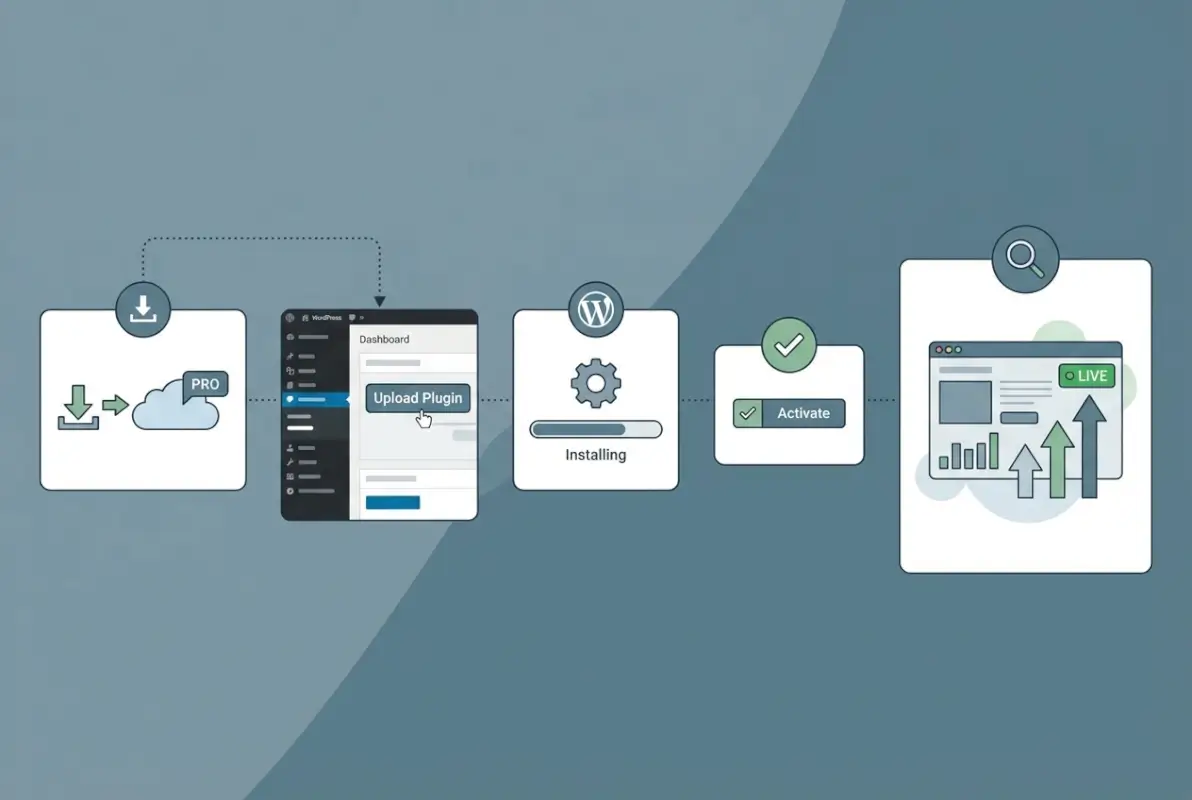
Step-by-Step Installation of Elementor Pro
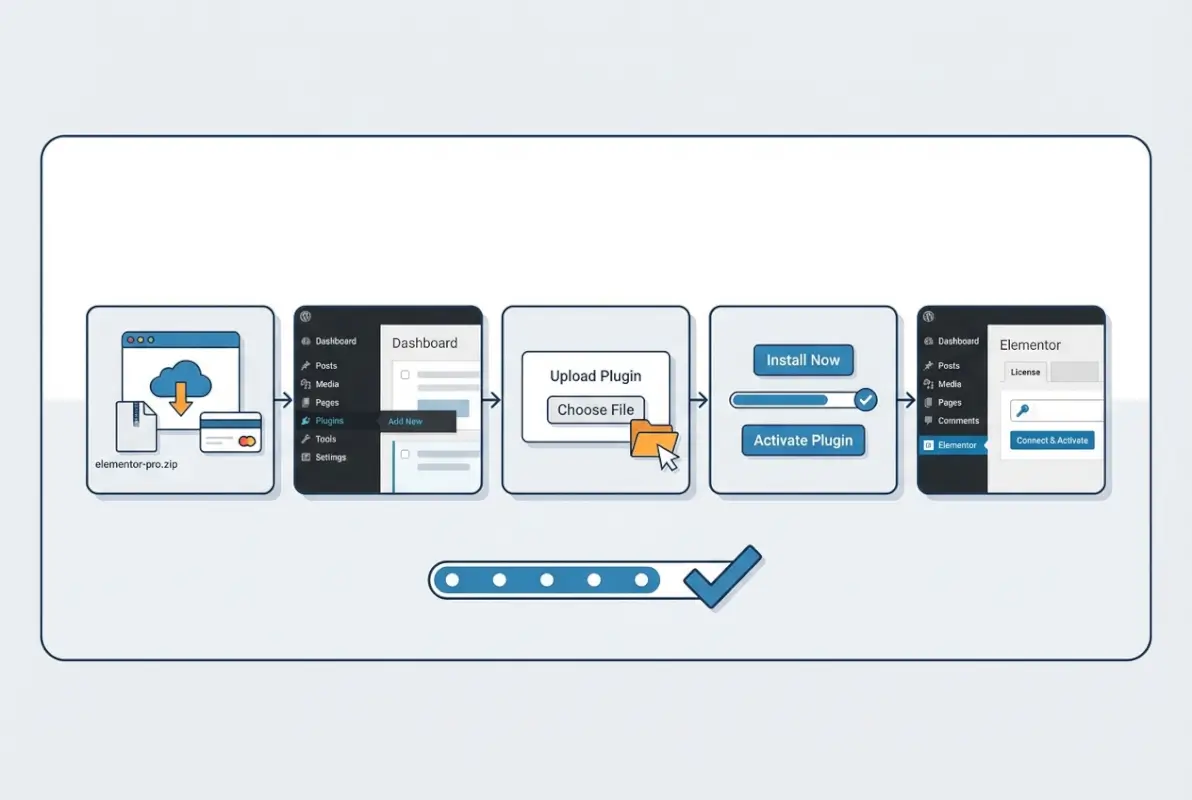
Now we get to the actual installation sequence, which follows a precise five-step progression that cannot be reordered. Each step builds on the previous one, and skipping even one will result in a non-functional setup. Follow this sequence exactly, and you’ll have Elementor Pro running within fifteen minutes.
Step A: Install and Activate Elementor Core
Log into your WordPress admin dashboard and navigate to Plugins > Add New. In the search box, type “Elementor” and locate the official plugin developed by Elementor.com (verify the developer name to avoid impostor plugins). Click Install Now, wait for the download to complete, then click Activate. You’ll see a welcome screen inviting you to create your first page—ignore it for now. The key indicator of successful Core installation is the appearance of “Elementor” in your admin sidebar with submenu items like Settings and Tools. This confirms the base layer is operational.
Step B: Obtain Your Elementor Pro License
Visit Elementor’s pricing page and select the plan that matches your needs: Essential for single sites, Advanced or Expert for multiple sites, or Agency for client work. Complete the checkout process through their secure payment system. Within minutes you’ll receive an email containing your account credentials and a link to your Elementor account dashboard. Log in to this dashboard (not your WordPress site) and locate the Downloads section. You’ll see a blue button to download Elementor Pro as a zip file—click it and save the file to your computer. This zip file contains the actual Pro plugin code, separate from any license keys or activation tokens.
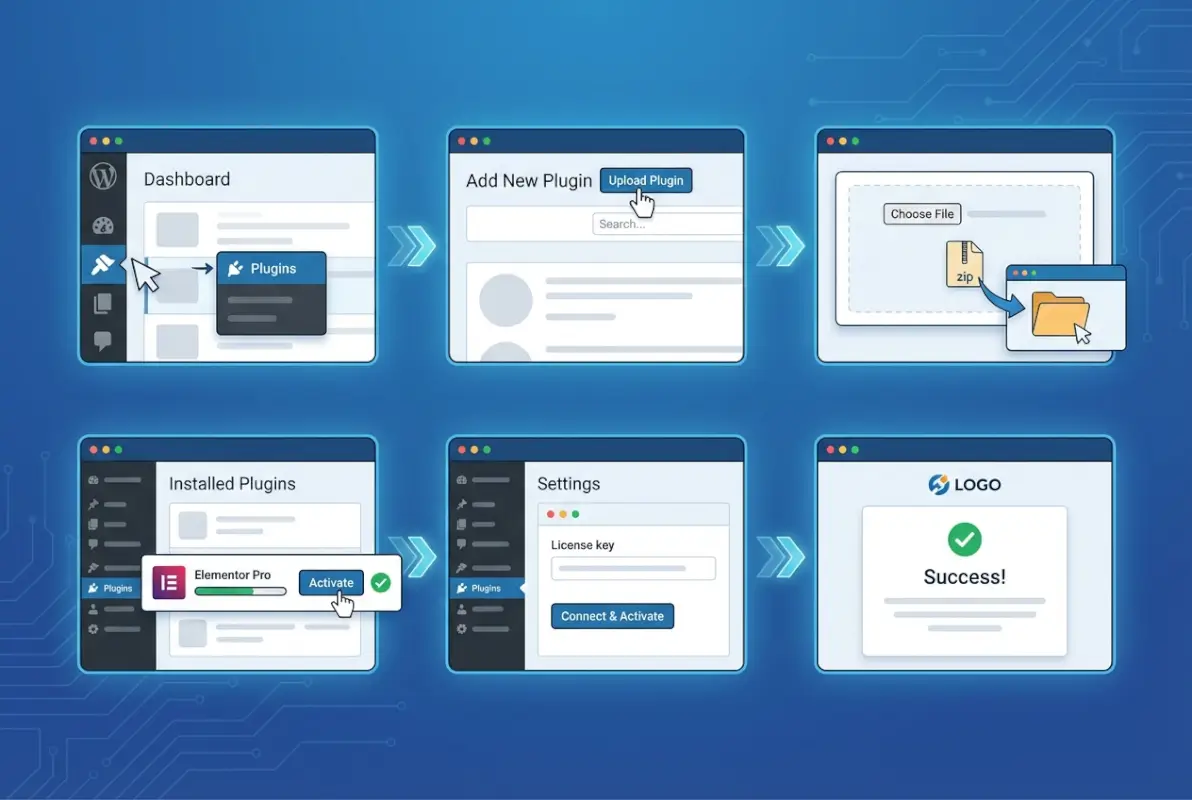
Step C: Install Elementor Pro (Two Paths Explained)
Path one, the Connect & Activate method: After installing Core, you’ll see an Elementor menu item in your WordPress sidebar. Click it, then look for a submenu option labeled “Connect & Activate” or similar language (exact wording varies by Elementor version). Clicking this launches a connection wizard that prompts you to log in with your Elementor account credentials—the same ones you used to access the downloads dashboard. Once authenticated, the wizard automatically downloads the Pro plugin files to your server and activates them. This method requires that your server can make outbound connections to Elementor’s servers and has write permissions to your plugins directory.
Path two, the manual upload method: Navigate to Plugins > Add New > Upload Plugin. Click “Choose File” and select the Elementor Pro zip file you downloaded earlier. Click “Install Now” and wait for the upload to complete—this can take thirty seconds to two minutes depending on your connection speed and server. Once uploaded, click “Activate Plugin.” You’ll immediately see Elementor Pro appear in your plugins list with a status of “Active.” This method works in any environment, including localhost, staging servers, and restrictive shared hosting setups where automatic installations fail.
| Installation Method | Best For | Technical Level | Speed |
|---|---|---|---|
| Connect & Activate | Standard live sites with good hosting | Beginner | Fastest |
| Manual Zip Upload | Localhost, staging, restrictive hosts | Intermediate | Moderate |
Step D: Activate Your License Key
Installing the plugin files doesn’t automatically unlock Pro features—you must explicitly activate your license. Navigate to Elementor > License in your WordPress admin. If you used the Connect & Activate method, this screen might already show your license as connected; if you uploaded manually, you’ll see a prompt to connect. Click “Connect & Activate” and log in with your Elementor account credentials when prompted. The system will display available subscriptions associated with your account. Select the correct subscription (if you have multiple), then click Activate. Within seconds you’ll see a green confirmation message indicating your license is active. Refresh your page, and all Pro widgets and features will become immediately available in the Elementor editor.
Step E: Verify Pro Features Are Unlocked
Create a new page or edit an existing one with Elementor. Click “Edit with Elementor” to launch the visual editor. In the left sidebar where widgets appear, you should now see Pro-exclusive widgets marked with a “PRO” badge: Posts widget, Portfolio widget, Forms widget, Login widget, Price Table, and dozens more. Click Elementor > Template > Theme Builder in your admin menu—if you see options to create Headers, Footers, Single Posts, and Archive templates, your Pro license is fully activated. Also check Elementor > Popups to confirm the popup builder is accessible. If any of these sections are missing or grayed out, return to the license screen and reconnect your account.
Post-Installation Setup and Best Practices
Activation is only the beginning. The real work involves configuring Elementor Pro to perform optimally while maintaining fast page load speeds and reliable editing experiences. Most people skip this configuration phase and then wonder why their editor feels sluggish or their site loads slowly on mobile devices.
Global Settings and Performance Optimization
Navigate to Elementor > Settings > Features and explore the performance experiments available. Enable “Improved Asset Loading” to load CSS inline instead of external files (reduces HTTP requests), activate “Optimized DOM Output” to generate cleaner HTML markup, and turn on “Lazy Load Background Images” for faster initial page rendering. These settings can reduce page weight by fifteen to twenty percent without any visual changes. Next, visit Settings > Advanced and configure your CSS Print Method—”Internal Embedding” works best for most sites, while “External File” is better if you use aggressive caching plugins. Understanding these technical levers separates professional implementations from amateur ones.
Template Kits and Starter Templates
Elementor Pro unlocks access to thousands of professionally designed template kits through the built-in library. Click the folder icon in the Elementor editor to browse templates filtered by category: landing pages, homepages, about pages, contact forms, pricing tables. These aren’t just aesthetic—they’re conversion-optimized layouts built by professional designers. Import a template kit relevant to your industry, customize the colors and content, and you can have a complete site design in hours instead of weeks. Some kits require companion plugins like Elementor Essential Addons or Unlimited Elements; the library will prompt you to install dependencies automatically. For directory sites needing structured member listings, these templates can save significant development time.
Theme Compatibility and the Hello Theme Strategy
Elementor performs best with lightweight themes that don’t impose heavy CSS or JavaScript overhead. The official Hello theme—a minimal WordPress theme built specifically for Elementor—weighs less than 20KB and provides a blank canvas for your designs. Install it from Appearance > Themes > Add New, search “Hello Elementor,” then activate. This eliminates conflicts with theme-specific page builders, custom post type systems, and redundant style frameworks. If you’re using a complex multipurpose theme like Avada or Divi, you might encounter widget conflicts or style inheritance issues. Testing your setup with Hello theme isolates whether problems stem from your theme or from Elementor configuration.
Common Issues and Troubleshooting
Even with perfect installation, you’ll eventually encounter issues—it’s the nature of WordPress’s plugin ecosystem where thousands of components interact. Knowing how to diagnose and resolve common problems separates site owners who thrive with Elementor from those who struggle.
License Activation Problems
The most frequent support request involves licenses that won’t activate or show as inactive after installation. First, verify you’re logged into the correct Elementor account—if you have multiple email addresses or purchased through a team member’s account, you might be attempting activation with credentials that don’t have access to the subscription. Second, check that your subscription hasn’t expired; Pro licenses are annual and require renewal for continued updates and support. Third, disconnect and reconnect the license: go to Elementor > License, click Disconnect, wait ten seconds, then click Connect & Activate again and re-enter your credentials. This refresh often resolves token mismatches between your site and Elementor’s licensing servers.
If none of that works, you might have hit the site activation limit for your subscription tier. Essential plans allow one site activation, Advanced allows three, Expert twenty-five, and Agency one hundred. If all slots are occupied, log into your Elementor account dashboard, navigate to My Licenses, and deactivate unused sites to free up slots. I remember spending two hours troubleshooting an activation failure, only to discover I’d forgotten about a test site still holding an active license slot—frustrating but easily fixable once identified.
Update Conflicts and Plugin Conflicts
WordPress’s strength is its extensibility, but that means potential conflicts between plugins competing for the same hooks and filters. If Elementor Pro suddenly stops working after an update—widgets disappear, the editor won’t load, or pages display broken—disable all other plugins except Elementor Core and Pro, then test again. If functionality returns, reactivate plugins one by one to identify the culprit. Common conflict sources include other page builders (Beaver Builder, Divi), aggressive caching plugins (WP Rocket, W3 Total Cache when misconfigured), and security plugins with overly restrictive settings. Always keep Elementor Core, Elementor Pro, WordPress core, and your theme updated to their latest versions; the developers fix compatibility issues in patches, but you have to apply those patches.
Performance-Related Hurdles
Slow editor performance—taking five to ten seconds to load the editing interface—usually indicates server resource constraints or poorly optimized third-party addons. Check your PHP memory limit in Site Health (Tools > Site Health > Info > Server): if it’s below 256MB, ask your host to increase it. Monitor CPU usage during editing sessions; shared hosting plans often impose strict limits that throttle performance when you’re actively building pages. Another culprit is Font Awesome—Elementor loads the entire icon library by default. Navigate to Elementor > Settings > Features and enable “Inline Font Icons” to load only the icons you actually use. For complex sites with dozens of custom post types or thousands of posts, optimizing your database structure can significantly improve Elementor’s query performance when loading dynamic widgets.
| Symptom | Likely Cause | Solution |
|---|---|---|
| Editor won’t load | Plugin conflict or JavaScript error | Disable plugins; check browser console |
| License shows inactive | Wrong account or expired subscription | Verify credentials; check renewal status |
| Slow page loads | Unoptimized assets or heavy widgets | Enable performance experiments; reduce widgets |
| Styles not applying | Cache not cleared or theme conflict | Regenerate CSS; clear all caches |
Security, Maintenance, and Ongoing Care
Installing Elementor Pro is a one-time event, but maintaining it is an ongoing commitment that directly impacts your site’s security posture, performance, and reliability. Neglecting these maintenance tasks is how sites end up compromised or broken.

Regular Updates and Backup Routines
Elementor releases updates every two to three weeks, addressing bugs, adding features, and patching security vulnerabilities. Configure automatic updates for minor releases (Settings > General > Auto Updates), but manually review major version changes that might introduce breaking changes. Before any update, create a full backup—database plus files. Test updates on staging first, especially if you’ve customized templates heavily or use third-party Elementor addons. Schedule automated weekly backups through your hosting control panel or a plugin like BackWPup, and store copies offsite (cloud storage or local drive) in case your server fails catastrophically.
License Management and Renewals
Elementor Pro licenses renew annually, and an expired license means no more updates or support access. You’ll retain Pro features on your site, but you won’t receive security patches—a dangerous situation. Mark your calendar two weeks before renewal, review whether your site count or needs have changed (maybe upgrade from Essential to Advanced), and process the renewal before expiration. If you’re managing client sites, track licenses in a spreadsheet with renewal dates, subscription tiers, and associated domains. Missing a renewal and discovering it only when a security vulnerability is announced is not a position you want to be in.
Compliance and Accessibility Considerations
Elementor provides ARIA labels and semantic HTML for accessibility, but you must configure them correctly. Use heading tags in proper hierarchical order (H2 after H1, never skip levels), add alt text to all images through the widget settings, ensure sufficient color contrast between text and backgrounds, and test keyboard navigation through your layouts. For directory sites that may be subject to accessibility lawsuits, these considerations aren’t optional—they’re legal requirements. Elementor’s accessibility features exist, but they don’t activate themselves. Run your pages through WAVE accessibility checker to identify issues, then fix them in the editor.
Leveraging Elementor Pro for Higher-Converting Sites
With installation and maintenance covered, let’s explore the Pro features that justify the license cost: Theme Builder, popups, forms, and WooCommerce integration. These aren’t just aesthetic additions, they’re conversion optimization tools that directly impact business metrics.
Theme Builder and Dynamic Content
Theme Builder lets you design every aspect of your site without touching code. Create a custom header with your logo, navigation menu, and call-to-action button—all using Elementor widgets. Design a footer with social icons, contact information, and multiple widget columns. Build single post templates that display featured images, author bios, and related posts exactly how you want. The real power emerges with dynamic content: pull custom field data, display user information, show taxonomy terms, all through simple widget settings. For directory sites showcasing business listings, you can create custom single templates that display business hours, location maps, contact forms, and image galleries—all populated dynamically from your database. This approach scales elegantly: design once, apply to hundreds or thousands of posts.
Popups, Forms, and Lead Generation
Elementor’s popup builder integrates exit-intent triggers, scroll-depth triggers, time-delay triggers, and click triggers to display offers at optimal moments. Build email capture popups that appear when visitors scroll seventy-five percent down a page, create exit-intent overlays offering lead magnets, display promotional popups to users who’ve visited three times in a week. Combine these with Elementor’s form builder—which includes conditional logic, multi-step forms, file uploads, and integrations with major email platforms—and you have a complete lead generation system without additional plugins. For directory owners looking to invite businesses to join, these forms can automate the entire onboarding process with approval workflows and payment collection.
WooCommerce Widgets and Checkout Customization
Elementor Pro includes fifteen WooCommerce-specific widgets: product grids, category displays, cart interfaces, checkout customization, and more. Design your shop page layout with filtered product grids that match your brand, create custom single product templates with tabbed descriptions and video demos, build a streamlined checkout page that reduces form friction. The ability to customize every pixel of the WooCommerce experience—historically locked behind PHP template editing—becomes point-and-click visual design. For directory sites monetizing through membership tiers or listing upgrades, these WooCommerce widgets enable checkout flows that convert significantly better than default WooCommerce styling.
Quick-Start Checklist for Elementor Pro Installation
Here’s a condensed reference you can bookmark and return to whenever setting up Elementor Pro on a new site:
- Pre-flight checks: Verify PHP 7.4+, WordPress 6.0+, 128MB+ memory, create full site backup
- Install Elementor Core: Plugins > Add New > search “Elementor” > Install > Activate
- Purchase and download: Buy Pro license, download zip from Elementor account dashboard
- Install Pro plugin: Choose Connect & Activate (auto) or manual zip upload method
- Activate license: Elementor > License > Connect & Activate > log in > select subscription > activate
- Verify functionality: Check for Pro widgets in editor, access Theme Builder and Popups menus
- Configure performance: Enable experiments in Settings > Features, optimize asset loading
- Install Hello theme: Eliminate theme conflicts with minimal Elementor-optimized theme
- Test and document: Create test page with Pro widgets, document any addon requirements
- Schedule maintenance: Set renewal reminder, configure automatic backups, plan update routine
For sites that need to advertise effectively or manage complex business listings, following this checklist ensures your Elementor Pro foundation is solid before building advanced features.
Frequently Asked Questions
What does Elementor Pro cost and is it worth it for a small business?
Elementor Pro starts at forty-nine dollars per year for one site (Essential plan), with higher tiers for multiple sites. For small businesses, the ROI comes from eliminating developer costs for custom headers, landing pages, and forms. If hiring a developer for those tasks would cost five hundred dollars or more, Pro pays for itself in the first year while giving you ongoing control.
Do I need Elementor Pro if I already have Elementor Free?
Free Elementor provides basic page building, but Pro unlocks Theme Builder for headers and footers, popup builder for lead generation, form builder with integrations, WooCommerce widgets for shop customization, and fifty-plus additional widgets. If you’re building more than simple blog pages, Pro becomes essential quickly. The free version can’t customize your site’s global theme elements.
How do I activate the Elementor Pro license after installation?
Navigate to Elementor > License in your WordPress admin. Click “Connect & Activate” and log in with the Elementor account credentials you used to purchase Pro. Select your subscription from the dropdown list, then click Activate. The system validates your license against Elementor’s servers and unlocks Pro features immediately. Refresh your page to see changes take effect.
What if the Pro license won’t activate or shows as inactive?
First, verify you’re using the correct Elementor account credentials—not your WordPress login. Second, check that your subscription hasn’t expired or reached its site activation limit in your account dashboard. Third, try disconnecting and reconnecting: Elementor > License > Disconnect, wait ten seconds, then Connect & Activate again. Clear browser and WordPress caches if the issue persists.
Can I use Elementor Pro with any WordPress theme?
Elementor technically works with any properly coded theme, but performance and compatibility vary. Lightweight themes like Hello, Astra, or GeneratePress work best because they don’t impose heavy styling that conflicts with Elementor’s designs. Multipurpose themes like Avada or Divi can cause widget conflicts. When in doubt, test with the free Hello theme to isolate theme-specific issues.
How do I optimize Elementor Pro performance on a live site?
Enable performance experiments in Elementor > Settings > Features: Improved Asset Loading, Optimized DOM Output, and Lazy Load Background Images. Use Internal Embedding for CSS Print Method in Settings > Advanced. Install a caching plugin like WP Rocket or LiteSpeed Cache. Choose a fast, managed WordPress host with adequate PHP resources. Minimize the number of widgets per page, especially complex ones like sliders or maps.
Can I transfer my Elementor Pro license to a different domain?
Yes, deactivate the license from the current site (Elementor > License > Disconnect), then activate it on the new site using the same account credentials. Your subscription allows a specific number of simultaneous activations based on your plan tier, but you can deactivate and move licenses between sites as needed. This flexibility supports development workflows involving staging and production environments.
Does Elementor Pro slow down my site compared to custom code?
Elementor adds overhead compared to hand-coded HTML/CSS, typically increasing page weight by one hundred to three hundred kilobytes and adding JavaScript for the visual editing interface. However, with proper optimization—lazy loading, asset minification, caching—the performance difference becomes negligible for most sites. The productivity gain from visual editing usually outweighs the minor performance cost, especially when compared to hiring developers for every layout change.
What happens if I don’t renew my Elementor Pro license?
Your existing pages continue functioning normally with all Pro features intact. However, you lose access to plugin updates (security patches, new features, compatibility fixes), support forums, and the ability to download Pro from your account. For sites running outdated WordPress or PHP versions, missing security updates poses real risks. You can renew at any time to restore update access without rebuilding anything.
Can Elementor Pro handle membership sites and directory functionality?
Elementor Pro provides the design and form tools, but you’ll need additional plugins for membership logic (MemberPress, Restrict Content Pro) or directory functionality (GeoDirectory, Business Directory Plugin). Elementor’s dynamic widgets can display member content, directory listings, and custom fields beautifully, but it doesn’t include the database structure for memberships. The combination of Pro’s design flexibility with specialized directory plugins creates powerful, custom-looking directory sites efficiently.
Taking Your WordPress Site to the Next Level
Installing Elementor Pro correctly—following the two-layer architecture of Core plus Pro, choosing the right installation method for your environment, and properly activating your license—sets the foundation for everything you’ll build. The difference between sites that leverage Pro effectively and those that struggle almost always traces back to this setup phase. You now have the roadmap: verify prerequisites, install Core first, add Pro through your preferred method, activate the license explicitly, and configure performance settings immediately.
The real work begins after installation. Explore Theme Builder to design custom headers that match your brand precisely, create exit-intent popups that actually capture emails without annoying visitors, and build forms with conditional logic that guide users through complex workflows effortlessly. For directory owners, these tools enable the sophisticated user experiences that distinguish professional platforms from amateur listings sites. Whether you’re showcasing businesses in San Francisco or building a niche directory for a specific industry, Elementor Pro provides the design flexibility that custom development used to require—at a fraction of the cost and time investment.
Don’t let analysis paralysis prevent you from starting. Elementor Pro’s worst-case scenario—an expired license—still leaves you with functioning pages and the option to renew later. The best-case scenario transforms your WordPress workflow, eliminating the constant back-and-forth with developers and giving you direct creative control over every pixel. That autonomy, combined with the performance optimizations and conversion tools Pro provides, makes it one of the highest-ROI investments in the WordPress ecosystem. Install it correctly once, maintain it properly, and you’ll wonder how you ever built WordPress sites without it.
Was this article helpful?