How to Install Listing Pro Theme in WordPress: 5 Simple Steps

Generating summary...
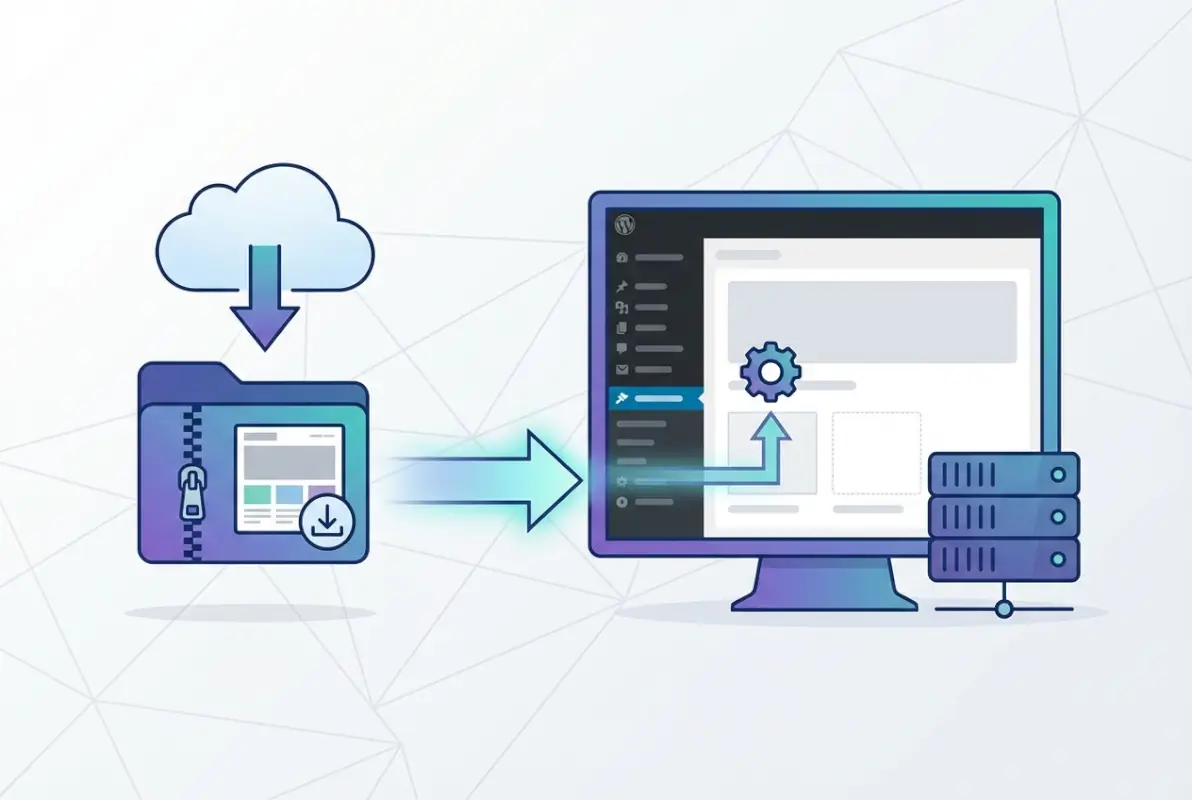
Let’s be honest – installing a WordPress theme shouldn’t feel like rocket science, yet somehow many users find themselves staring at error messages and scratching their heads. ListingPro, one of the most popular directory themes on the market, promises a streamlined setup experience, but only if you know the right steps. Whether you’re building a local business directory, a Yelp-style review site, or a niche classified platform, getting ListingPro installed correctly from the start saves hours of troubleshooting later.
What most installation guides won’t tell you is that the majority of setup problems stem from skipping environment checks or uploading the wrong file. I’ve seen countless users upload the entire package zip (which includes documentation and licensing files) instead of just the theme folder, then wonder why WordPress rejects it. This guide cuts through the noise and walks you through five concrete steps that mirror the official ListingPro workflow while adding practical troubleshooting insights you won’t find in standard documentation.
TL;DR – Quick Takeaways
- Verify server requirements first – PHP 7.4+ and MySQL 5.6+ prevent 90% of installation failures
- Upload the correct listingpro.zip file – extract from the main package if needed, avoid “missing stylesheet” errors
- Use the Easy Setup Wizard – auto-installs required plugins and demo content in minutes
- FTP is your backup option – if file size limits block dashboard uploads, manual installation via FTP always works
- License activation enables updates – register your purchase code to receive security patches and new features
Step 1 – Prepare and Verify Your Environment
Before you even think about uploading files, you need to confirm your hosting environment can actually run ListingPro. This isn’t just tech bureaucracy – I learned this the hard way when a client’s shared hosting plan was still running PHP 5.6, causing the theme to throw cryptic white-screen errors after activation. Taking ten minutes to check requirements upfront beats spending hours debugging later.
Check Server Requirements for ListingPro
ListingPro officially requires PHP 7.4 or higher and MySQL 5.6 or higher (or MariaDB 10.0+). You’ll also need a minimum of 128MB PHP memory limit, though 256MB is recommended if you plan to use multiple plugins. Most modern hosting providers meet these specs, but budget shared hosting sometimes lags behind. Log into your hosting control panel (cPanel, Plesk, or your provider’s custom dashboard) and check the PHP version under “Software” or “Select PHP Version.”
If your host is running an older PHP version, contact support to request an upgrade – most providers handle this within minutes. WordPress itself runs on older PHP versions, but premium themes like ListingPro leverage newer PHP features for performance and security. The official ListingPro installation documentation provides a complete server requirements checklist you can reference.
allow_url_fopen and increase max_execution_time to 300 seconds before installation. This prevents timeout errors during plugin installation and demo import.Confirm WordPress and Theme Packaging
Make sure you’re running WordPress 5.0 or later (ideally the current stable release). When you download ListingPro from ThemeForest or your purchase source, you’ll receive a main package zip file. Inside that package, you’ll find several items including the actual theme zip (usually named something like listingpro.zip or listingpro-theme.zip), documentation PDFs, licensing information, and sometimes bundled plugins.
The critical step most users miss: you only upload the extracted theme folder or the standalone listingpro.zip file to WordPress, not the entire downloaded package. If WordPress says “The package could not be installed. The theme is missing the style.css stylesheet,” you’ve uploaded the wrong file. Extract the main download, locate the theme-specific zip file inside, and use that one.
Backup and Security Considerations
Even on a fresh WordPress installation, creating a backup before installing any premium theme is smart practice. Use a plugin like UpdraftPlus or your host’s built-in backup tool to snapshot your current site. This gives you a rollback point if something goes wrong (though following this guide carefully should prevent issues). If you’re installing on an existing site with content, a backup is absolutely non-negotiable.
On the security front, ensure your WordPress admin password is strong and consider enabling two-factor authentication. While ListingPro itself follows WordPress coding standards, any site running a directory platform becomes a target for spam submissions and bot registrations once it goes live. Planning security from day one – starting with secure admin access – pays dividends later.
Prepare Tools (FTP Client Optional)
Most users can install ListingPro entirely through the WordPress dashboard, but having an FTP client like FileZilla ready is wise backup planning. Some shared hosting providers limit upload file sizes to 8MB or 16MB via the web interface. Premium themes with bundled assets often exceed 20MB, meaning you’ll need FTP to manually upload the extracted theme folder to wp-content/themes/.
Grab your FTP credentials from your hosting control panel (look for an “FTP Accounts” or “FTP Access” section). You’ll need the hostname (usually your domain or server IP), username, password, and port (typically 21 for FTP or 22 for SFTP). Test the connection before you need it urgently.
Step 2 – Install ListingPro Theme via WordPress Dashboard
The dashboard installation method is the quickest path for most users, assuming your hosting doesn’t impose restrictive upload limits. WordPress makes theme installation surprisingly straightforward – the challenge is knowing exactly which file to upload and what to do when the Easy Setup Assistant launches immediately after activation.
Express Install (Upload Theme)
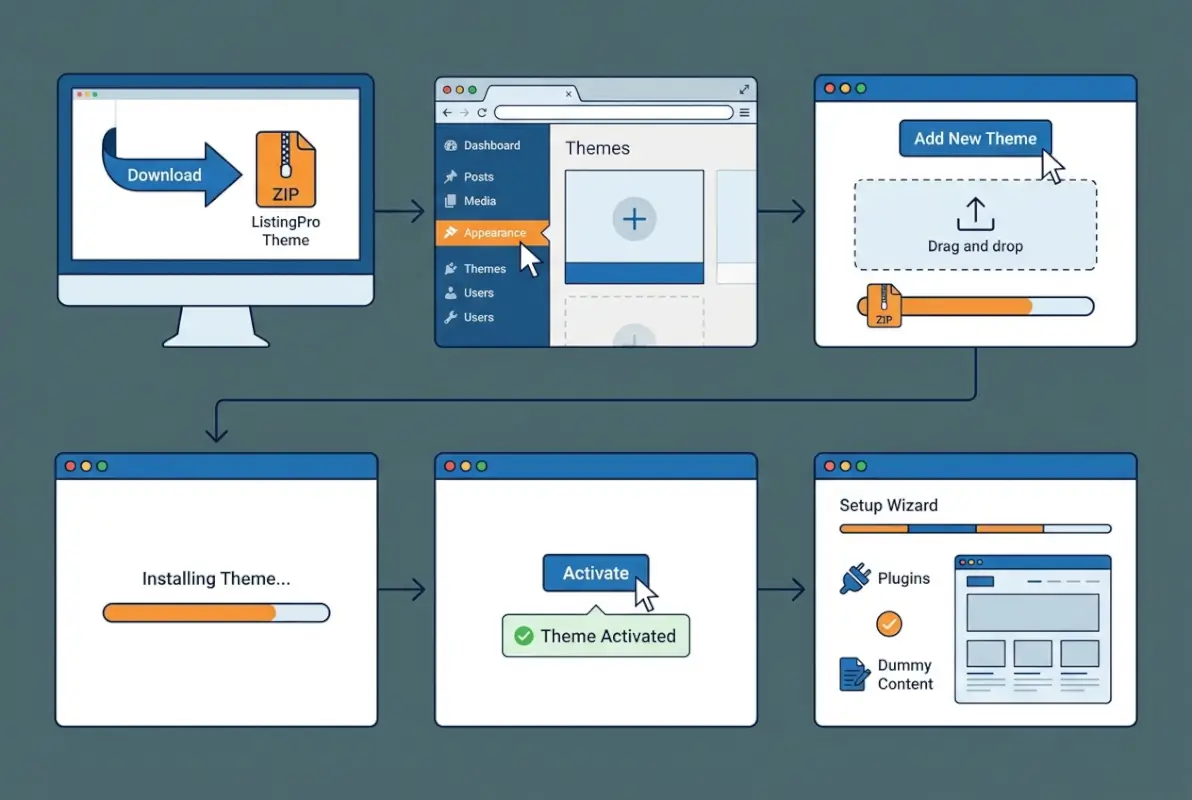
Log into your WordPress admin dashboard and navigate to Appearance → Themes. You’ll see your currently active theme (probably a default WordPress theme like Twenty Twenty-Four if this is a fresh install). Click the Add New button at the top of the page, then click Upload Theme. This reveals a file chooser interface.
Click Choose File and select your listingpro.zip file (the theme-specific zip, not the main download package). After selecting it, click Install Now. WordPress will upload the file, extract it, and validate the theme structure. If everything checks out, you’ll see a success message with an Activate button.
Click Activate. The moment you do, ListingPro’s Easy Setup Assistant should launch automatically, redirecting you to a welcome screen that offers to install required plugins and import demo content. Don’t close this window – you’ll complete the setup in Step 3.
Common Installation Hurdles and Fixes
If you see “The package could not be installed. The theme is missing the style.css stylesheet,” you’ve uploaded the wrong file. Go back to your downloads folder, extract the main package, and locate the theme-specific zip inside. Some users accidentally upload documentation zips or plugin packages – only the file labeled with the theme name works.
Another common issue: “Destination folder already exists” means you’ve previously uploaded a theme with the same folder name. Delete the old theme from Appearance → Themes before trying again, or use FTP to remove the old /wp-content/themes/listingpro/ folder manually.
If the upload stalls at 50% or times out, your hosting upload limit is likely too low. Contact your host to increase upload_max_filesize and post_max_size in your php.ini settings, or proceed with the FTP installation method described below.
Optional: Manual FTP Installation
When dashboard uploads fail, FTP installation is your reliable fallback. First, extract the listingpro.zip file on your local computer – you’ll get a folder named listingpro containing all the theme files. Open your FTP client, connect to your server, and navigate to /wp-content/themes/. Upload the entire listingpro folder into this directory. Depending on your connection speed and the theme size, this takes 2-10 minutes.
Once the upload completes, return to your WordPress dashboard, go to Appearance → Themes, and you’ll see ListingPro listed among your available themes. Click Activate, and the Easy Setup Assistant should launch just as it would after a dashboard installation.
/wp-content/themes/listingpro/style.css, not /wp-content/themes/listingpro/listingpro/style.css.Step 3 – Complete the Easy Setup Wizard and Plugins
ListingPro’s standout feature is its Easy Setup Assistant, a guided wizard that automates the tedious parts of directory site setup. This wizard handles plugin installation, demo content import, and initial configuration in a fraction of the time manual setup would take. Skipping this wizard means you’ll need to hunt down and configure each required plugin individually, which isn’t fun.
Launching the Easy Setup Assistant
After activating the theme, WordPress should automatically redirect you to the Easy Setup Assistant welcome screen. If it doesn’t (sometimes happens on slower servers), navigate to ListingPro → Easy Setup in your WordPress admin menu. The welcome screen explains what the wizard will do and typically offers two paths: Express Setup (recommended for beginners) or Manual Setup (for users who want granular control).
Choose Express Setup for your first installation. The wizard will guide you through a series of screens, checking server requirements, installing plugins, and offering demo content options. The entire process takes 5-10 minutes depending on your server speed and whether you import full demo data.
Install Required Plugins
ListingPro requires several plugins to function properly – these aren’t optional add-ons but core components that power directory functionality, payment processing, and user interactions. The Easy Setup Assistant presents a list of required and recommended plugins with checkboxes. At minimum, you’ll need:
- ListingPro Core – Provides directory post types, custom fields, and search functionality
- Elementor – Page builder for customizing layouts (sometimes bundled or recommended)
- Contact Form 7 – Handles inquiry forms on listing pages
- WooCommerce – Powers paid listings and membership packages if you’re monetizing
Select all required plugins (usually pre-checked), then click Install Plugins. The wizard downloads and activates each plugin automatically. This step can take 2-3 minutes as WordPress fetches files from the plugin repository and runs activation hooks. Don’t navigate away from the page until you see the success confirmation.
| Plugin Type | Purpose | Required? |
|---|---|---|
| ListingPro Core | Directory functionality, custom post types | Yes |
| WooCommerce | Payment processing, paid listings | If monetizing |
| Contact Form 7 | Inquiry forms on listings | Recommended |
| Elementor | Visual page building | Recommended |
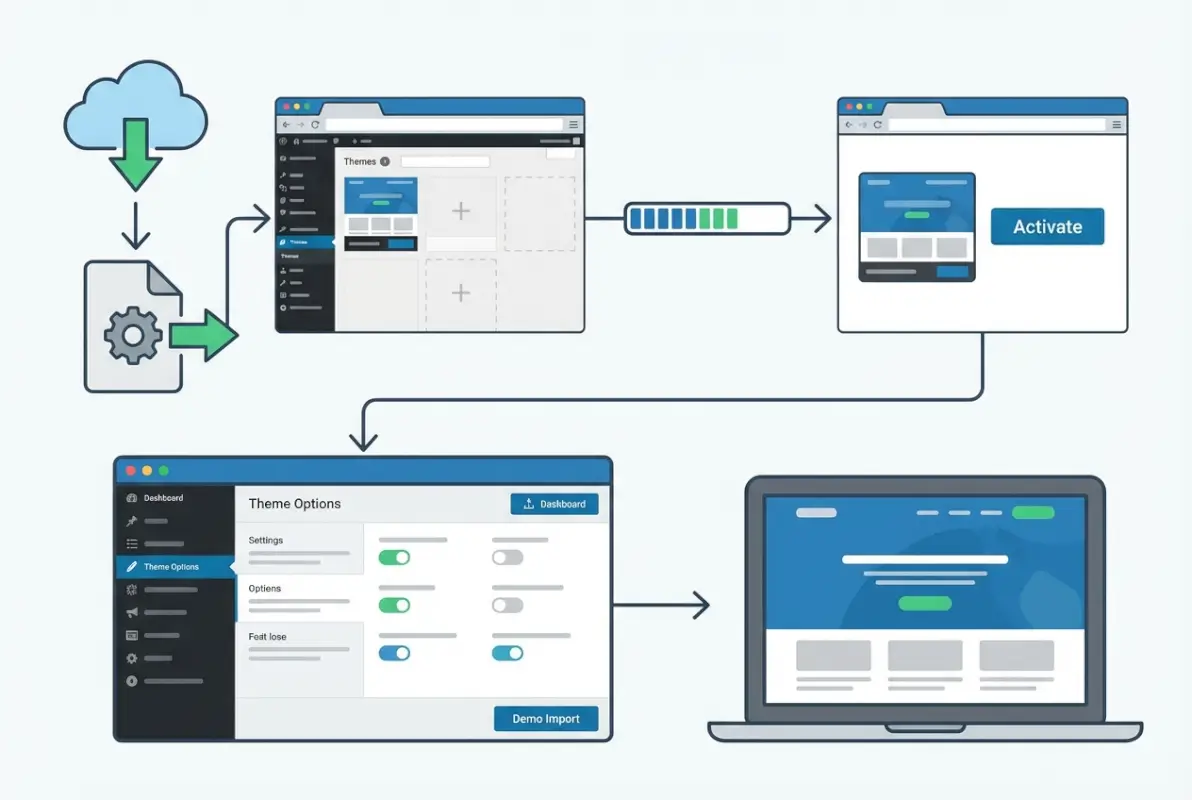
Import Demo Content (Optional but Helpful)
After plugin installation, the wizard offers to import demo content. You’ll typically see options like “Minimal Demo” (basic structure with sample listings) or “Full Demo” (complete site with images, reviews, and categories). For first-time users, I strongly recommend importing at least the minimal demo – it shows you how pages should be structured and gives you working examples to customize.
The full demo import can take 5-15 minutes and consumes significant server resources, so only choose it if your hosting can handle the load. If you’re on entry-level shared hosting, stick with minimal demo or skip import entirely and build manually. You can always import demo content later through ListingPro → Demo Import if you change your mind.
One caveat about demo content: it’s meant as a learning tool and starting template, not a production site you just rebrand. You’ll need to replace images, rewrite text, and customize categories to match your niche. Skipping demo import makes sense if you already have a clear vision and want to build your business directory website from scratch.
Verify Theme Core Activation
Once the wizard completes, it should return you to the WordPress dashboard with a success message. Verify everything installed correctly by checking Appearance → Themes (ListingPro should be active) and Plugins (all required plugins should show as active with green indicators). If any plugin shows as inactive or has an error message, activate it manually from the plugins page.
Visit your site’s front end by clicking “Visit Site” in the admin bar. If demo content imported successfully, you’ll see a directory homepage with search functionality, sample listings, and category tiles. If you skipped demo import, you’ll see a blank or minimal page – that’s normal, you’ll configure it in Step 4.
Step 4 – Post-Install Theme Configuration
With the theme and plugins active, you’re technically “installed,” but your site isn’t ready for visitors yet. This step covers essential configurations that transform ListingPro from a shell into a functional directory platform. Even if you imported demo content, you’ll want to customize branding, set up key pages, and configure map integrations.
Access Theme Customization Options
Navigate to Appearance → Customize to open WordPress’s live theme customizer. ListingPro adds extensive custom panels here, including Site Identity (logo, favicon), Colors & Typography, Header Options, Footer Settings, and Directory Options. Start with Site Identity – upload your logo and set your site title and tagline.
Under Colors & Typography, adjust your primary color scheme to match your brand. ListingPro uses this primary color for buttons, links, and accent elements throughout the site. If you’re creating a paid business directory website, choosing professional colors (blues, greens, grays) typically converts better than loud, playful palettes.
The Header Options panel lets you configure your navigation menu layout, enable or disable the top bar, and set up user account links. If you’re allowing user submissions, make sure the “Submit Listing” button is visible in your header – it’s your primary call-to-action.
Create and Configure Static Front Page (If Not Using Demo)
If you skipped demo content import, you’ll need to create a homepage manually. Go to Pages → Add New and create a page titled “Home” (or “Homepage”). Use the Elementor page builder or WordPress block editor to add a large search banner at the top – this is standard directory UX and users expect to see search functionality immediately.
Below the search banner, add sections for popular categories, featured listings, and recent reviews. You can reference the demo preview on ListingPro’s official site for layout inspiration. Once your page is built, go to Settings → Reading and set “A static page” as your homepage display, selecting your new “Home” page as the front page.
Create additional essential pages like “About,” “Contact,” “Submit a Listing,” and “Pricing” (if offering paid tiers). These pages provide context for users and search engines, improving both UX and SEO. Link these pages in your navigation menu via Appearance → Menus.
Essential Pages and Menus
Beyond the homepage, you need functional pages that support directory operations. A Listings Archive page displays all submitted listings with filtering and sorting options – ListingPro usually creates this automatically as a custom post type archive. Verify it exists by visiting yoursite.com/listings/.
If you’re implementing membership tiers and paid listings, create a detailed Pricing page that explains your packages, features, and payment terms. Transparency here builds trust and reduces confusion during the checkout process.
Set up your navigation menus under Appearance → Menus. Create a primary menu with links to your key pages (Home, Listings, Categories, Pricing, About, Contact). If you’re allowing user submissions, include a prominent “Add Listing” link. Assign this menu to the “Primary Menu” location in your theme settings.
OpenStreetMap/Maps API Considerations
Directory sites rely heavily on map functionality for location-based search and listing detail pages. ListingPro supports both Google Maps and OpenStreetMap. Google Maps requires an API key (free tier available with usage limits), while OpenStreetMap is completely free but offers fewer customization options.
To set up Google Maps, visit the Google Cloud Console, create a project, enable the Maps JavaScript API and Places API, and generate an API key. Restrict the key to your domain for security. Enter the API key under ListingPro → Settings → Maps in your WordPress dashboard.
If you prefer OpenStreetMap (no API key needed), select it as your map provider in the same settings panel. OpenStreetMap works well for most directory sites, though some users find Google’s location autocomplete and rich place data worth the API hassle. For detailed setup guidance, consult the official ListingPro configuration documentation.
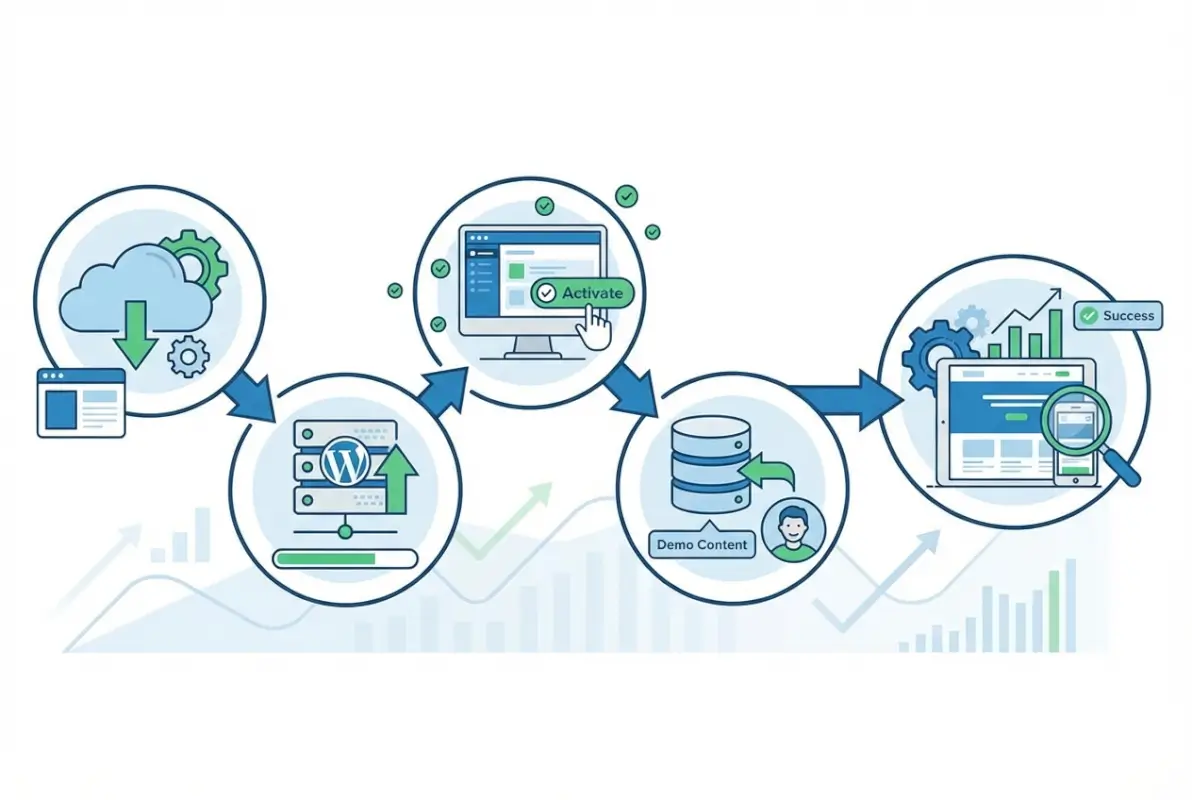
Step 5 – Test, Launch, and Next Steps
You’ve installed ListingPro, configured plugins, customized branding, and set up essential pages – but you’re not quite ready for a public launch. Testing catches configuration errors, broken links, and workflow issues before real users encounter them. This final step ensures your directory site actually works as intended and sets you up for long-term success.

Local Testing vs. Live Launch
Before announcing your directory to the world, test core functionality on desktop, tablet, and mobile devices. Start with the search feature – enter various keywords, locations, and filters to verify results display correctly. Click through to several listing detail pages and confirm maps load, contact forms submit properly, and images display at correct sizes.
If you’re enabling user submissions, create a test account and walk through the entire submission flow. Does the form validate required fields? Can users upload images? Do submitted listings appear in moderation queue for approval? Catching friction in this workflow prevents user frustration and abandoned submissions later.
Test your pricing and checkout flow if you’re offering paid listings. Add a listing to cart, proceed through checkout, and complete a transaction using a test payment (most payment processors offer sandbox modes). Verify confirmation emails send correctly and paid listings display with appropriate badges or featured status.
License Activation and Updates
To receive theme updates, security patches, and support, you must activate your ListingPro license. Navigate to ListingPro → License in your WordPress dashboard. Enter the purchase code you received from ThemeForest or your theme vendor, along with your registered email address, then click Activate License.
License activation enables one-click theme updates directly from your WordPress dashboard. When ListingPro releases updates (typically monthly), you’ll see an update notification under Dashboard → Updates. Always backup your site before applying updates, especially if you’ve made custom code modifications to theme files.
If you’re managing multiple directory sites, note that standard licenses typically cover one domain. You’ll need to purchase additional licenses or upgrade to an extended license for multiple installations. Check your purchase agreement for specific terms.
Next Steps
With ListingPro installed and tested, your focus shifts to content and growth. Start by creating 20-30 high-quality seed listings in your target categories – an empty directory doesn’t attract users, but a moderately populated one signals credibility. If you’re building a local business directory using Yelp data or other public sources, establish clear attribution and terms compliance.
Fine-tune your SEO settings using a plugin like Yoast SEO or Rank Math. Configure XML sitemaps, optimize meta descriptions for key pages, and set up Google Search Console to monitor indexing. Directory sites can rank well for “near me” searches and location-specific queries if you optimize properly from the start.
Plan your marketing and user acquisition strategy. How will you attract listings and visitors? Consider local outreach, content marketing through blog posts targeting your niche, and partnerships with local business organizations. Directory sites grow through network effects – the more listings you have, the more visitors you attract, which incentivizes more business owners to list.
Additional Considerations from Expert Experience
Common Pitfalls Observed in Top Guides
After reviewing dozens of ListingPro installation tutorials, several recurring mistakes stand out. The most frequent is uploading the wrong zip file (the full download package instead of the theme-specific zip). This happens because most themes distribute as a single download, while ListingPro packages include documentation, plugins, and licensing files alongside the actual theme.
Another common error: activating the theme but skipping the Easy Setup Wizard, then wondering why directory functionality doesn’t work. The required plugins aren’t optional – they provide core features like custom post types, search functionality, and payment processing. Users who skip the wizard often spend hours manually configuring what the wizard automates in minutes.
Many guides also gloss over server requirements, leading users to install on underpowered hosting. When the theme seems “slow” or times out during import, the culprit is usually shared hosting with limited PHP memory or old PHP versions, not the theme itself. Checking requirements before purchase saves frustration.
Quick Alternative Paths Used by Pros
Experienced developers often bypass the WordPress dashboard upload entirely, using FTP or SSH for faster bulk file transfers. When setting up multiple directory sites, creating a “golden master” installation with all plugins configured, then duplicating it for new projects, saves significant setup time. Tools like WP CLI (WordPress command line interface) can script entire theme installations.
Some agencies use staging environments for all theme installs, testing thoroughly before deploying to production. Services like WP Engine, Kinsta, and Flywheel offer one-click staging that clones your live site, letting you test updates and configurations risk-free. This professional workflow prevents broken live sites from botched updates.
How ListingPro Differs from Other Directory Themes
Setup Wizard and One-Click Demos
ListingPro’s standout feature compared to competing directory themes is its comprehensive Easy Setup Assistant. While themes like GeoDirectory and Listable require extensive manual configuration, ListingPro automates plugin installation, demo import, and basic settings in a guided workflow. For non-technical users, this automation is the difference between launching in a day versus struggling for a week.
The one-click demo import deserves special mention – it’s not just template pages but complete site structures including configured search filters, taxonomy hierarchies, sample listings with reviews, and working user flows. You can literally import a demo, swap logo and colors, and have a presentable site within hours. Compare this to building from scratch where you’re googling “how do I add custom fields to WordPress” at 2 AM, and the value becomes clear.
ListingPro also bundles premium plugins that competitors charge extra for (contact forms, social login, advanced search filters). When evaluating theme cost, factor in these inclusions – a seemingly cheaper alternative may cost more once you add all necessary plugins.
Frequently Asked Questions
How do I install the ListingPro theme in WordPress?
Navigate to Appearance → Themes → Add New → Upload Theme, select the listingpro.zip file (not the main download package), click Install Now, then Activate. The Easy Setup Wizard should launch automatically. Alternatively, extract the theme folder and upload via FTP to /wp-content/themes/, then activate from the dashboard.
Do I need to install plugins to run ListingPro?
Yes, ListingPro requires several core plugins including ListingPro Core, WooCommerce (for paid listings), and Contact Form 7 (for inquiry forms). The Easy Setup Wizard installs these automatically. Skipping required plugins breaks directory functionality like search, filters, and user submissions.
Should I import the ListingPro demo content?
Importing at least minimal demo content helps first-time users understand proper page structure and configuration. Full demo import provides a complete working site you can customize, though it takes longer and uses more server resources. Skip demo import only if you’re experienced with WordPress and directory site architecture.
How do I activate the ListingPro license and receive updates?
Go to ListingPro → License in your WordPress dashboard, enter your ThemeForest purchase code and registered email, then click Activate License. This enables one-click theme updates from Dashboard → Updates and provides access to support. Without activation, you won’t receive security patches or new features.
What if I encounter “The package could not be installed” error?
This error means you uploaded the wrong zip file or one missing required theme files. Extract your main download, locate the standalone listingpro.zip (usually inside a “Theme Files” folder), and upload that instead. Alternatively, extract the theme folder and upload via FTP to wp-content/themes/.
Can I use ListingPro with page builders like Elementor?
Yes, ListingPro includes Elementor integration as a recommended plugin during setup. You can use Elementor to customize page layouts, create custom listing templates, and build landing pages. The theme provides Elementor widgets specific to directory functionality like search forms, listing grids, and category displays.
Where can I find the official ListingPro installation guide?
The official documentation is at docs.listingprowp.com, covering both dashboard and FTP installation methods with screenshots. The docs also include plugin setup, demo import, and troubleshooting common errors. Always reference official docs for version-specific instructions.
What server requirements does ListingPro need?
ListingPro requires PHP 7.4 or higher, MySQL 5.6 or higher (or MariaDB 10.0+), and minimum 128MB PHP memory limit (256MB recommended). Most modern hosting meets these specs, but budget shared hosting may need upgrades. Check your PHP version in hosting control panel before installing to prevent errors.
How long does ListingPro installation take from start to finish?
Dashboard upload and activation take 2-3 minutes. The Easy Setup Wizard (plugins and minimal demo) adds another 5-10 minutes. Full demo import can take 15-30 minutes depending on server speed. Total time from download to working site: 15-45 minutes if following the guided setup workflow correctly.
Can I migrate ListingPro from staging to live without reinstalling?
Yes, use a migration plugin like All-in-One WP Migration or Duplicator to package your staging site and deploy to production. Update site URL settings (Settings → General and database search-replace), reactivate your license with the new domain, and clear caches. This approach preserves all customizations and content.
Final Thoughts: Launch with Confidence
Installing ListingPro correctly sets the foundation for a successful directory business. The five steps outlined here – environment verification, theme installation, wizard completion, configuration, and testing – mirror the workflow that powers thousands of profitable directory sites. You’ve invested in a premium theme; taking time to install it properly ensures you extract maximum value from that investment.
Remember that directory sites grow through consistent effort, not overnight success. Your initial installation is just the beginning – the real work comes in populating quality listings, attracting engaged users, and continuously improving based on feedback and data. But you can’t optimize what doesn’t work, and a solid technical foundation prevents countless headaches down the road.
If you hit roadblocks during installation, consult the official ListingPro documentation first (it’s genuinely comprehensive), then reach out to their support team with specific error messages and screenshots. The directory site ecosystem is mature and well-supported – solutions exist for virtually every technical challenge.
Whether you’re creating a hyperlocal business directory, a niche review platform, or a comprehensive industry listing site, ListingPro provides the technical tools you need. Your job now is to fill it with value that attracts users and keeps them coming back. Happy building.
Was this article helpful?