How to Install a Plugin on a Minecraft Server: A Step-by-Step Guide

Generating summary...
So you’ve decided to add plugins to your Minecraft server—smart move. Plugins are what transform a basic survival world into something genuinely memorable: custom commands, player economies, mini-games, anti-cheat protection, you name it. If you’ve ever joined a server with teleport commands, land claims, or custom shops, you’ve experienced the power of plugins firsthand. But here’s the thing most guides won’t tell you upfront: installing a plugin isn’t just about dropping a file into a folder. It’s about understanding your server ecosystem, choosing the right platform (Paper, Spigot, or Bukkit), vetting sources for security, and troubleshooting when things inevitably don’t load green the first time. This guide walks you through the entire process—from selecting a compatible server build to verifying successful installation and fixing common errors—so you can confidently extend your server’s functionality without the headaches.
TL;DR – Quick Takeaways
- Plugins require Bukkit-compatible servers – Vanilla Minecraft doesn’t support them; use Paper, Spigot, or Bukkit
- Manual installation is simple – Download the .jar, stop your server, upload to the plugins folder, restart, and verify with
/plugins - Always backup first – Test new plugins in a staging environment or keep rollback-ready backups
- Check logs for errors – If a plugin shows red or doesn’t load, your console logs will tell you why (version mismatch, missing dependencies, etc.)
- Trusted sources matter – Stick to official repositories like Hangar, SpigotMC, and verified GitHub releases
Understanding the Prerequisites and Ecosystem
Before you download your first plugin, you need to understand what you’re working with. Not all Minecraft servers are created equal. Vanilla servers—the ones you download directly from Mojang—don’t support plugins at all. You need a server platform that implements the Bukkit API, which is the foundation for the entire plugin ecosystem. Paper, Spigot, and CraftBukkit all fall into this category, with Paper being the most widely recommended for performance and compatibility. These platforms extend the vanilla server with hooks and events that plugins can tap into, enabling everything from custom commands to complex game mechanics.
Plugins are distributed as .jar files (Java Archive) and live in a dedicated plugins folder in your server’s root directory. When the server starts, it scans this folder, loads each plugin, and initializes them according to their internal plugin.yml configuration. It’s a straightforward system once you understand the basics, but it does require that your server software and plugins are version-compatible. A plugin built for Minecraft 1.20 probably won’t work on 1.16, and vice versa.
Paper vs Spigot vs Bukkit: Compatibility, Performance, and Loading
Let’s break down the three main platforms. CraftBukkit is the original Bukkit implementation, but it’s largely been superseded by Spigot and Paper. Spigot builds on CraftBukkit with performance improvements and additional API features. Paper, in turn, builds on Spigot with even more optimizations, bug fixes, and a growing library of unique APIs. In my experience, Paper is the sweet spot for most server owners: it’s faster, better maintained, and supports the widest range of modern plugins. According to PaperMC’s official documentation, Paper is fully backward-compatible with Spigot and Bukkit plugins, so you’re not sacrificing plugin availability by choosing it.
Where to Find Plugins and How to Evaluate Trustworthiness
The plugin ecosystem is massive. Hangar, PaperMC’s official plugin repository, hosts thousands of vetted plugins with download statistics and version compatibility clearly marked. Other major sources include SpigotMC Resources, BukkitDev, and GitHub releases from established developers. When evaluating a plugin, look for recent activity (last updated within the past few months), clear documentation, and a reasonable number of downloads or stars. Be wary of plugins that haven’t been updated in years—they may introduce compatibility issues or security vulnerabilities. I remember downloading a poorly maintained economy plugin once, it broke half my server commands because it was trying to hook into an API that no longer existed.
Backup and Testing Strategies Before Adding Plugins
This is non-negotiable: always back up your server before installing new plugins. I know it sounds paranoid, but plugins can conflict with each other or with your server configuration in unpredictable ways. A full backup of your world files, plugins folder, and server configurations takes minutes and can save hours of troubleshooting. Even better, set up a staging server—a duplicate of your production environment where you can test new plugins before deploying them to your live server. This way, if something breaks, your players never notice. If you’re managing a thriving local community, downtime is the last thing you want.
Real-World Statistics and Context
The plugin ecosystem isn’t just large—it’s actively growing. Hangar alone lists thousands of plugins across dozens of categories, from administration and economy to world management and mini-games. Popular plugins like EssentialsX, ViaVersion, and Geyser each have hundreds of thousands of downloads, demonstrating both the scale and the maturity of this ecosystem. According to data visible on Hangar and SpigotMC, the majority of actively maintained plugins support Minecraft versions 1.19 through 1.21, with backward compatibility often extending further. This tells you that the plugin development community is responsive to new Minecraft releases and that you’ll have plenty of options regardless of your server version.
Plugin Ecosystem Size and Activity
The sheer volume of available plugins means you can find solutions for almost any server need. Want to add player warps? There’s a plugin. Need a permission system? Multiple options exist, with LuckPerms being the most popular. Looking for anti-cheat? You’ll find both free and premium solutions. The ecosystem’s diversity also means you need to be selective, there are hundreds of similar plugins, and not all are created equal. Check recent reviews, read the plugin’s documentation, and verify that it’s compatible with your server version before committing. This is where the key steps to launching a successful directory of resources becomes invaluable—treat your plugin selection like a curated list.
Documentation and Developer Guidance as the Authority
PaperMC and Bukkit/Spigot maintain extensive documentation that covers plugin installation, lifecycle, troubleshooting, and development. The Paper plugin lifecycle guide explains how plugins are loaded, initialized, enabled, and disabled—useful knowledge when debugging why a plugin isn’t working. Official documentation also emphasizes security: download from known sources, review permissions, and keep both your server and plugins updated. This guidance is authoritative because it comes directly from the platform maintainers and reflects best practices that have evolved over years of community experience.
Finding and Selecting the Right Plugin
Now that you understand the ecosystem, let’s talk about how to choose the right plugin for your needs. This is more art than science, but there are concrete steps you can take to increase your odds of success. Start by clearly defining what you want the plugin to do. Are you looking for basic server management (teleports, homes, warps)? Or do you need something more specialized, like a custom economy or mini-game framework? Once you know what you need, head to Hangar or SpigotMC and search by category or keyword. Read the plugin’s description, check the supported Minecraft versions, and look for dependencies (other plugins it requires to function).

Trusted Sources and Signals of Quality
Quality plugins share common traits. They have clear, comprehensive documentation (either in the plugin’s resource page or on a dedicated wiki). They’re actively maintained, with updates released within the past few months. They have a healthy number of downloads and positive reviews. They clearly list version compatibility and dependencies. And ideally, they have an active Discord or support forum where you can ask questions. Avoid plugins that promise too much (“All-in-one server suite with 50 features!”), these tend to be bloated and poorly maintained. Also steer clear of plugins with vague descriptions, no documentation, or a history of breaking changes without warning.
Checking Compatibility with Your Server Version and Dependencies
This is where a lot of new server owners trip up. A plugin built for Minecraft 1.20.4 on Paper might not work on Spigot 1.19.2, even though both are Bukkit-compatible. Always check the plugin’s supported versions before downloading. If a plugin lists dependencies (e.g., “Requires Vault”), you must install those dependencies first. Vault, for example, is a permissions and economy API that many plugins hook into. Without it, those plugins won’t load or will throw errors. Read the plugin’s description and installation instructions carefully to avoid missing critical dependencies.
Reading Plugin Docs, Reviews, and Community Discussions
Don’t skip this step. Plugin documentation often includes configuration examples, command lists, and troubleshooting tips that will save you time later. Reviews and community discussions (on SpigotMC, Discord, or Reddit) can reveal issues that aren’t obvious from the description. For instance, you might discover that a plugin has a memory leak in certain configurations or conflicts with another popular plugin. I’ve avoided countless headaches by spending ten minutes reading reviews before installing a plugin. Think of it as due diligence—if you’re building something with proven tactics to grow, you vet your tools.
Preparing a Safe Download and Audit Checklist
Before you download anything, create a simple checklist. First, confirm the plugin’s source (official resource page, verified GitHub, etc.). Second, verify that the version matches your server (Paper 1.20.4, for example). Third, note any dependencies and plan to install them first. Fourth, back up your server (seriously, do this every time). Fifth, consider testing in a staging environment if the plugin is critical or complex. This process might seem tedious, but it becomes second nature after a few installations, and it significantly reduces the risk of downtime or conflicts.
Verify Source Jar, Confirm Version Matches Server, Check for Dependencies
When you download a plugin, you should receive a .jar file. Double-check the file name and version number against what’s listed on the resource page. If the file has a suspicious name or comes from an unverified source, don’t use it. Once downloaded, review the plugin’s page one more time for any dependencies. Some plugins will explicitly state “Requires ProtocolLib” or “Requires PlaceholderAPI.” Make a note of these and download them separately. Installing dependencies in the wrong order (plugin before dependency) will cause the plugin to fail on load.
Create a Quick Rollback Plan
A rollback plan is simple: know how to remove the plugin and restore your server to its previous state. This means having a recent backup and knowing the location of your plugins folder. If a plugin breaks your server, you should be able to stop the server, delete the offending .jar from the plugins folder, restart, and be back to normal. If the plugin created config files or databases, you may need to clean those up as well. Having this plan in place reduces stress and makes you more willing to experiment with new plugins, which is how you discover the gems that transform your server.
Manual vs Automatic Plugin Installation (Step-by-Step)
There are two primary ways to install plugins: manually (the traditional method that works on any server setup) and automatically (via a hosting control panel that simplifies the process). Both have their place, and understanding both gives you flexibility. Manual installation is universal and gives you full control, while automatic installation is faster and more beginner-friendly if your host supports it. Let’s walk through both methods step by step, so you’ll know exactly what to do regardless of your setup.

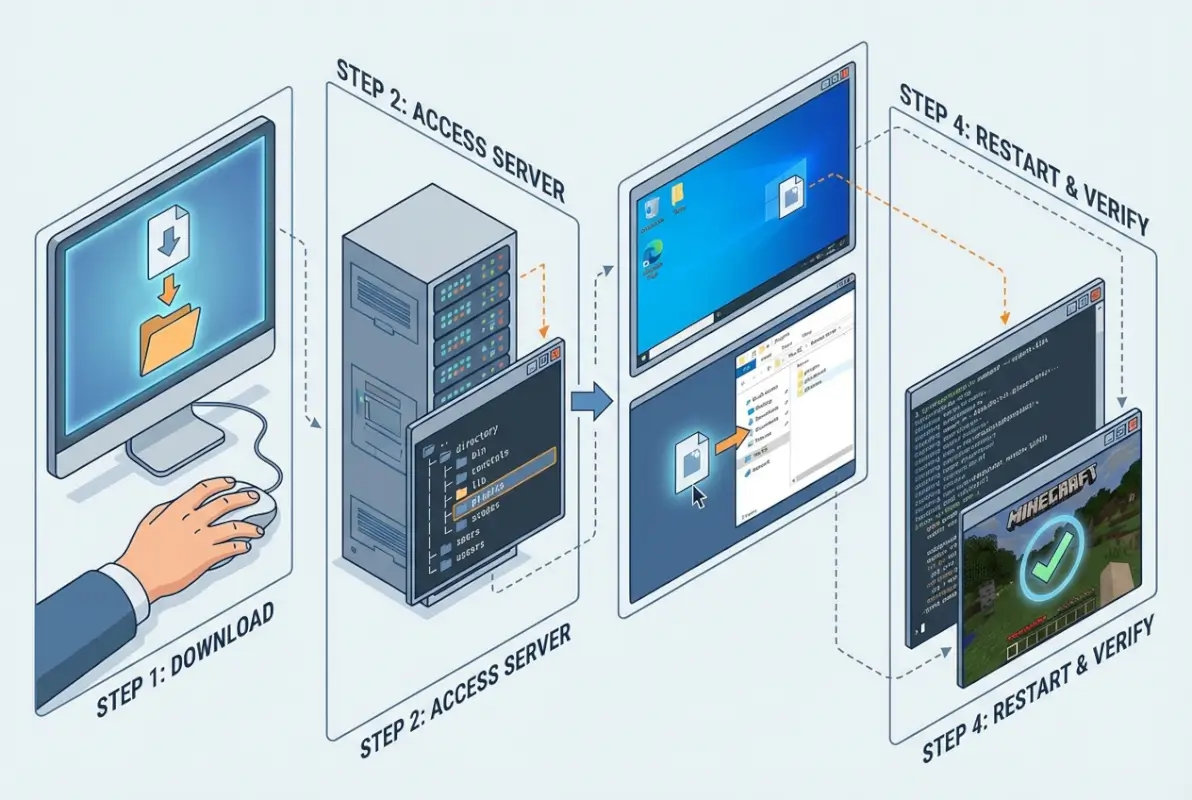
Step-by-Step: Manual Installation
Manual installation is the gold standard because it works everywhere—whether you’re on a shared host, a VPS, or running the server on your own hardware. Here’s the process:
- Download the plugin .jar from a trusted source (Hangar, SpigotMC, official GitHub release).
- Stop your server completely. You can do this via your control panel, terminal, or in-game with
/stop. Never add plugins while the server is running—it can cause corruption. - Locate your server’s root directory and find the
pluginsfolder. This is usually in the same directory as your server.jar and world folders. - Upload the plugin .jar to the plugins folder. If you’re on a VPS, use SFTP or SCP. If you’re on a control panel, use the file manager. Just drag and drop the .jar file into the plugins folder.
- Restart your server. The server will scan the plugins folder, load the new .jar, and initialize the plugin.
- Verify the plugin loaded successfully. Join your server (or check the console) and run
/pluginsor/pl. You should see your new plugin listed in green. Green means it loaded correctly; red means there was an error.
If the plugin shows up green, congratulations—you’re done. If it’s red or missing entirely, check your console logs (usually in logs/latest.log) for error messages. Common issues include missing dependencies, incorrect server version, or a corrupted .jar file. We’ll cover troubleshooting in detail shortly.
| Step | Action | Common Pitfall |
|---|---|---|
| 1 | Download plugin .jar | Using an untrusted source |
| 2 | Stop the server | Adding plugins while running |
| 3 | Upload to plugins folder | Uploading to wrong directory |
| 4 | Restart server | Using /reload (can cause issues) |
| 5 | Verify with /plugins | Ignoring red/missing plugins |
Automatic Installation via Control Panels
Many hosting providers (Hostinger, Apex Hosting, and others) offer one-click plugin installation through their control panels. This feature typically includes a searchable plugin library, automatic dependency detection, and streamlined installation. Here’s how it usually works:
- Log into your hosting control panel and navigate to the plugins or addons section.
- Search for the plugin you want to install. The panel will show you compatible versions and dependencies.
- Click “Install” or “Add Plugin.” The panel will download the .jar, place it in your plugins folder, and may automatically restart your server.
- Verify installation by checking
/pluginsin-game or reviewing the control panel’s plugin list.
This method is convenient, but it has limitations. Not all plugins are available in every control panel’s library, and you have less control over specific plugin versions. For niche or cutting-edge plugins, you’ll likely still need to do manual installation. That said, for popular plugins like EssentialsX, WorldEdit, or LuckPerms, automatic installation is a huge time-saver.
What to Do After Installation
Installation is just the beginning. Once the plugin is loaded, you need to configure it. Most plugins create a config file in plugins/PluginName/config.yml when they first load. This file contains settings, permissions, messages, and feature toggles. Open it with a text editor and review the options. Some plugins work perfectly out of the box; others require you to set permissions, enable features, or integrate with other plugins (like Vault for economy features). Always restart your server after making config changes to ensure they take effect.
Run /plugins to confirm the plugin is green. Check your console for any warnings or errors. If the plugin loaded but isn’t behaving as expected, review its documentation and config file. Many plugins also have in-game commands for configuration (e.g., /pluginname reload or /pluginname help). Take a few minutes to test the plugin’s core features to make sure everything is working before you announce it to your players. Similar to installing a plugin on Bludit, the post-install configuration is where the real customization happens.
Troubleshooting Common Issues
When plugins don’t load or behave strangely, the culprit is usually one of a few common issues:
- Incompatible version: The plugin was built for a different Minecraft version. Check the plugin’s supported versions and download the correct build.
- Missing dependencies: The plugin requires another plugin (e.g., Vault, ProtocolLib) that isn’t installed. Install the dependency first, then restart.
- Multiple versions: You have two versions of the same plugin in the plugins folder. The server will try to load both, causing conflicts. Delete the old version.
- Corrupted .jar: The download failed or the file was modified. Re-download from the official source.
- Using /reload instead of restart: The
/reloadcommand can cause memory leaks and plugin conflicts. Always use a full restart after adding or updating plugins.
Your server logs (logs/latest.log) are your best friend when troubleshooting. Look for lines containing the plugin’s name and keywords like “error,” “failed,” or “missing.” These messages usually tell you exactly what went wrong. If you see “NoClassDefFoundError” or “ClassNotFoundException,” it’s a dependency issue. If you see “UnsupportedApiVersion,” it’s a version mismatch. Once you know the error, you can search for solutions or ask for help on the plugin’s support Discord or forum.
/reload in production servers. It’s a debugging tool, not a substitute for a proper restart. Many plugin developers explicitly warn that /reload can break things.Post-Install: Optimization and Maintenance
Installing a plugin is easy, maintaining a stable, performant server with 10+ plugins is an ongoing process. The key is to be deliberate about what you add and proactive about updates and configuration. Start with a minimal set of essential plugins (permissions, economy, teleports, anti-cheat) and add more as you identify specific needs. Every plugin adds overhead—memory usage, CPU cycles, and potential conflicts—so resist the temptation to install everything that looks cool. I’ve seen servers with 40+ plugins that were borderline unplayable because of lag and conflicts. Less is often more.
Basic Configuration and Best Practices
When you add a plugin, spend time reviewing its config file and documentation. Disable features you don’t need, adjust permissions to match your server’s roles, and customize messages to fit your server’s theme. This not only improves performance but also creates a more cohesive experience for your players. For example, if you install EssentialsX, you probably don’t need every single module enabled—turn off the ones you don’t use. If you’re running a small server, you might not need all the anti-cheat features that a 500-player network requires.
Keep your server software and plugins updated. Paper releases bug fixes and performance improvements regularly, and plugin developers do the same. Check for updates every few weeks, read the changelog to understand what’s changed, and test updates in your staging environment before deploying to production. This habit prevents you from falling behind on critical security patches and compatibility updates. It’s also a good idea to follow best practices from other ecosystems, like versioning and documentation.
Performance and Compatibility Considerations
Plugin load order can matter, especially when plugins depend on or interact with each other. Most server platforms handle this automatically, but if you’re running into issues, check your console logs for load order warnings. Some plugins (like Vault) need to load before others can hook into them. If two plugins both try to modify the same game behavior (e.g., chat formatting), the last one to load usually wins—unless there’s a conflict, which can cause crashes or unexpected behavior.
Monitor your server’s performance after adding plugins. Use tools like /timings (built into Paper/Spigot) to see which plugins are using the most CPU time. If a plugin is hogging resources, consider replacing it with a lighter alternative or adjusting its config to reduce load. For instance, some anti-cheat plugins are very aggressive and can slow down servers with lots of players. You might be able to disable certain checks or reduce their frequency without sacrificing protection.
Extending Knowledge: Developer and Community Resources
The Minecraft plugin ecosystem is supported by a robust community and excellent documentation. If you want to go deeper—whether to develop your own plugins or just to understand how they work—there are plenty of resources available. The PaperMC documentation is comprehensive and covers everything from basic plugin installation to advanced API usage. The Bukkit and Spigot wikis provide similar information, though they’re not as actively maintained as Paper’s docs. For community support, join the Paper Discord, SpigotMC forums, or relevant subreddits (r/admincraft is a great resource).
Plugin developers often maintain their own wikis, Discord servers, or GitHub discussions where you can ask questions, report bugs, or request features. Don’t be afraid to engage with these communities—most developers are happy to help, especially if you’ve done your homework by reading the docs first. If you encounter a bug or compatibility issue, file a detailed issue report on the plugin’s GitHub page. Include your server version, plugin version, relevant console logs, and steps to reproduce the problem. This helps the developer fix the issue quickly and benefits the entire community.
Frequently Asked Questions
What is a Minecraft server plugin, and how does it differ from a mod?
A plugin runs on the server side and modifies server behavior (commands, game rules, economy) without requiring clients to install anything. Mods, on the other hand, usually require both server and client to install matching files and often use Forge or Fabric. Plugins are easier to manage and don’t affect players’ game clients, making them ideal for public servers.
Do I need a specific server version to run plugins?
Yes, you need a Bukkit-compatible server like Paper, Spigot, or CraftBukkit. Vanilla Minecraft servers do not support plugins. Additionally, the plugin’s version must match your server’s Minecraft version (e.g., a 1.20 plugin won’t work on a 1.19 server). Always check compatibility before downloading.
Can I install plugins on Vanilla Minecraft servers?
No, vanilla servers don’t have the API hooks that plugins require. You must use a Bukkit-compatible server platform (Paper, Spigot, or CraftBukkit) to run plugins. These platforms are drop-in replacements for vanilla servers and support the same worlds and gameplay with added extensibility.
How do I know if a plugin loaded correctly?
Run the /plugins or /pl command in-game or in your server console. Plugins that loaded successfully will appear in green; those with errors will show in red. You can also check your server logs for loading messages and error details. Green means good; red means you need to troubleshoot.
What are common plugin sources, and how do I evaluate trust?
Trusted sources include Hangar (PaperMC’s official repository), SpigotMC Resources, BukkitDev, and verified GitHub releases from established developers. Look for recent updates, clear documentation, positive reviews, and active community support. Avoid random file-sharing sites or sketchy forums—malicious plugins can compromise your server.
What if a plugin doesn’t load or shows as red in the list?
Check your server logs for error messages. Common causes include missing dependencies (e.g., Vault, ProtocolLib), version incompatibility (plugin built for 1.21, but you’re running 1.20), or corrupted .jar files. Install any missing dependencies, verify version compatibility, and re-download the plugin if necessary. If the issue persists, consult the plugin’s documentation or support forum.
Are there recommended essential plugins for most servers?
EssentialsX (commands, homes, warps), LuckPerms (permissions management), Vault (economy API), CoreProtect (rollback/logging), and WorldEdit (world management) are common starting points. Anti-cheat plugins like Matrix or Spartan are also popular. Choose plugins based on your server’s specific needs—not every server requires every plugin.
Can I install multiple plugins at once?
Yes, but it’s better to add them one at a time, especially if you’re new to server management. This makes it easier to identify which plugin is causing an issue if something breaks. If you’re adding a large set of plugins (e.g., migrating from another server), test them in a staging environment first and review logs carefully after each restart.
What’s the difference between a plugin reload and a server restart?
A server restart stops and starts the entire server process, clearing memory and reinitializing all plugins. A /reload command attempts to unload and reload plugins without stopping the server, but it can cause memory leaks and plugin conflicts. Most developers recommend full restarts, especially when adding or updating plugins. Use /reload only for quick config changes during testing, never in production.
How do I update a plugin without breaking my server?
First, back up your server (seriously). Download the new version of the plugin, stop your server, replace the old .jar in the plugins folder with the new one, and restart. Check the plugin’s changelog for any breaking changes or new config options. Test in a staging environment if the plugin is critical. If something breaks, you can roll back to your backup and the old plugin version.
Final Thoughts: Building a Plugin-Powered Server That Lasts
Installing plugins on a Minecraft server isn’t rocket science, but it does require a methodical approach. Choose Paper or Spigot for broad compatibility and performance. Download plugins from trusted sources like Hangar or SpigotMC. Always back up before making changes. Install manually by uploading .jar files to the plugins folder, or use your host’s control panel for one-click installs. Verify with /plugins, check your logs for errors, and configure each plugin to fit your server’s needs. Start small, test thoroughly, and expand gradually.
Your Next Step: Pick one essential plugin (EssentialsX, LuckPerms, or CoreProtect) and install it following the manual process outlined above. Get comfortable with the workflow, then gradually add more plugins as you identify specific needs. Treat your plugin selection like a curated toolkit—every tool should serve a clear purpose and be maintained with care. Happy server building!
Was this article helpful?