5 Steps to Delete Multiple Directories in WordPress Business Directory Plugin
Generating summary...
Managing a WordPress directory site means dealing with an inevitable reality: not every listing deserves to stay forever. Whether you’re running a thriving business directory with hundreds of submissions or a niche network that’s evolved beyond its original scope, the time comes when you need to prune outdated entries efficiently. But here’s the catch most site owners miss—bulk deletion isn’t just about clicking a button and watching entries vanish. It’s a high-stakes operation that can crater your SEO, break internal links, and leave orphaned data scattered across your database like digital debris. The Business Directory Plugin for WordPress offers powerful bulk management tools, yet most users never learn to wield them safely. This guide walks you through a five-step framework that balances speed with surgical precision, ensuring you can delete multiple directories without the typical collateral damage.
TL;DR – Quick Takeaways
- Always backup first – Full database and media backups are non-negotiable before any bulk deletion operation
- Test in staging – Run your deletion workflow in a staging environment to catch unintended consequences before they hit production
- Filter precisely – Use the Business Directory Plugin’s built-in filters (status, category, date range) to narrow your deletion scope and avoid mistakes
- Monitor orphaned data – Bulk deletions leave behind orphaned media files, taxonomy terms, and metadata that require separate cleanup
- Document everything – Keep logs of what you delete, when, and why—future-you will thank present-you when something goes wrong
1) Assessing What to Delete
Before you touch a single delete button, you need a clear-eyed view of what actually deserves removal. The worst bulk deletion disasters I’ve seen (and yes, I’ve seen plenty) started with good intentions but zero triage discipline. Your first job is establishing objective criteria for what counts as “stale” or “unwanted.” For most directories, listings that haven’t been updated in 12-24 months, duplicate entries from the same business, or categories you’ve deprecated are prime candidates. The Business Directory Plugin tracks last-modified dates and activity metrics—use them ruthlessly.

Open your directory’s admin panel and start by filtering listings by “last updated” date. Look for entries that haven’t changed in over a year, then cross-reference them against your site analytics to see if they’re generating any traffic. According to Forbes research on data hygiene, outdated records that generate zero engagement for 18+ months carry negligible SEO value but significant maintenance overhead. If a listing hasn’t been clicked, viewed, or updated in that timeframe, it’s dead weight.
Identify stale or unwanted directories/listings
Quick triage starts with three hard filters. First, status flags: abandoned drafts, expired listings, or entries marked “pending review” for months signal neglect. Second, duplicate detection: search for businesses with nearly identical names, addresses, or phone numbers—these often result from users resubmitting when they forgot login credentials. Third, category orphans: if you’ve restructured your taxonomy and certain categories no longer align with your business listing solution strategy, flag all their member listings for review.
The Business Directory Plugin’s listing management screen lets you sort by these criteria, but here’s a pro tip: export your full listing dataset to a spreadsheet first. You’ll spot patterns (like a batch of spam submissions from the same IP range or a wave of registrations that never completed onboarding) that are invisible when browsing paginated admin screens. Mark your candidates for deletion with a clear reason code—it helps during the audit phase.
Map dependencies and backups
Every directory listing ties into a web of dependencies: featured images, gallery attachments, custom field data, taxonomy terms, user relationships, and sometimes payment/transaction records. Before you delete anything, document these connections. Run a quick audit by selecting a representative “doomed” listing and noting every piece of related data—categories it belongs to, tags, custom fields populated, and any media library items attached. Multiply that complexity by however many listings you’re about to nuke, and you’ll understand why this step matters.
Backups are your insurance policy, plain and simple. Create a full database export using your hosting control panel or a plugin like UpdraftPlus (not an endorsement, just a widely-used option). Also back up your /wp-content/uploads/ directory—deleted listings may orphan images that you’ll later want to recover or reassign. According to W3C accessibility and data preservation guidelines, maintaining versioned backups with clear restore points is a baseline operational practice. Decide now what constitutes a “safe” restore point: can you afford to lose a day’s worth of new submissions if the deletion goes sideways, or do you need hourly snapshots?
2) Preparing Your WordPress Site
Preparation separates professionals from amateurs when it comes to bulk operations. You wouldn’t perform surgery without sterilizing instruments, yet site owners routinely attempt mass deletions on live production sites with zero safety net. The preparation phase is where you build that net, and it revolves around two pillars: bulletproof backups and a staging environment where mistakes cost nothing.
Start with a complete site snapshot. Your hosting provider may offer one-click backups (many managed WordPress hosts do), but verify the backup actually includes both the database and the entire /wp-content/ directory. Test the restore process on a throw-away subdomain or local environment—a backup you’ve never restored is an untested backup, which is the same as no backup. I learned this the hard way years ago when a “successful” backup turned out to have corrupted during transfer, leaving me with nothing when a client’s bulk delete spiraled. Don’t be me.
Backups and staging
Your staging environment doesn’t need to be fancy, it just needs to be isolated. Many WordPress hosts (WP Engine, Kinsta, Flywheel) offer staging as a built-in feature; if yours doesn’t, use a plugin like WP Staging or Duplicator to clone your live site to a subdomain. The key is testing your exact deletion workflow—same filters, same selection criteria, same bulk action—and then thoroughly auditing the result. Check that the right listings vanished, related media behaves as expected, and no critical pages broke.
Staging lets you discover edge cases before they bite you. For example, you might find that deleting a listing doesn’t automatically remove its associated featured image from the media library, bloating your uploads folder. Or that certain custom fields populated by third-party plugins throw errors when their parent listing disappears. According to Statista data on WordPress adoption, millions of sites run complex plugin ecosystems where interactions aren’t always predictable—staging is where you map those interactions without consequences.
Analyzing directory structure in Business Directory Plugin
The Business Directory Plugin organizes listings into a hierarchical structure of categories, tags, and custom taxonomies, with each listing potentially belonging to multiple groupings. Before you execute any bulk action, spend time in the plugin’s directory management screen understanding how your content is organized. Navigate to the “Manage Listings” section and experiment with the built-in filters: sort by category, filter by status (published, pending, expired, draft), and sort by last modified date. Each filter combination reveals a different slice of your directory.
Plan your deletion scope with surgical precision. Instead of selecting “all expired listings,” consider narrowing further: “expired listings in the ‘Restaurants’ category that haven’t been updated since 2022.” This granular approach minimizes collateral damage. The plugin’s bulk action dropdown (usually at the top or bottom of the listing table) offers “Move to Trash” and “Delete Permanently”—the former is reversible for 30 days, the latter is instant and irreversible. For your first few bulk operations, always choose “Move to Trash” so you have a recovery window. Once you’re confident in your criteria, you can switch to permanent deletion for future cleanups.
If your directory uses custom post statuses beyond WordPress defaults (some advanced setups do), verify that the Business Directory Plugin’s bulk actions respect those statuses. Some third-party extensions add statuses like “claimed,” “verified,” or “premium” that may not appear in standard filters. Check the Business Directory Plugin knowledge base documentation to understand how these interact with bulk operations, and always test the behavior in staging first.
Document your planned deletion scope in a simple text file: “Plan: Delete all listings in ‘Automotive’ category with status ‘expired’ and last modified before [specific date]. Expected count: ~150 listings. Dependencies: 12 shared tags, 3 custom fields, approx. 200 associated images.” This documentation serves two purposes—it forces you to think through the operation step-by-step, and it becomes your audit trail if something goes wrong. Plus, if you’re working with a team or collaborating with business listing solution providers, written scope prevents miscommunication.
3) Executing Bulk Deletion
Using built-in Bulk Actions in Business Directory Plugin
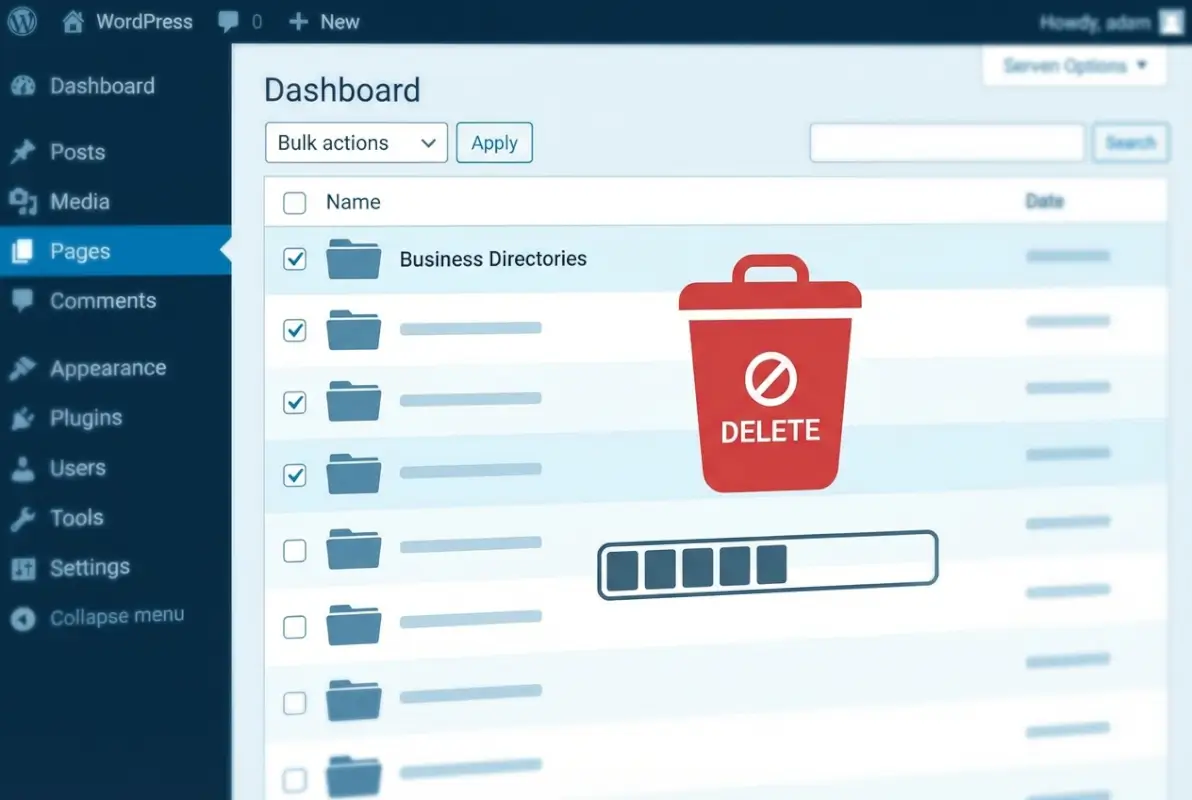
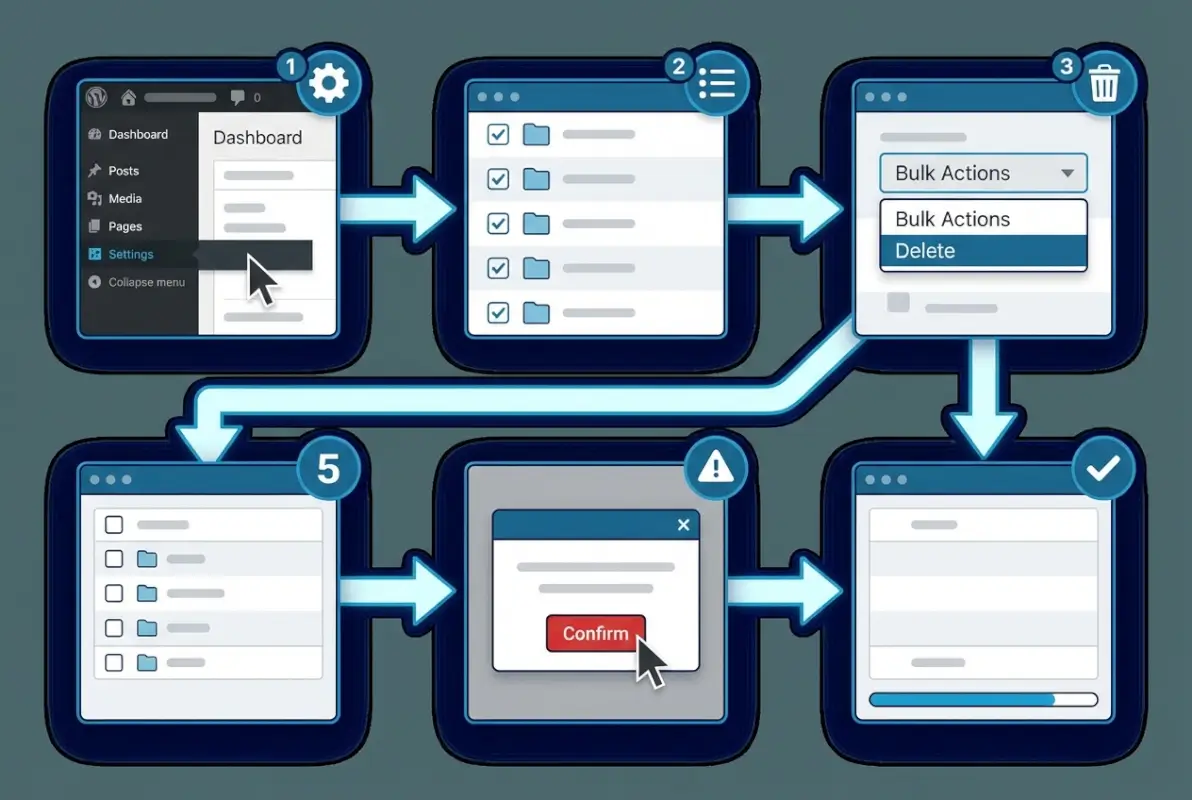
The Business Directory Plugin provides a familiar, table-based interface for managing listings that mirrors WordPress’s native post-management screen. From your WordPress dashboard, navigate to Business Directory → Manage Listings to access the full list of directory entries. At the top of the table you’ll see a checkbox to select all visible listings, plus individual checkboxes for each row; use the filters (status, category, date range) at the top of the page to narrow your view to exactly the candidates you identified in step one.
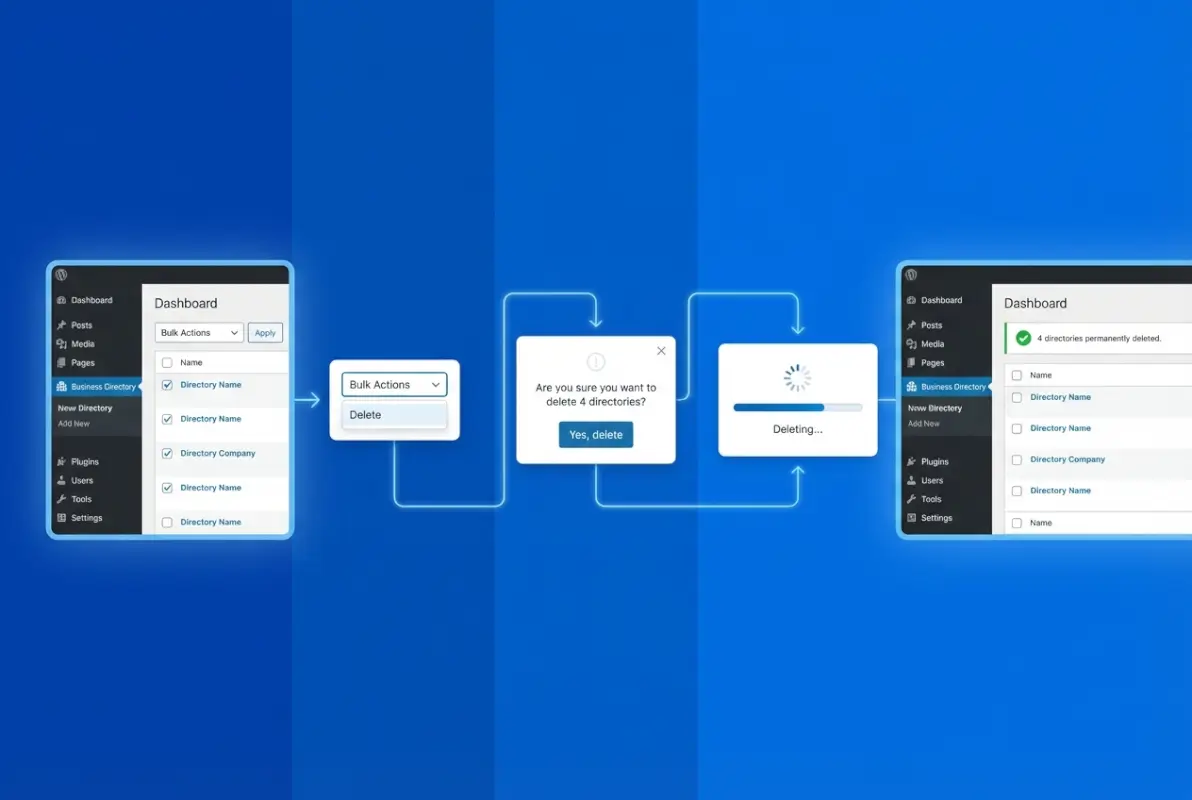
Once you’ve applied your filters and selected the listings you want to remove, choose either Move to Trash or Delete Permanently from the Bulk Actions dropdown, then click Apply. Trash is the safer default—it moves listings to a holding area where they remain recoverable for 30 days—while permanent deletion removes them from the database immediately with no built-in undo. Always start with Trash on your first pass, verify the results, then empty the trash manually if you’re confident the deletions are correct.
Pay close attention to the filter state before you click Apply: selecting “All” with no active filters will queue every listing in your directory for deletion. Cross-reference the count displayed (e.g., “42 listings selected”) against your documented scope from step one to catch any unintended selections. If the numbers don’t match, reset your filters and re-apply them one criterion at a time until you isolate the correct set.
After applying the bulk action, the plugin will reload the page and display a success message at the top confirming how many listings were trashed or deleted. Navigate to Business Directory → Manage Listings → Trash to inspect what was removed; you can restore individual items from this view if you spot any mistakes. This intermediate checkpoint is your safety net—don’t skip it, and don’t empty the trash until you’ve completed the verification steps in section four.
Using general WordPress bulk deletion tools
If the Business Directory Plugin’s native bulk actions don’t support the specific criteria you need—for example, deleting by custom-field value, author, or a complex date pattern—supplement with a dedicated bulk-deletion plugin like Bulk Delete or WP Bulk Delete. These tools extend WordPress’s core bulk-management capabilities to cover advanced filters, scheduled deletions, and dry-run previews that show exactly what will be removed before you commit. Install and activate your chosen plugin from the WordPress.org repository, then access it via Tools → Bulk Delete (or the equivalent menu entry).
Before running any bulk operation, use the plugin’s preview or dry-run feature to generate a list of affected post IDs and titles. Compare this list against your documented scope from step one; if the count or specific entries don’t align, refine your filters and re-run the preview until they match. Most bulk-deletion plugins offer options to skip trash and delete permanently—resist this unless you’ve already tested the exact workflow on your staging site and confirmed the outcome.
Be aware that general bulk-deletion plugins operate on WordPress’s post architecture, so they may not recognize Business Directory Plugin’s custom meta or taxonomy relationships. After a bulk delete via a third-party tool, check for orphaned media (featured images, gallery uploads) and orphaned taxonomy terms (categories, tags) that the plugin didn’t clean up automatically. You’ll address these in the next section, but noting them now will streamline your cleanup checklist.
| Tool | Best For | Preview Mode? |
|---|---|---|
| Business Directory Plugin Bulk Actions | Standard filters (status, category, date) | No (use Trash as preview) |
| Bulk Delete plugin | Advanced criteria (custom fields, authors, regex) | Yes (dry-run with post IDs) |
| WP-CLI (wp post delete) | Scripted, repeatable operations | Partial (–dry-run flag in some commands) |
4) Post-Deletion Cleanup
Cleaning up orphaned data and media
Bulk deletion often leaves behind orphaned media files, post meta rows, and taxonomy terms that are no longer attached to any active listing. Navigate to Media → Library and filter by “Unattached” to surface images and documents that were previously associated with the deleted listings; manually review this list to confirm each file is truly unused, then select and delete in batches. For database-level orphans—meta rows, term relationships, and transients—install a plugin like Advanced Database Cleaner or WP-Optimize to scan and remove stale entries without hand-editing SQL.

After clearing orphaned data, regenerate your site’s XML sitemap to ensure search engines no longer crawl URLs for the deleted listings. If you’re using a plugin like Yoast SEO or Rank Math, navigate to the plugin’s settings and click the regenerate or rebuild button; if you rely on WordPress’s built-in sitemap (/wp-sitemap.xml), it updates automatically, but you should verify by visiting the URL in your browser. Clear any full-page or object caches (Redis, Memcached, or plugin-based caches like WP Rocket) to prevent stale listing data from appearing on your front end.
Finally, rebuild any custom indexes or caches that the Business Directory Plugin maintains. From Business Directory → Settings → Advanced, look for options to flush cache, rebuild listings, or re-index search data; run these operations to align the plugin’s internal state with the updated database. If your site uses an external search service (Algolia, ElasticSearch), trigger a full re-index from that service’s dashboard to remove the deleted listings from search results.
Verifying site integrity and SEO
With the deletions complete and orphaned data cleared, systematically test for broken internal links and 404 errors. Install a plugin like Broken Link Checker to scan your site’s content and flag any links pointing to the now-deleted listing URLs; update or remove these links in posts, pages, and widgets to preserve a clean user experience. If you have a large site, run the scan during off-peak hours to avoid performance slowdowns.
Check Google Search Console for a spike in 404 errors over the days following your bulk deletion. If the deleted listings were indexed, you’ll see crawl errors appear in the Coverage report; for a small number of high-value URLs, set up 301 redirects to relevant category pages or a general directory landing page using a plugin like Redirection. For bulk URLs with minimal traffic, simply mark them as “Fixed” in Search Console once you’ve confirmed they’re no longer linked internally—Google will eventually drop them from the index.
Review your internal linking structure to ensure that any navigational elements (menus, related-listing widgets, breadcrumbs) no longer reference the deleted entries. Test a sampling of category and tag archives to confirm that pagination and counts are accurate; the Business Directory Plugin should handle this automatically, but manual spot-checks catch edge cases. Document any SEO-related changes (redirects, de-indexed URLs, updated sitemaps) in your site’s runbook so future administrators understand the deletion’s impact.
5) Long-Term Hygiene and Automation
Scheduling regular cleanups
Establish a recurring cadence for listing audits—quarterly or bi-annually is typical for most directories—to prevent the accumulation of stale, duplicate, or low-quality entries. Block time on your team calendar to review listing activity reports (last updated date, page views, submissions) and flag candidates for the next bulk deletion cycle. Use the same triage criteria from step one (no activity in 12–24 months, duplicates, deprecated categories) to maintain consistency across cleanup rounds.

Automate the identification step by setting up scheduled reports or queries that surface potential candidates without manual filtering. For example, configure a WP-CLI cron job or a plugin like WP Crontrol to email you a CSV of listings that haven’t been updated in 18 months; review the list at your leisure, then run the bulk deletion when you’re ready. This transforms cleanup from a reactive fire drill into a predictable maintenance task.
Document your cleanup workflow in a shared runbook or standard operating procedure so that any team member can execute it safely. Include step-by-step instructions (filters to apply, backup verification, post-deletion checklist), links to this guide, and contact information for escalation if something goes wrong. Regular, documented cleanups reduce the risk of runaway data bloat and keep your directory’s performance and relevance high.
Implementing safeguards and logs
Enable change logging or audit trails to capture who performed bulk deletions, when, and what scope was applied. Plugins like Simple History or WP Activity Log record post-deletion events, user actions, and filter states, creating a forensic record you can reference if data goes missing unexpectedly. Configure these plugins to retain logs for at least 90 days and restrict access to administrator roles only.
Implement role-based safeguards by limiting bulk-deletion capabilities to a small group of trusted administrators. Use a plugin like Members or User Role Editor to create a custom capability (e.g., delete_business_directory_listings) and assign it only to users who have completed training on your cleanup workflow. Pair this with two-factor authentication and regular access reviews to minimize the chance of accidental or malicious mass deletions.
Build a rollback plan into your workflow by maintaining at least two generations of full-site backups before any bulk operation. Label each backup with the date, scope, and pre-deletion listing count so you can identify the correct restore point if you need to undo a mistake. Test your restore procedure on staging at least once per year to confirm that backups are valid and that your team knows how to execute a recovery under pressure.
| Safeguard | Implementation | Review Frequency |
|---|---|---|
| Audit logs | Simple History or WP Activity Log plugin | Monthly log review |
| Role restrictions | Custom capability for bulk delete | Quarterly access audit |
| Backup generations | Two labeled full-site backups before bulk ops | Annual restore test |
FAQ: Frequently Asked Questions
How can I bulk delete WordPress listings safely?
Start with a full site backup and staging environment test. Use the Business Directory Plugin’s built-in bulk actions to select listings by criteria like status or date. Filter carefully to avoid accidental deletions, verify trash versus permanent delete settings, and confirm no critical data dependencies exist before executing.
Can I delete multiple Business Directory Plugin listings at once?
Yes. Navigate to the Directory menu in your plugin dashboard, use the filter options to narrow your selection by status, category, or date range, check the boxes for target listings, then apply the bulk delete or trash action from the dropdown menu. Always test in staging first.
What should I back up before performing bulk deletions on WordPress?
Back up your complete WordPress database and uploads folder. This includes all listing data, custom fields, media attachments, taxonomies, and plugin settings. Use a reliable backup plugin or hosting provider tool, verify the backup archive is valid, and store it off-site for safe recovery if needed.
How do I recover a listing after accidental deletion?
If the listing was moved to trash, restore it immediately from the WordPress Trash view. For permanently deleted listings, restore from your most recent backup or use your hosting control panel’s restore point. Document which listings were affected to expedite manual recreation if backups are unavailable.
What are best practices for bulk deleting directory data without harming SEO?
Implement 301 redirects for any deleted listing URLs that had external links or search visibility. Update your XML sitemap immediately, monitor Google Search Console for crawl errors, and fix broken internal links. Schedule regular audits to identify and redirect orphaned URLs before search engines penalize your site.
Should I use a separate bulk delete plugin for WordPress directories?
Use a separate plugin only if the Business Directory Plugin lacks the specific filter or bulk action you need. Plugins like WP Bulk Delete offer advanced criteria and scheduling, but always test in staging to ensure compatibility with your directory structure and verify orphaned data is handled correctly.
How often should I perform bulk cleanup on my WordPress business directory?
Schedule quarterly audits to identify inactive listings, duplicates, and outdated categories. Automate monthly reports on listing activity and status changes. Establish clear criteria for what constitutes stale content, document your cleanup process, and maintain audit logs to track historical deletions and minimize future risk.
Take Action and Keep Your Directory Lean
You now have a proven, five-step framework for safely deleting multiple directories and listings in WordPress, whether you rely on the Business Directory Plugin’s native bulk actions or supplement with a dedicated deletion tool. The key is discipline: back up before you touch anything, test every workflow in staging, document exactly what you plan to remove, and verify the outcome from database integrity to SEO health.
Apply this process the next time you audit your directory. Start small—pick a single category or a handful of stale listings—and walk through each step. You’ll quickly build confidence and speed, making future cleanups routine rather than risky. Set a quarterly reminder to revisit your listings, orphaned media, and taxonomy terms so data bloat never sneaks back in.
Ready to Clean Up Your Directory?
Block out 30 minutes this week to run your first audit. Export a list of candidates, back up your site, spin up a staging clone, and execute a test deletion. The confidence you gain from one successful run will pay dividends every time you need to prune outdated listings or reorganize your directory structure.
Start your cleanup today and keep your WordPress directory fast, relevant, and penalty-free.
Was this article helpful?