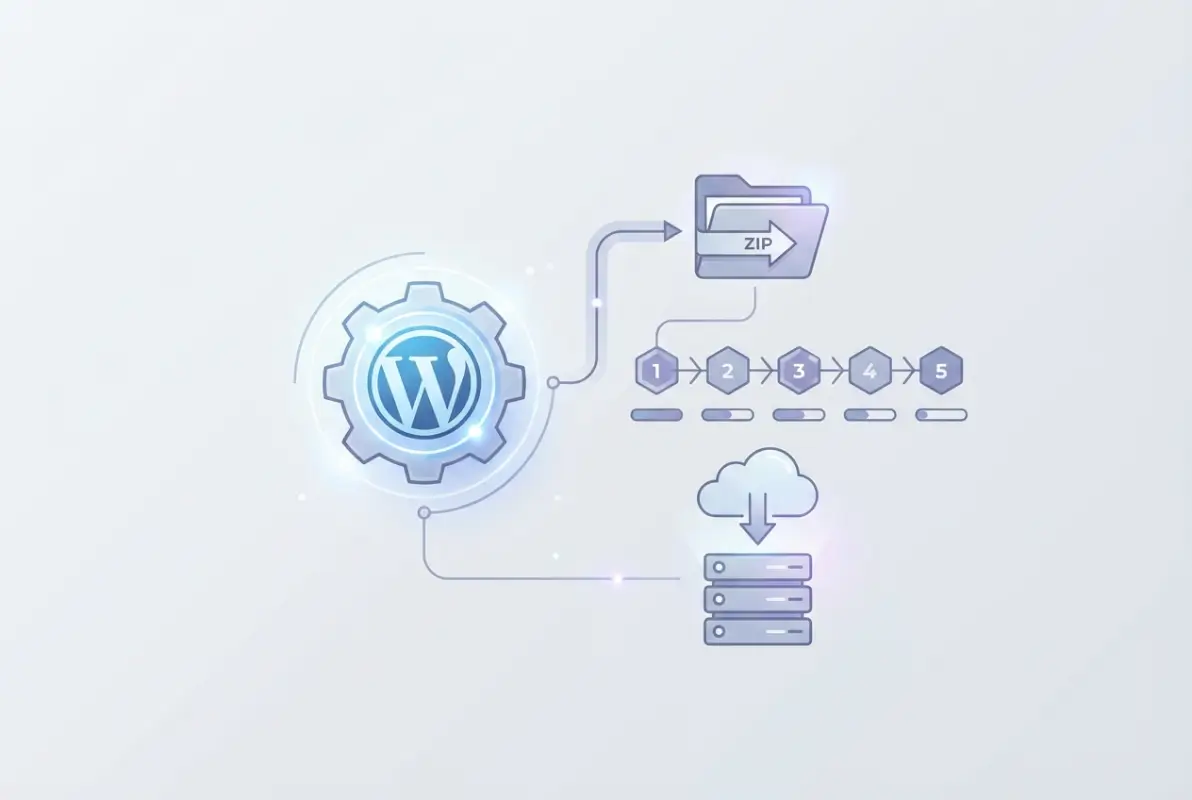
How to Install a WordPress Plugin ZIP File: 5 Simple Steps
Generating summary...
If you’ve purchased a premium WordPress plugin, downloaded a custom-built tool from a developer, or grabbed a plugin ZIP file that isn’t available in the official directory, you’re probably wondering how to get it onto your site. The good news? Installing a WordPress plugin from a ZIP file is one of the most straightforward tasks you’ll tackle as a site owner—yet it’s also one of the most misunderstood. Many beginners assume they need FTP access or developer skills, when in reality WordPress has a built-in uploader that handles the entire process in under five minutes.
What makes this skill essential is its versatility. Premium plugins, beta versions, proprietary tools, and legacy plugins all rely on ZIP-based installation. Unlike the one-click install from the WordPress.org directory, uploading a ZIP gives you control over exactly which version and source you’re using. In this guide, you’ll learn the precise five-step workflow for uploading and activating any plugin ZIP file through your WordPress dashboard, plus troubleshooting tips for common failures, security considerations to protect your site, and alternative methods when server restrictions get in the way.
TL;DR – Quick Takeaways
- Dashboard upload is the standard method – Navigate to Plugins > Add New > Upload Plugin, select your ZIP, and click Install Now
- Never unzip before uploading – WordPress handles extraction automatically; uploading extracted folders causes failures
- Check PHP upload limits first – Server restrictions are the #1 cause of failed uploads; verify limits before attempting large files
- Activation is separate from installation – After upload completes, you must click Activate Plugin to enable functionality
- FTP/SFTP is the fallback – If dashboard upload fails, direct file system access to wp-content/plugins always works
Step 1 — Prepare Your ZIP File and Environment
Before you even open your WordPress dashboard, you need to verify that your ZIP file is actually ready for upload. This might sound obvious, but it’s where most installation failures originate. First, confirm that your downloaded file has a .zip extension and hasn’t been automatically extracted by your operating system (macOS and some Windows configurations do this by default). If you see a folder instead of a ZIP file, you’ll need to re-compress it or download the original ZIP again.
Keep a backup copy of the original ZIP file somewhere safe—external hard drive, cloud storage, wherever you keep important files. Plugin developers sometimes remove older versions from their download portals, and if you need to roll back after an update goes wrong, that backup becomes your lifeline. I learned this the hard way when a premium form plugin update broke my client’s checkout process, and the developer had removed the previous version from their member portal entirely.
Next, you need to check your hosting environment’s PHP upload limits. This is technical but crucial: WordPress uploads are constrained by your server’s php.ini configuration. Most shared hosting accounts default to 2MB–8MB upload limits, which is fine for small plugins but catastrophic for large premium tools that can exceed 50MB. Log into your hosting control panel (cPanel, Plesk, or your host’s custom dashboard) and look for PHP settings or MultiPHP INI Editor. The key directives are:
- upload_max_filesize – Maximum size of a single uploaded file
- post_max_size – Should be slightly larger than upload_max_filesize
- max_execution_time – How long PHP scripts can run (30–60 seconds is often too short for large ZIPs)
- memory_limit – Should be at least 128MB, preferably 256MB or higher
If you don’t have access to these settings, contact your hosting support and ask them to increase the limits. Most hosts will do this immediately for legitimate use cases. According to WordPress developer documentation, the core upload function respects these PHP limits, so there’s no workaround from within WordPress itself—you need server-level changes.
The WordPress plugin ecosystem has remained incredibly active through the mid-2020s, with tens of thousands of developers continuously releasing updates and new tools. This growth means ZIP-based installation remains a core skill, especially as premium plugin marketplaces and custom development continue to thrive outside the official repository. For more on manual installation techniques, there are comprehensive guides available.
Step 2 — Open the WordPress Admin and Navigate to Upload
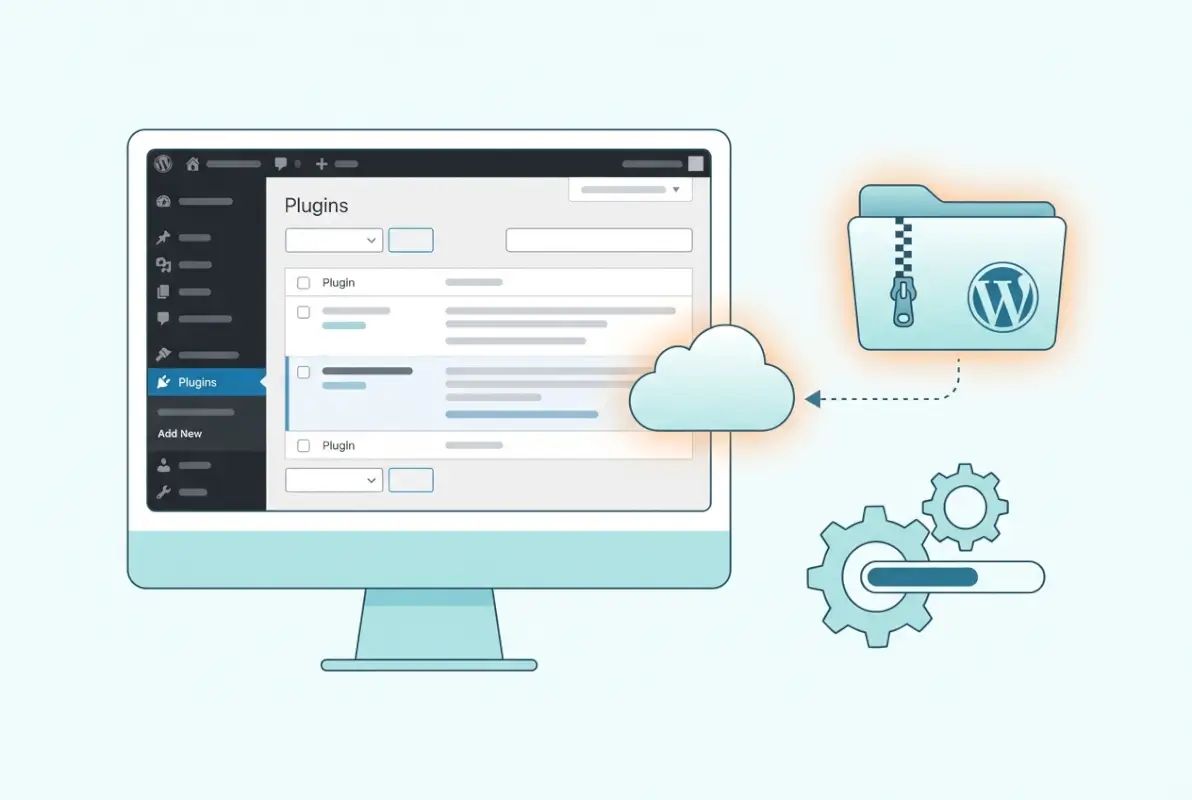
Once your ZIP file is verified and your server environment is ready, it’s time to access the WordPress upload interface. Log into your WordPress dashboard (typically yoursite.com/wp-admin) with your admin credentials. From the left sidebar menu, hover over Plugins and click Add New. This takes you to the plugin installation screen where you’ll see featured, popular, and recommended plugins from the WordPress.org directory.
At the top of this screen, next to the “Search plugins” field, you’ll see an Upload Plugin button. Click it, and the interface changes to reveal a simple file upload form. This is the standard dashboard path for any non-repository plugin installation—whether you’re working with a $200 premium tool or a free plugin downloaded from a developer’s personal site. The interface is identical for both.
One important distinction to understand: if you’re using WordPress.com (the hosted service) rather than a self-hosted WordPress.org installation, the upload functionality depends on your plan tier. Free and Personal plans don’t support custom plugin uploads at all. You need at least a Business plan ($300/year as of recent pricing) to access the Upload Plugin button. If you’re on WordPress.com and don’t see this option, check your plan limitations in Settings > Plan. This trips up many newcomers who assume “WordPress” is one unified platform when it’s actually two distinct ecosystems with different feature sets.
After clicking Upload Plugin, you’re presented with a straightforward interface: a “Choose File” button and an “Install Now” button. This is where your preparation in Step 1 pays off. The interface is clean and minimal because WordPress is designed to handle the complexity behind the scenes—it’ll extract the ZIP, place the files in the correct directory structure, and validate the plugin headers automatically.
Step 3 — Upload the ZIP File
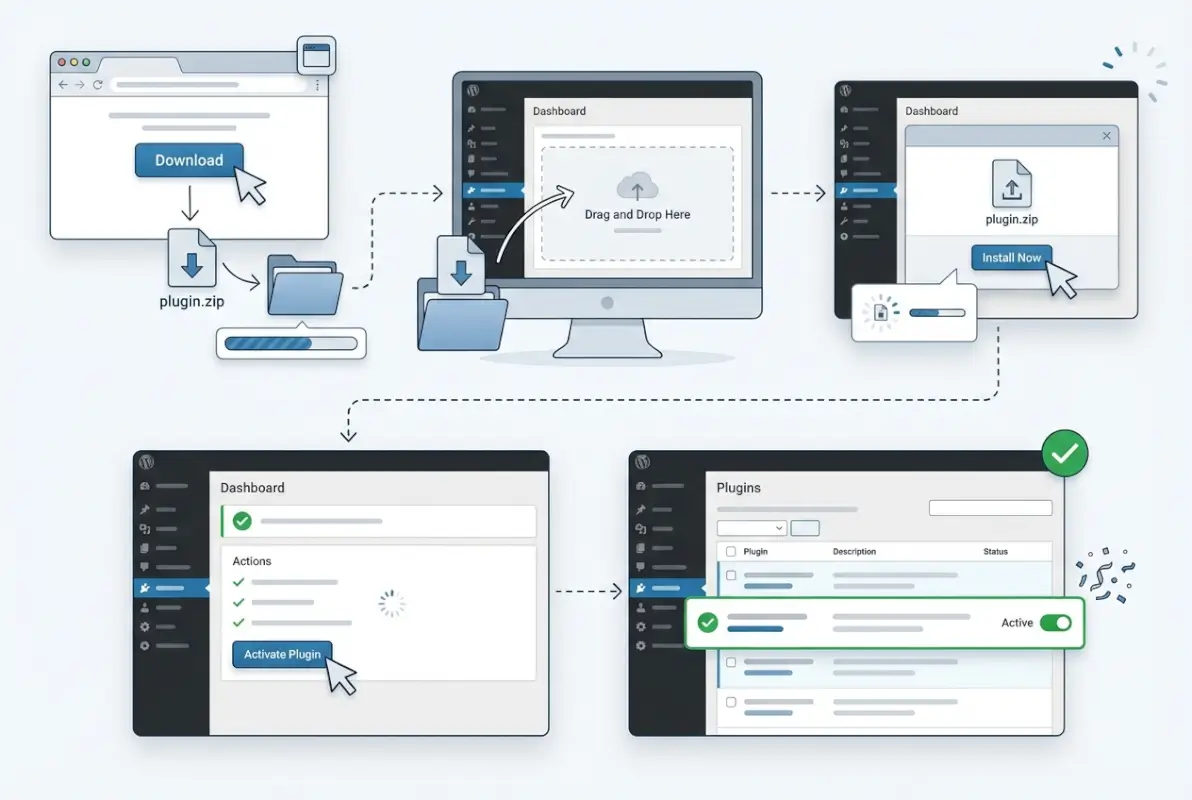
Click the Choose File button and navigate to where you saved your plugin ZIP. Select the file—and this is critical—select the .zip file, not an extracted folder. Your operating system’s file picker should show the file type as “ZIP archive” or similar. Double-check the file extension before clicking Open. Once selected, the filename appears next to the Choose File button, confirming WordPress knows which file you’re about to upload.
Now click Install Now. WordPress immediately begins uploading the ZIP file to your server. Depending on your internet connection speed and the file size, this can take anywhere from a few seconds to several minutes. You’ll see a progress indicator—don’t navigate away from this page or close your browser until the process completes. If you do, you’ll need to start over from the beginning.
What happens next is mostly invisible to you but important to understand: WordPress uploads the ZIP to a temporary directory, extracts its contents, validates the plugin’s headers (checking for required fields like Plugin Name, Version, and Author), and moves the extracted folder to wp-content/plugins/. If any step fails—corrupted ZIP, missing headers, incorrect folder structure—WordPress halts the process and displays an error message. This is why proper ZIP preparation in Step 1 is non-negotiable.
| Common Error | Cause | Solution |
|---|---|---|
| The uploaded file exceeds the upload_max_filesize directive | PHP upload limit too small | Increase server limits via cPanel or contact host |
| Could not create directory | Incorrect file permissions on wp-content/plugins | Set folder permissions to 755 via FTP |
| The package could not be installed (no valid plugins) | ZIP contains wrong folder structure | Extract ZIP, verify structure, re-compress properly |
| Destination folder already exists | Plugin with same folder name present | Delete or rename existing plugin folder first |
When upload and installation succeed, WordPress displays a success message: “Plugin installed successfully.” You’ll also see an Activate Plugin link. Don’t click it yet—we’ll cover activation properly in Step 4. If the installation fails, carefully read the error message. WordPress error messages for plugin uploads are usually specific and actionable, unlike some other CMS platforms where you’re left guessing.
One common pitfall: file name issues. Some plugins use hyphens, others use underscores, and occasionally you’ll encounter spaces (which should be avoided). WordPress handles most of these gracefully, but if you’ve renamed the ZIP file yourself, ensure the name doesn’t contain special characters or spaces. Stick to lowercase letters, numbers, and hyphens for maximum compatibility. For detailed insights on building successful directories, proper plugin management is essential.
Step 4 — Activate and Configure
After installation completes, you must explicitly activate the plugin to enable its functionality. Click the Activate Plugin link on the success screen, or navigate to Plugins > Installed Plugins, find your newly installed plugin in the list, and click Activate beneath its name. The plugin’s status changes from “Inactive” to “Active,” and depending on the plugin, you may see immediate changes to your dashboard sidebar (new menu items) or admin notices prompting configuration.

Many premium plugins require license key activation as a separate step after initial activation. This is not a WordPress requirement—it’s a vendor-specific anti-piracy measure. You’ll typically find a dedicated settings page (often added under Settings or as a top-level menu item) where you enter the license key you received at purchase. Until you complete license activation, some plugins run in limited mode or display persistent admin notices. Follow the vendor’s documentation exactly here, because license activation workflows vary wildly between developers.
After activation, you need to configure the plugin according to its documentation. Don’t assume default settings are optimal for your use case. For example, caching plugins default to conservative settings that may not leverage your server’s full capabilities, while SEO plugins often require extensive initial configuration to avoid conflicts with other tools. Set aside 15-30 minutes for proper configuration on your first install—rushing this step is how you end up with half-working features and support tickets.
Once activated and configured, verify the plugin appears in your Plugins > Installed Plugins list with an “Active” status. Test its core functionality immediately—don’t wait until you need it in production to discover it’s not working correctly. If it’s a contact form plugin, submit a test form. If it’s a backup tool, run a manual backup. If it’s an SEO plugin, check that meta tags appear in your page source. Basic functionality verification takes five minutes and prevents emergency troubleshooting later.
Some plugins also require third-party integrations or API connections during initial setup. Payment gateways need API credentials, email marketing tools need list connections, analytics plugins need tracking codes. Gather all required credentials before starting configuration so you can complete the setup in one session. Leaving plugins partially configured is a security risk (exposed endpoints) and a functional risk (half-working features).
Step 5 — Troubleshooting and Alternatives
When ZIP uploads fail, the solution usually falls into one of three categories: server configuration, file integrity, or permissions. We covered server limits in Step 1, but if you’ve verified upload_max_filesize and post_max_size are adequate and uploads still fail, check max_execution_time and memory_limit. Large plugin ZIPs can require 90+ seconds to process on slower servers, and default execution limits of 30 seconds cause timeouts mid-extraction.

File integrity issues are less common but harder to diagnose. If you downloaded the ZIP via a flaky internet connection, the file might be corrupted. Most browsers don’t validate ZIP integrity during downloads. Re-download the ZIP from the original source and compare file sizes—a corrupted ZIP is often slightly smaller than the legitimate version. You can also extract the ZIP locally before uploading; if extraction fails on your computer, it’ll definitely fail on the server.
Permissions problems manifest as “Could not create directory” or “Could not copy file” errors. WordPress needs write permissions on wp-content/plugins/ to create plugin folders and copy files. Connect via FTP or your hosting file manager, navigate to wp-content, and verify that the plugins folder has permissions set to 755 (or 775 on some servers). If it’s set to 644 or 444, WordPress cannot write to it. Change permissions to 755, then retry the upload.
| Method | Best For | Technical Level | Speed |
|---|---|---|---|
| Dashboard Upload | Most users, small-to-medium plugins | Beginner | Fast (2-5 min) |
| FTP/SFTP | Large plugins, server limit issues | Intermediate | Medium (5-10 min) |
| SSH/WP-CLI | Bulk installs, automation | Advanced | Very fast (1-2 min) |
When dashboard upload is impossible due to insurmountable server restrictions, FTP/SFTP becomes your fallback. Connect to your server using FileZilla, Cyberduck, or your preferred FTP client (you’ll need FTP credentials from your hosting provider). Navigate to /public_html/wp-content/plugins/ (path may vary slightly by host). Create a new folder for your plugin, then extract the ZIP on your local computer and upload the extracted folder’s contents into the new folder you created on the server. Once uploaded, return to your WordPress dashboard, navigate to Plugins > Installed Plugins, and activate the plugin normally.
Security considerations become paramount when installing plugins from ZIP files. Unlike the WordPress.org repository, where plugins undergo review by the plugin team, ZIP files from third-party sources have no validation layer. This means malicious code, security vulnerabilities, or simply bad programming can make it onto your site. Only download ZIPs from developers you trust—preferably those with established reputations, active support channels, and transparent development practices. For those exploring directory-building strategies, choosing reputable plugins is crucial.
After successfully installing any plugin via ZIP, maintain discipline around updates. Premium plugins typically deliver updates through their own update mechanisms (requiring license activation), while free plugins distributed outside the repository don’t receive automatic update notifications at all. Set calendar reminders to check for updates manually, or use a plugin management tool that monitors third-party plugin versions. Running outdated plugins is one of the top three causes of WordPress security breaches, according to major security vendors.
Best Practices and Quick-Start Checklist
Before every ZIP plugin installation, run through this checklist to minimize risk and maximize success rates. First, verify the ZIP source is legitimate. If you purchased the plugin, download only from your account dashboard on the vendor’s official site. If it’s a free plugin, download only from the developer’s own site—never from file-sharing platforms or plugin aggregators. These third-party hosts sometimes inject malware or outdated versions into otherwise-legitimate plugin ZIPs.
Second, back up your entire site before installing any new plugin. This sounds paranoid until you experience a plugin conflict that crashes your site at 2 AM. Most hosts offer one-click backups; use them. If your host doesn’t, install a dedicated backup plugin first (ironic, but necessary). A full backup before plugin installation gives you a rollback point if anything goes wrong during activation or configuration.
- Download only from official sources – Vendor sites, not third-party aggregators
- Verify file integrity – Check file size matches vendor documentation; re-download if suspicious
- Confirm server environment – PHP version, upload limits, memory allocation adequate for plugin requirements
- Back up before installation – Full site backup (files + database) before any plugin changes
- Test in staging first – If available, install and test on staging before production
- Document configuration – Take screenshots of settings; you’ll thank yourself during troubleshooting
- Monitor performance impact – Check page load times before and after; some plugins are resource hogs
- Set update reminders – Third-party plugins don’t auto-notify; schedule manual update checks
Regularly audit your installed plugins, both active and inactive. Inactive plugins still represent security risks because WordPress loads certain files even when plugins aren’t activated. If you’re not using a plugin, delete it entirely—don’t just deactivate. This reduces your attack surface and simplifies maintenance. Aim for the minimum number of plugins that deliver the functionality you need; there’s no prize for having 50+ plugins installed.
Compatibility verification prevents most catastrophic failures. Before installing a plugin ZIP, check its compatibility with your WordPress version. Look for this information in the plugin’s documentation or readme file (you can extract the ZIP temporarily and read readme.txt). Most premium plugins list compatibility requirements on their sales pages. If a plugin hasn’t been updated in two years and you’re running the latest WordPress version, that’s a red flag—proceed with extreme caution or find an alternative. Those managing business directories know this maintenance is non-negotiable.
Real-World Examples and Typical Scenarios
Consider a common scenario: you’ve purchased WPForms Pro from their official site for $199/year. After checkout, you receive an email with download credentials and log into your WPForms account. You download the ZIP file (wpforms-pro.zip, roughly 12MB), save it to your Downloads folder, and prepare for installation. Your shared hosting account runs PHP 8.1 with 64MB upload limit and 256MB memory limit—adequate for this plugin. You log into your WordPress dashboard, navigate to Plugins > Add New > Upload Plugin, select wpforms-pro.zip, and click Install Now. Upload completes in 15 seconds, WordPress extracts and validates the plugin, and displays the success message. You click Activate Plugin, the plugin adds a WPForms menu item to your sidebar, and you navigate to WPForms > Settings to enter your license key. Total elapsed time: under five minutes.
Contrast that with a more challenging scenario: you’ve hired a developer to build a custom membership plugin, and they deliver a 75MB ZIP file with extensive documentation. Your hosting environment defaults to 8MB upload limit—you know this because you’ve hit the limit before. Before attempting dashboard upload, you contact your host via live chat and request an increase to 100MB. They make the change within 10 minutes. You verify the new limit by checking PHP info (your host’s control panel shows current PHP settings), then proceed with the standard Plugins > Add New > Upload Plugin workflow. This time, upload takes nearly two minutes due to file size, but it completes successfully. However, when you click Activate, you receive a fatal error—the plugin conflicts with another membership tool you have installed. You deactivate the conflicting plugin, reactivate the new custom plugin, and everything works. Total elapsed time: 30 minutes including host contact and troubleshooting. This is reality—not every installation is trivial, but the process itself is consistent.
For WordPress.com users, the experience differs significantly. If you’re on a Business plan and upload a plugin ZIP, the platform runs additional security scans before installation. This can add 30-60 seconds to the process, and WordPress.com may reject plugins that contain code patterns they consider risky (even if the plugin is legitimate). This is one reason many power users prefer self-hosted WordPress—you have full control without platform-imposed restrictions. If you’re serious about advanced plugin usage, self-hosting is usually the better long-term choice.
I remember working with a client who insisted on installing 40+ plugins from various sources because “more features equals better site.” Within a month, their hosting provider issued performance warnings, their dashboard loaded in 8+ seconds, and they had three different security plugins conflicting with each other. We spent a week auditing, removing unnecessary plugins, and consolidating functionality. The lesson: strategic plugin selection beats feature hoarding. Every plugin adds technical debt—installation complexity, maintenance overhead, security surface, and performance impact. Choose wisely, install carefully, maintain diligently. For fundraising-focused sites, check out directory fundraiser strategies that emphasize lean plugin stacks.
Frequently Asked Questions
How do I install a WordPress plugin from a ZIP file?
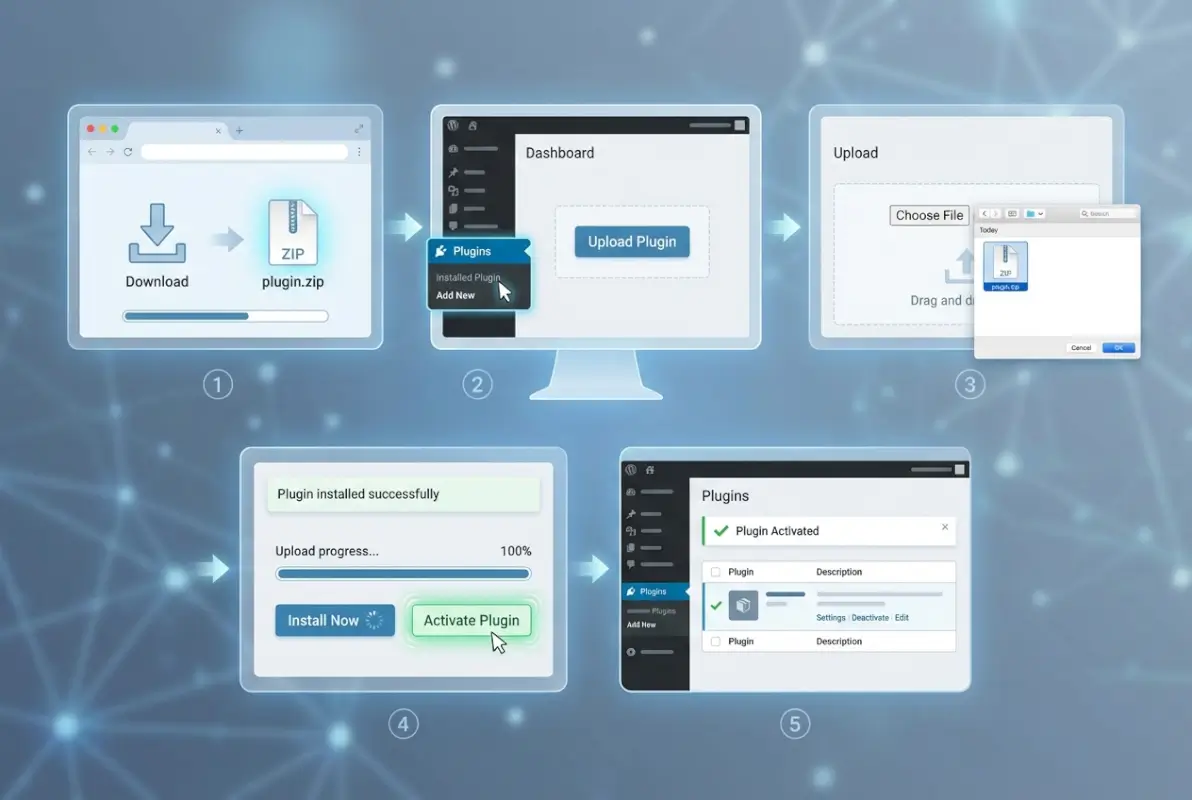
Log into your WordPress dashboard, navigate to Plugins > Add New > Upload Plugin, click Choose File and select your ZIP file, click Install Now, and finally click Activate Plugin after installation completes. The entire process takes 2-5 minutes for most plugins.
Can I install a plugin ZIP file if it’s not in the WordPress repository?
Yes, the Upload Plugin interface accepts any valid plugin ZIP file regardless of its source. This is how you install premium plugins, custom-built tools, and beta versions. Just ensure the ZIP comes from a trustworthy developer to avoid security risks.
What should I do if ZIP upload fails due to server limits?
Contact your hosting provider and request an increase to upload_max_filesize, post_max_size, and max_execution_time. If that’s not possible, use FTP/SFTP to manually upload the extracted plugin folder to wp-content/plugins/ instead of using the dashboard uploader.
Should I unzip the ZIP file before uploading to WordPress?
No, never unzip before uploading via the WordPress dashboard. Upload the ZIP file as-is and WordPress will handle extraction automatically. Only extract the ZIP if you’re using FTP/SFTP to upload directly to the plugins folder.
Do I need to activate a plugin after uploading it?
Yes, installation and activation are separate steps. After the ZIP upload completes successfully, you must click the Activate Plugin link to enable the plugin’s functionality. Until activated, the plugin is installed but has no effect on your site.
Where can I find official guidance on uploading plugin ZIP files?
The WordPress Developer Resources document the install_plugins_upload() function and related processes. Learn WordPress also provides comprehensive tutorials for all user levels.
Are ZIP uploads supported on WordPress.com plans?
Only on Business plan and higher. Free and Personal plans do not allow custom plugin installation. If you’re on a lower-tier plan, you’ll need to upgrade or migrate to a self-hosted WordPress.org installation for full plugin flexibility.
What are the most common reasons plugin ZIP uploads fail?
The top causes are server upload size limits (too restrictive), incorrect file permissions on wp-content/plugins (usually 644 when it should be 755), corrupted ZIP files from incomplete downloads, and malformed ZIPs with incorrect internal folder structure.
How can I verify a plugin ZIP is safe before installing?
Download only from the official developer site or reputable marketplaces. Check the file size against vendor documentation to detect tampering. Extract the ZIP locally and review the main plugin file for suspicious code if you have development skills. Run the ZIP through VirusTotal before uploading to production.
Can I use FTP instead of the dashboard to upload plugin ZIPs?
Yes, but you must extract the ZIP first. Connect via FTP, navigate to wp-content/plugins/, create a folder for the plugin, and upload the extracted contents into that folder. Then activate the plugin from your WordPress dashboard as usual.
Take Control of Your Plugin Installations
You now have the complete workflow for installing any WordPress plugin from a ZIP file—from pre-upload environment checks through activation and troubleshooting. This five-step process works identically for premium plugins, custom-built tools, beta versions, and any plugin distributed outside the official repository. The key is preparation: verify your ZIP integrity, confirm server limits are adequate, follow the dashboard path precisely, activate immediately after installation, and troubleshoot methodically when issues arise.
Don’t let plugin installation intimidate you. It’s one of the most empowering skills for WordPress site owners because it breaks the dependency on the official repository and opens up the entire ecosystem of premium and specialized tools. Whether you’re adding a $500 membership plugin or a free custom tool from a trusted developer, the mechanics are identical. Master this workflow once and you’ll never hesitate when a project requires non-repository plugins.
- Audit your current plugins—delete anything inactive or unnecessary
- Document your next plugin install (screenshot each step for future reference)
- Set up a staging environment if your host offers one; test all new plugins there first
- Create a plugin maintenance calendar—schedule quarterly audits and updates
- Bookmark official WordPress documentation for quick reference during troubleshooting
Start with one plugin installation to build confidence with the process. Choose something low-risk—maybe a small utility plugin or a premium tool you’ve been meaning to try. Follow the steps exactly as outlined, and you’ll realize this is far simpler than it seemed from the outside. The WordPress community has spent years refining this workflow to be accessible to non-technical users while remaining powerful enough for advanced deployments. Take advantage of that work and expand your site’s capabilities without artificial limitations.
Was this article helpful?