How to Install a Chrome Plugin in Selenium: A Step-by-Step Guide

Generating summary...
If you’ve ever wondered how to load a Chrome extension in your Selenium tests—whether to simulate real-user plugins, test authentication flows, or debug tricky scenarios—you’ve landed in the right place. Most guides gloss over the security implications and skip the nuances of Manifest V3 (MV3), but here’s the thing: loading extensions in automated tests isn’t just a technical trick, it’s a strategic decision that can make or break your test reliability. In this comprehensive guide, you’ll learn exactly how to install a Chrome plugin in Selenium, covering Python and Java examples, security best practices, and real-world pitfalls I’ve seen teams stumble over. Whether you’re dealing with packed CRX files or unpacked extension folders, we’ll walk through every step—and tackle the gotchas that rarely make it into official docs.
TL;DR – Quick Takeaways
- Chrome extensions can be loaded in Selenium using ChromeOptions, either as a packed CRX file or an unpacked folder—Selenium can’t pull them directly from the Web Store
- Security matters: over 280 million Chrome users have installed dangerous extensions; apply whitelists, audit permissions, and lock versions in test environments
- MV3 changes impact automation: newer extensions may require different permissions or behave unexpectedly in headless mode
- Language-specific syntax varies: Python uses
add_extension()oradd_argument(), Java relies onaddExtensions()oraddArguments() - Verification is critical: always confirm the extension loaded and test its expected behavior within your automated session
Understanding Chrome Extensions and Selenium
Before you dive into code, it helps to understand what a Chrome extension actually is—and why Selenium handles them the way it does. A Chrome extension is essentially a packaged bundle of HTML, CSS, JavaScript, and a manifest file (manifest.json) that defines permissions, icons, and entry points. You’ll encounter extensions in two forms: a packed .crx file (a ZIP-like archive) or an unpacked directory structure. Both work with Selenium, though the method for loading them differs slightly.

Selenium WebDriver controls Chrome via the ChromeDriver binary and the DevTools Protocol. When you launch Chrome through Selenium, it starts a fresh browser profile by default—no history, no cookies, no extensions. That’s intentional: clean state means reproducible tests. But it also means you can’t just “install” an extension from the Chrome Web Store mid-session the way a human would. Instead, Selenium requires you to preload the extension files before the browser starts. This approach offers fine-grained control (you dictate exactly which version runs) but introduces new responsibilities around file management and security audits.
What Is a Chrome Extension (CRX or Unpacked Folder)?
A .crx file is a Chrome-specific archive format, similar to a ZIP, that packages the extension’s manifest and assets. When you install an extension from the Web Store, Chrome downloads a CRX behind the scenes. An unpacked extension, on the other hand, is just the raw folder structure—manifest.json, scripts, images, all sitting in a directory. Developers use unpacked extensions during active development, and testers often prefer them because they’re easier to inspect and modify on the fly. Both formats work in Selenium, though CRX files are more portable (single file vs. entire folder).
How Selenium Interacts with Browser Profiles and Extensions
Selenium doesn’t reuse your everyday Chrome profile (the one with your bookmarks and saved passwords) unless you explicitly point it there. By default, it spins up a temporary profile in a system temp directory. That’s a blessing for test isolation but a curse if you want persistent settings or preinstalled extensions. To load an extension, you configure ChromeOptions—a set of launch parameters—before initializing the WebDriver. ChromeOptions tells Chrome, “Hey, when you start, load these extension files.” Once the browser launches, the extension is active and ready to intercept page events, modify DOM, or handle authentication just as it would for a human user.
Why Selenium Can’t “Live-Load” Web Store Extensions Directly
The Chrome Web Store requires interactive OAuth flows and user consent for extension installs. Selenium lacks the hooks to automate that user interaction cleanly (and Google intentionally makes automated installs difficult to prevent abuse). So the workaround is straightforward: grab the extension files manually, then preload them via ChromeOptions. You can download a CRX from the Web Store using third-party downloaders (use caution and verify hashes), or you can request the unpacked source from the extension’s GitHub repo if it’s open-source. Either way, you’re responsible for verifying the extension’s integrity and compatibility with your Chrome version.
Quick Security Context: Malware Risk Landscape and Manifest V3
Recent security studies revealed that hundreds of millions of Chrome users have installed extensions flagged as dangerous or privacy-invasive. While many were removed from the Web Store, test teams sometimes cache older versions locally. MV3—Chrome’s new extension manifest format—tightens permissions and deprecates background scripts in favor of service workers. That’s great for security but can break older extensions or change how they behave in automated contexts. If your test depends on an extension feature that relied on persistent background pages, you may see unexpected failures post-MV3 migration. Always check the extension’s compatibility with your target Chrome version and MV3 status before committing to it in your suite.
Preparing to Use a Chrome Extension with Selenium
Preparation is half the battle. Before you write a single line of Selenium code, you need to decide which extension you’ll use, acquire the files safely, verify compatibility, and set up a clean test profile. Skipping these steps is like trying to install software without checking system requirements—you’ll hit cryptic errors and waste hours debugging. I remember once spending an entire afternoon troubleshooting why an extension wouldn’t load, only to realize I was running an MV2 extension on a Chrome version that enforced MV3. Lesson learned: always validate versions upfront.

Choose the Extension You’ll Use (CRX vs Unpacked Folder)
Your first decision: CRX or unpacked? CRX files are neat and portable—drop one file into your project repo and you’re done. Unpacked folders offer transparency: you can inspect every script, tweak settings, and commit the source to version control for auditing. If you’re working in a regulated industry (finance, healthcare), unpacked extensions make compliance reviews easier because auditors can literally read the code. If portability and simplicity matter more, go CRX. Just know that Chrome sometimes complains about CRX files from “unknown sources” (anything not from the Web Store), triggering warning popups you’ll need to suppress in your test environment.
Obtain the Extension Files Legally and Safely
Never download extensions from sketchy third-party sites. If the extension is open-source, clone the GitHub repo and build it yourself (many extensions include build instructions). For closed-source extensions, use the Chrome Web Store and a reputable CRX downloader tool (search “chrome extension downloader” and pick one with good reviews). Alternatively, load the extension in a regular Chrome session, navigate to chrome://extensions/, enable Developer Mode, and click “Pack extension” to generate a CRX from the installed files. Always verify file hashes if the extension publisher provides them, and scan downloads with antivirus tools—paranoia pays off in security.
extensions/ folder in your test project. Commit them to version control (if permissible) so all team members use identical versions—avoiding “it works on my machine” syndrome.Verify Extension Compatibility with Your Chrome Version and MV3 Status
Check the extension’s manifest.json file (inside the CRX or unpacked folder). Look for "manifest_version": 2 or "manifest_version": 3. MV2 extensions still run on older Chrome versions but are deprecated; Google has set sunset dates for MV2 support. If your CI uses the latest Chrome stable, you might hit compatibility issues with MV2 extensions. Test locally first, and if you encounter problems, look for an updated version or a MV3-compatible fork. Some extensions never migrated to MV3 and remain stuck on MV2—consider that a red flag for long-term maintainability in your test suite.
Create a Clean Chrome Profile for Selenium Tests
Selenium creates temporary profiles by default, but you can also point it to a persistent user data directory. For extension testing, a persistent profile can help if the extension stores configuration in local storage or IndexedDB. However, persistent profiles accumulate cruft (cookies, cache, history) that can pollute test runs. My recommendation: use a dedicated test profile stored in your project directory (e.g., test-profile/), and periodically wipe it between major test runs to ensure clean state. You’ll specify this profile path in ChromeOptions alongside the extension path, giving you full control over both browser state and loaded extensions.
Consider Security: Limit Permissions, Monitor Extensions in CI
Extensions can request broad permissions—access to all websites, clipboard data, network requests. In a test environment, those permissions might expose sensitive test data or credentials. Review the manifest’s "permissions" array and question anything excessive. If you’re testing in a CI/CD pipeline, ensure the extension can’t phone home to analytics servers or ad networks (some extensions do this). Consider network-level controls (firewall rules, proxy configs) to block outbound connections from extensions during test runs. Enterprise environments can enforce extension whitelists and policies via Chrome management tools, ensuring only approved extensions load—even in automated contexts.
Loading a Chrome Extension in Selenium (Cross-Language, with Concrete Examples)
Now for the meat: actually loading the extension in Selenium. The process is conceptually the same across languages—configure ChromeOptions, pass the extension path, initialize the driver—but syntax varies. We’ll cover the general approach, then drill into Method A (packed CRX) and Method B (unpacked folder), with language-specific nuances for Python and Java. If you’re using another language (JavaScript, C#), the patterns are similar; consult your Selenium binding’s ChromeOptions documentation and adapt accordingly.
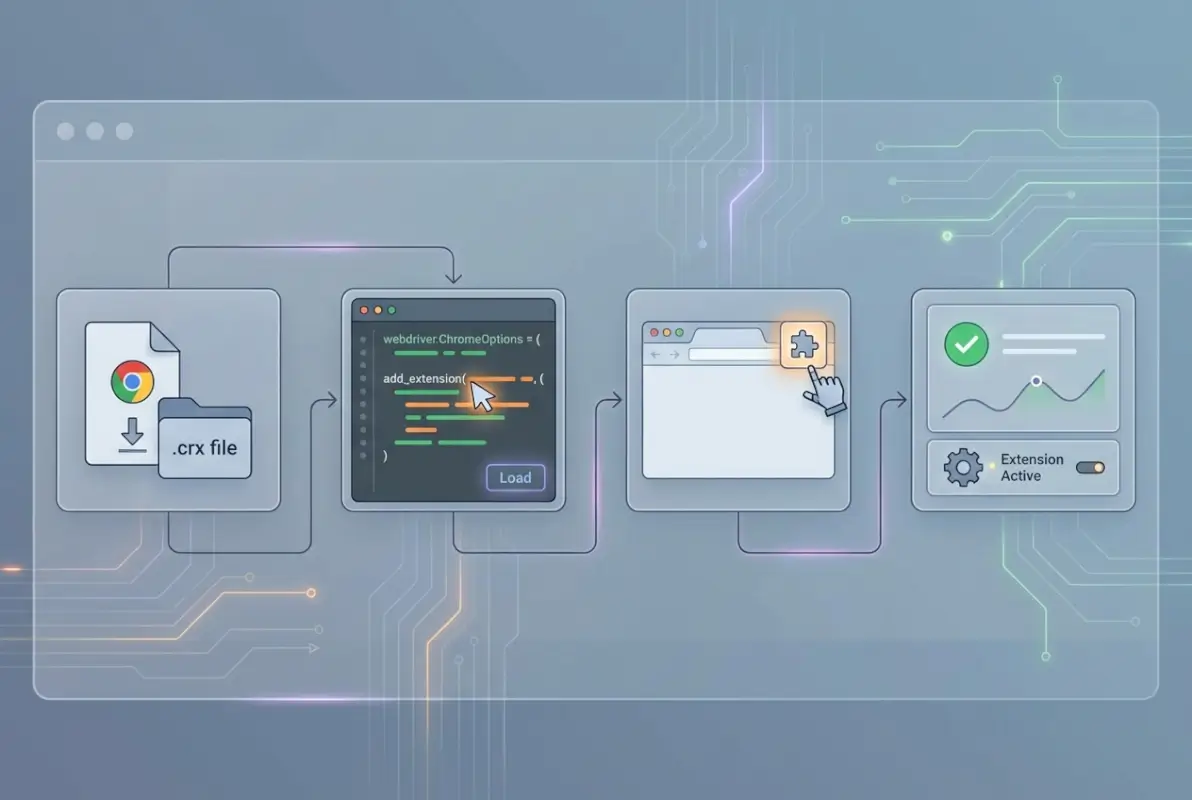
General Approach
Selenium’s ChromeOptions object is your gateway to browser customization. You instantiate ChromeOptions, call methods to add extensions or command-line arguments, then pass that options object to the ChromeDriver constructor. The key methods are addExtensions() (for CRX files) and addArguments() (for unpacked folders via the --load-extension flag). Both work; which you choose depends on whether you have a CRX or a folder. Once the driver starts, Chrome automatically loads and activates the extension—no further action needed. From there, navigate to a test page and verify the extension’s behavior (more on verification later).
Method A — Loading a Packed CRX File
Packed CRX files are handled via the addExtensions() method (Python) or addExtensions() method (Java). Here’s the step-by-step outline:
- Prepare/locate your extension.crx: Place the file in a known directory, e.g.,
./extensions/my-extension.crx. - Configure ChromeOptions: Create a ChromeOptions instance and call the appropriate method to add the CRX path.
- Initialize ChromeDriver: Pass the options object to the WebDriver constructor.
- Verify: Navigate to a test page and check that the extension is active (look for UI changes, network requests, or console logs).
Pseudocode example:
options = ChromeOptions()
options.add_extension("/absolute/path/to/extension.crx")
driver = ChromeDriver(options)
driver.get("https://example.com")
# Verify extension behavior here
driver.quit()
In Python, the method is add_extension() (singular). In Java, it’s addExtensions() (plural) because it accepts a File object. Always use absolute paths or resolve relative paths to absolute at runtime to avoid “file not found” errors.
Method B — Loading an Unpacked Extension Folder
Unpacked extensions require the --load-extension Chrome command-line flag. You pass this via addArguments() in ChromeOptions, supplying the absolute path to the extension folder (the one containing manifest.json). The steps are:
- Unpack or point at the extension folder: Ensure the folder structure is intact (manifest.json at the root).
- Use load-extension approach: Call
options.add_argument("--load-extension=/path/to/extension"). - Initialize driver: Pass options to ChromeDriver.
- Verify: Test the extension’s functionality as you would with a CRX.
Pseudocode example:
options = ChromeOptions()
options.add_argument("--load-extension=/absolute/path/to/extension-folder")
driver = ChromeDriver(options)
driver.get("https://example.com")
# Verify extension behavior
driver.quit()
Unpacked extensions are more transparent—you can edit scripts between runs without repackaging—but they’re also more fragile (missing a file breaks the load). Choose this method when you need to debug or modify extension code during test development. If you want to learn more about managing plugins and configurations, check out this guide on installing and activating plugins in other contexts—similar principles of versioning and setup apply.
Language-Specific Nuance Snapshots
Python: Use webdriver.ChromeOptions() from the selenium.webdriver module. Method names are add_extension(path) for CRX and add_argument("--load-extension=path") for unpacked. Python’s file handling is straightforward—just ensure paths are strings and use os.path.abspath() to resolve relative paths if needed.
Java: Use org.openqa.selenium.chrome.ChromeOptions. For CRX, call addExtensions(new File("/path/to/extension.crx")) (note the plural and File object). For unpacked, call addArguments("--load-extension=/path/to/folder"). Java’s strong typing means you’ll need to import java.io.File, and path handling differs slightly on Windows vs. Linux (use File.separator or Paths.get() for cross-platform code).
Other languages (JavaScript/Node, C#, Ruby) follow similar patterns. Consult the Selenium official documentation for your binding, and look for ChromeOptions or DesiredCapabilities examples. The core concepts—absolute paths, preload before driver start—remain constant across languages.
Practical Walkthrough: Python Selenium Example
Let’s walk through a complete Python example, from installation to verification. This is the workflow I use when onboarding new testers—it’s simple, repeatable, and exposes common pitfalls early. We’ll load a CRX file, navigate to a test page, and confirm the extension is active by checking for expected side effects (e.g., modified page content or network requests). If you’re following along, you’ll need Python 3.7+, pip, and Chrome installed locally.
Prerequisites
First, install Selenium and download a matching ChromeDriver binary. Open a terminal and run:
pip install selenium
Next, download ChromeDriver from the official site (ensure the version matches your Chrome browser version—check chrome://version/ in Chrome). Place chromedriver in a directory on your PATH, or note the absolute path to pass to Selenium. Finally, obtain a CRX file or unpacked extension folder. For this example, let’s assume you have my-extension.crx in a folder called extensions/ at the same level as your script.
Script Outline
Here’s the full Python script with inline comments:
import os
from selenium import webdriver
from selenium.webdriver.chrome.options import Options

# Resolve absolute path to the extension
extension_path = os.path.abspath("extensions/my-extension.crx")

# Create ChromeOptions and add the extension
chrome_options = Options()
chrome_options.add_extension(extension_path)

# Optional: suppress "disable developer mode extensions" warning
chrome_options.add_experimental_option("excludeSwitches", ["enable-automation"])
chrome_options.add_experimental_option("useAutomationExtension", False)

# Initialize the driver with options
driver = webdriver.Chrome(executable_path="/path/to/chromedriver", options=chrome_options)

# Navigate to a test page
driver.get("https://example.com")

# Verify the extension loaded (example: check page title or console logs)
print(driver.title)

# Clean up
driver.quit()
If you’re using an unpacked extension instead, replace chrome_options.add_extension(extension_path) with:
chrome_options.add_argument(f"--load-extension={extension_path}")
(and ensure extension_path points to the folder, not a CRX file). Run the script with python test_extension.py. Chrome should launch, the extension should load, and you’ll see the test page. If the extension modifies the page (e.g., injects a banner, blocks ads), you’ll notice those changes. If not, proceed to verification steps below.
binary_location in ChromeOptions: chrome_options.binary_location = "/path/to/chrome". This is common on Linux systems with non-standard Chrome installs.Common Issues and Troubleshooting
Here are the top issues I’ve seen (and how to fix them):
- MV3 permission errors: MV3 extensions may require you to accept permissions interactively. Selenium can’t click those popups automatically, so you’ll need to preapprove permissions or modify the manifest to request minimal permissions.
- Headless mode limitations: Some extensions don’t load in headless Chrome because they rely on UI elements. Try running in headed mode first (
chrome_options.add_argument("--headless")disabled) to confirm the extension works, then troubleshoot headless separately. - Profile isolation: If the extension saves state (localStorage, IndexedDB), ensure you’re not reusing profiles between unrelated tests. Either use temporary profiles or clear state manually between runs.
- File path typos: Double-check that
extension_pathis correct and the file exists. A simpleprint(os.path.exists(extension_path))can save you minutes of head-scratching.
For more detailed troubleshooting, consult the GeeksforGeeks Python Selenium extension guide, which covers additional edge cases and platform-specific quirks.
Practical Walkthrough: Java Selenium Example
Java developers face similar steps but with more verbose syntax and strong typing. If your team uses Java for test automation (common in enterprise environments), here’s how to load a Chrome extension using Selenium WebDriver for Java. We’ll assume you’re using Maven or Gradle to manage dependencies and have the Selenium Java bindings already included in your project.

Prerequisites
Add Selenium WebDriver to your pom.xml (Maven) or build.gradle (Gradle). For Maven, include:
<dependency>
  <groupId>org.seleniumhq.selenium</groupId>
  <artifactId>selenium-java</artifactId>
  <version>4.15.0</version>
</dependency>
(Use the latest version available; Selenium 4.x is current as of this writing). Download ChromeDriver and place it in a known location, or use WebDriverManager to handle binary downloads automatically (highly recommended for Java projects).
Script Outline
Here’s a complete Java example class:
import org.openqa.selenium.WebDriver;
import org.openqa.selenium.chrome.ChromeDriver;
import org.openqa.selenium.chrome.ChromeOptions;
import java.io.File;

public class ExtensionTest {
    public static void main(String[] args) {
        // Set the path to ChromeDriver (or use WebDriverManager)
        System.setProperty("webdriver.chrome.driver", "/path/to/chromedriver");

        // Create ChromeOptions
        ChromeOptions options = new ChromeOptions();

        // Add the CRX extension (use File object)
        File extensionFile = new File("/absolute/path/to/extension.crx");
        options.addExtensions(extensionFile);

        // Optional: suppress automation flags
        options.setExperimentalOption("excludeSwitches", new String[]{"enable-automation"});

        // Initialize ChromeDriver
        WebDriver driver = new ChromeDriver(options);

        // Navigate to test page
        driver.get("https://example.com");

        // Verify extension (check title or page source)
        System.out.println(driver.getTitle());

        // Clean up
        driver.quit();
    }
}
For an unpacked extension, replace options.addExtensions(extensionFile) with:
options.addArguments("--load-extension=/absolute/path/to/extension-folder");
Compile and run with javac ExtensionTest.java && java ExtensionTest (or via your IDE’s run configuration). Chrome should launch with the extension loaded. If you’re using a build tool, integrate this into your test suite (JUnit, TestNG) and run via Maven/Gradle commands.
Validation Steps
To confirm the extension loaded, check for side effects:
- Page modifications: If the extension injects content (e.g., a notification bar), use
driver.findElement(By.id("extension-banner"))to locate it. - Network interception: If the extension blocks ads or modifies requests, navigate to a page with ads and confirm they’re missing (or check the network log via DevTools Protocol).
- Console logs: Execute JavaScript to read
console.logentries if the extension writes debug info to the console.
For enterprise projects, consider adding assertions (e.g., assertTrue(driver.getTitle().contains("Expected"))) to fail the test if the extension didn’t load correctly. This ensures CI builds catch extension issues early, before they cascade into flaky tests downstream. If you need to install extensions or plugins in other systems, the principles are similar—check out this guide on installing WordPress plugins from ZIP files for a comparable workflow in a different domain.
Common Pitfalls and Debugging Tips
Java-specific issues include:
- Profile conflicts: Java’s ChromeDriver sometimes reuses cached profiles if you don’t explicitly set a user data directory. Use
options.addArguments("--user-data-dir=/path/to/profile")to isolate profiles. - Wrong path references: Windows backslashes (
\) in paths can break if not escaped or if using raw strings. Use forward slashes orFile.separatorfor cross-platform compatibility. - MV3 compatibility: Same as Python—ensure the extension’s manifest version matches your Chrome version’s capabilities. If you see “Extension failed to load” errors, check the Chrome console (run
chrome://extensions/manually to see detailed error messages).
Alternative Approaches and Workarounds
Loading extensions via ChromeOptions is the standard path, but it’s not the only one. Depending on your constraints—headless runs, CI limitations, or corporate policies—you might need alternative strategies. Let’s explore a few workarounds and when to use them.
Direct Web Store Loading Limitations
As mentioned earlier, Selenium can’t automate Web Store installs due to OAuth and user-consent requirements. Some teams have tried workarounds like automating clicks on the “Add to Chrome” button via Selenium actions, but that’s unreliable (UI changes, timing issues, CAPTCHA) and often violates Web Store terms of service. The recommended practice is to download the CRX once, cache it in your repo or artifact store, and preload it via ChromeOptions. This approach also locks the extension version—critical for reproducible tests. If you’re interested in managing resources and links at scale, see this local business directory guide for insights on organizing assets and dependencies.
Third-Party Tooling or Libraries
For Python, libraries like webdriver-manager automate ChromeDriver downloads but don’t directly handle extensions. However, you can combine webdriver-manager with custom logic to fetch and cache extension CRX files from a private server or S3 bucket. Java developers might use Maven plugins to download extensions as build artifacts. The key is to integrate extension management into your existing build/dependency pipeline rather than treating it as a manual step—automation for the automation, if you will.
Headless vs. Headed Runs
Some extensions don’t work in headless Chrome because they rely on popup windows, clipboard access, or UI overlays. If your tests must run headless (common in CI), test the extension in headed mode locally first to ensure it functions. If it breaks headless, consider alternatives: mock the extension’s behavior with injected JavaScript, or use a headed Docker container with a virtual display (Xvfb on Linux). Headless limitations are a Chrome quirk, not a Selenium issue, so don’t spin your wheels trying to “fix” Selenium—work around Chrome’s constraints instead.
Best Practices for CI/CD Pipelines
In CI, reproducibility is king. Pin extension versions just as you pin browser versions and Selenium versions. Store extensions in artifact repositories (Artifactory, Nexus) or alongside your test code in version control (if permissible). Use environment variables to specify extension paths so you can swap them between dev, staging, and prod environments without code changes. Monitor extension load times—large extensions or slow startup scripts can add seconds to each test run, multiplying across hundreds of tests. If an extension becomes a performance bottleneck, profile it or find a lighter alternative. For more on managing directories and resources in automated workflows, this monetize business directory guide offers parallel strategies for organizing and scaling content.
Maintaining Extension Updates vs. Fixed Versions
Should you always use the latest extension version, or lock to a specific version? It depends on your risk tolerance. Latest versions bring bug fixes and security patches but also introduce breaking changes. My recommendation: lock to a known-good version in production test suites, and run a separate canary suite with the latest version to catch issues early. When the canary passes for a few weeks, promote the new version to production. Document the version in a VERSIONS.md file or similar so future developers know what’s deployed. This approach balances stability with proactive maintenance.
| Approach | Pros | Cons |
|---|---|---|
| Packed CRX | Portable, single file | Opaque, harder to debug |
| Unpacked Folder | Transparent, easy to edit | Fragile, requires folder structure |
| Headless Mode | Fast, CI-friendly | Limited UI, some extensions break |
| Headed Mode | Full feature parity | Slower, requires display |
Verification, Validation, and Quality Assurance
Loading an extension is only half the job—confirming it works as expected is the other half. Without proper verification, you might run tests for weeks before realizing the extension never loaded or behaved incorrectly. Here’s how to build robust verification into your test suite, so you catch issues immediately rather than debugging flaky failures later.
How to Verify That an Extension Is Loaded
The simplest check is to navigate to chrome://extensions/ in your Selenium session and scrape the page source for your extension’s name or ID. Here’s a Python snippet:
driver.get("chrome://extensions/")
page_source = driver.page_source
if "My Extension Name" in page_source:
    print("Extension loaded successfully")
else:
    print("Extension NOT loaded")
This method works but is brittle (UI changes break it). A better approach: have the extension inject a known marker into the page (e.g., a hidden <div id="extension-marker">), then check for that marker in your tests. Or, if the extension exposes a background script API, use Selenium’s execute_cdp_cmd (Chrome DevTools Protocol) to query extension state directly. Advanced users can leverage CDP to list installed extensions, check permissions, and even trigger extension actions programmatically.
How to Validate Expected Extension-Driven Behavior
Beyond confirming the extension loaded, validate its side effects. For example:
- Content blocker: Navigate to a page with ads, then assert that ad elements are missing from the DOM (
driver.find_elements(By.class_name("ad"))returns empty list). - Authentication helper: Check that login cookies or tokens are set after the extension auto-fills credentials.
- Page modifier: Verify that injected CSS classes or JavaScript variables are present.
Write assertions that fail if the extension doesn’t behave as expected. Treat extension behavior like any other test dependency—if it’s unreliable, quarantine the test until the extension is fixed or replaced. I once debugged a test suite where an ad-blocker extension was silently failing, causing random test passes and failures depending on whether ads loaded. Adding explicit assertions for blocked content eliminated the mystery and improved test stability overnight.
Recording Results and Logging for Audit Trails
In regulated industries, you may need to prove which extension version ran in each test and whether it functioned correctly. Log extension metadata (name, version, manifest hash) at the start of each test run, and capture screenshots or page snapshots showing extension activity. Store these artifacts in your test reporting framework (Allure, ExtentReports) so auditors can review them. If an extension introduces a compliance issue, you’ll have a paper trail showing exactly when it loaded and what it did.
Re-Run Strategies When MV3 Changes Are Released
Chrome’s MV3 rollout is phased; breaking changes can land unexpectedly in Chrome stable updates. Monitor Chrome release notes and MV3 migration guides (see academic research on extension security for deeper context). When a new Chrome version drops, re-run your extension tests against it before deploying to production. If tests fail, check whether the extension needs an MV3-compatible update or if your test code requires adjustments (e.g., new permission prompts). Proactive monitoring prevents production incidents where tests suddenly break en masse due to browser updates.
Security, Compliance, and Best Practices
Security isn’t an afterthought—it’s foundational when loading third-party code (extensions) into your test environment. A compromised extension can exfiltrate test data, credentials, or even attack your CI infrastructure. Here’s how to harden your setup and comply with organizational security policies.
Security Posture: Limit Extensions to Whitelist
Maintain a whitelist of approved extensions, reviewed by security and approved by leadership. Any extension not on the whitelist is prohibited from test environments. Enforce this via code reviews and automated checks (e.g., a CI script that scans for unauthorized CRX files in the repo). If a developer wants to add a new extension, require a security review: inspect the manifest permissions, audit the source code (if available), and scan for malware with tools like VirusTotal. Enterprise teams can use Chrome’s enterprise controls to enforce whitelists at the browser level, blocking unapproved extensions from loading even if test code tries to load them.
Permissions Hygiene and Frequent Audits
Extensions request permissions in manifest.json—access to all URLs, clipboard, cookies, etc. Review these permissions critically. Does the extension really need access to <all_urls>, or can you restrict it to specific domains? Overprivileged extensions increase attack surface. Conduct quarterly audits: list all extensions in use, review their permissions, check for updates (including security patches), and retire extensions that haven’t been updated in over a year. Stale extensions are security time bombs, especially if the original developer abandoned the project.
Observing and Responding to Malware Risk Trends
Recent studies (like the Forbes report on dangerous extensions) highlight that hundreds of millions of users have installed malicious or privacy-invasive extensions. While test environments are isolated from production data in theory, breaches happen when attackers pivot from test to prod via shared credentials or network access. Stay informed: subscribe to security mailing lists (e.g., Chromium security announcements), follow browser security researchers on social media, and integrate threat intelligence feeds into your security monitoring. If an extension you use is flagged, remove it immediately and assess whether any test data was compromised.
Guidelines Drawn from Recent Security Reporting
Follow best practices from government and industry bodies. For example, the Rwanda Cyber Security Authority published guidelines on securing browser extensions, including least-privilege principles and network segmentation. Apply these to test environments: isolate test browsers in sandboxed VMs or containers, restrict outbound network access, and log all extension activity for forensic analysis. In financial or healthcare contexts, compliance frameworks (PCI-DSS, HIPAA) may mandate specific controls around browser extensions—ensure your test setup aligns with those requirements.
Testing Rationale: When to Use Extensions in Selenium Tests
Not every test needs an extension. Loading extensions adds complexity, maintenance burden, and potential instability. So when should you use them, and when should you avoid them? Here’s a decision framework I share with teams during test planning sessions.
Scenarios Where Extensions Add Value
- Automation helpers: Extensions that auto-fill forms, manage passwords, or handle authentication flows can simplify complex test scenarios—especially in environments where users rely on those extensions in production.
- Debugging aids: Developer tools extensions (e.g., React DevTools, Redux DevTools) help diagnose issues when tests fail, providing visibility into app state that standard Selenium logs don’t capture.
- Content manipulation: Ad blockers, cookie managers, or privacy tools let you test how your app behaves under real-world conditions (many users run ad blockers), ensuring graceful degradation or fallback UI.
- Security testing: Extensions that inject scripts or modify requests help validate CSP policies, XSS protections, or authentication flows—critical for security-focused test suites.
Scenarios Where Extensions May Complicate Test Stability
- Flickering UI: Extensions that inject DOM elements or modify styles can cause race conditions—your test expects a button at coordinates (100,200), but the extension shifts it to (100,250).
- Permission prompts: MV3 extensions may trigger permission dialogs that block test execution. If you can’t preapprove permissions, the test hangs waiting for user input that never comes.
- Performance overhead: Heavy extensions (especially those with analytics or background sync) slow down page loads, inflating test runtimes and increasing CI costs.
- Version drift: If different developers use different extension versions, “works on my machine” problems multiply. Locking versions mitigates this but requires discipline.
Decision Matrix for Including Extensions
| Criteria | Use Extension | Avoid Extension |
|---|---|---|
| Production users rely on it | Yes – test realistic UX | No – mock behavior instead |
| Simplifies test logic significantly | Yes – reduces code complexity | No – adds maintenance cost |
| Extension is open-source/auditable | Yes – security risk is manageable | No – closed-source is riskier |
| Introduces flakiness or slowdowns | No – stability is priority | Yes – avoid if tests become unreliable |
Use this matrix in sprint planning when deciding whether a new test should include an extension. Document the decision in your test plan so future maintainers understand the rationale.
Cross-Browser Considerations
Chrome isn’t the only browser—what about Firefox, Edge, or Safari? Extension loading works differently across browsers, and that impacts test portability. If your test suite needs to run on multiple browsers, here’s what you need to know.
Chrome-Only Extension Loading vs. Firefox/Edge Behavior
Firefox uses WebExtensions (similar to Chrome’s extension API) but loads them via FirefoxProfile and add_extension() in Selenium. The file format is often .xpi instead of .crx. Edge (Chromium-based) supports Chrome extensions and uses the same ChromeOptions syntax, so your Chrome extension code works on Edge with minimal changes. Safari extensions are entirely different—Apple’s extension model doesn’t integrate cleanly with Selenium, so Safari extension testing typically requires XCUITest or manual testing. If cross-browser coverage is a hard requirement, focus on Chrome and Edge (both Chromium), and use Firefox only if you can source or build .xpi versions of your extensions.
Implications for Test Portability and CI Pipelines
If your CI runs tests on Chrome, Firefox, and Edge, you’ll need browser-specific extension files and logic branches in your test code. Use a config file or environment variables to specify which extension file to load per browser. For example:
if browser == "chrome":
    options.add_extension("extensions/extension.crx")
elif browser == "firefox":
    profile.add_extension("extensions/extension.xpi")
Maintain separate extension versions for each browser, or find extensions with cross-browser support (many popular extensions publish to both Chrome Web Store and Firefox Add-ons). Document browser compatibility in your test suite’s README, and tag tests with browser-specific markers (e.g., @chrome_only) so CI can skip incompatible tests automatically. For more on organizing resources and links across multiple platforms, explore this guide on business directory links and SEO—similar principles of cross-referencing and metadata apply.
MV3 Transition and Its Impact on Cross-Browser Automation
MV3 adoption varies by browser. Chrome enforces MV3 aggressively; Firefox is more lenient (still allows MV2 for now). Edge follows Chrome’s timeline. If your extension is MV2, it may work in Firefox tests but fail in Chrome tests post-deadline. Monitor each browser’s extension policy roadmap and plan migrations accordingly. Test your extension on all target browsers in a staging environment before rolling to production CI. Cross-browser testing is hard enough without extension version skew—don’t make it harder by ignoring browser differences.
Frequently Asked Questions (FAQ)
How can I load a Chrome extension into a Selenium test?
Use ChromeOptions in Selenium to load a local CRX file with add_extension() or an unpacked folder with add_argument("--load-extension=PATH"). Initialize the ChromeDriver with those options, and the extension will load automatically when Chrome starts.
Can Selenium load extensions directly from the Chrome Web Store?
No. The Chrome Web Store requires interactive OAuth and user consent, which Selenium cannot automate. Download the extension as a CRX or unpacked folder and preload it via ChromeOptions instead.
What are the best practices for using Chrome extensions in automated tests?
Lock extension versions, audit permissions, store files in version control or artifact repos, verify extension behavior with assertions, and isolate test profiles. Monitor security advisories and update extensions proactively to avoid malware or compatibility issues.
What are common issues when loading extensions with Selenium, and how can I fix them?
Common issues include file path errors, MV3 permission prompts, headless mode incompatibility, and profile conflicts. Fix them by using absolute paths, preapproving permissions, running headed mode initially, and isolating test profiles with --user-data-dir.
Is MV3 a problem for Selenium extension loading?
MV3 can introduce challenges—permission prompts, service worker limitations, and deprecated APIs. Test extensions on your target Chrome version, check MV3 compatibility in the manifest, and update or replace extensions that fail under MV3.
Do Chrome extensions introduce security risks in automated tests?
Yes. Extensions can exfiltrate data, inject malicious scripts, or compromise CI infrastructure. Mitigate risks by auditing permissions, using whitelists, sourcing extensions from trusted publishers, and monitoring for malware alerts.
How do I verify that the extension loaded correctly in a Selenium session?
Navigate to chrome://extensions/ and check page source for the extension name, or have the extension inject a marker element you can assert against. Use browser console logs or Chrome DevTools Protocol to query extension state programmatically.
Are there language-specific differences (Python vs Java vs others) in loading extensions?
Syntax varies: Python uses add_extension(path) or add_argument("--load-extension=..."), Java uses addExtensions(File) or addArguments("--load-extension=..."). Core concepts remain the same—absolute paths, preload before driver init, ChromeOptions configuration.
What are the differences between loading a CRX file vs an unpacked extension folder?
CRX files are portable single archives, loaded via add_extension(). Unpacked folders are raw source directories, loaded via --load-extension argument. CRX is simpler for deployment; unpacked is easier for debugging and modification.
How should I manage extension versions and updates in CI/CD environments?
Lock versions in production test suites to ensure reproducibility, and run a canary suite with the latest version. Store extensions in artifact repos, document versions in a VERSIONS file, and automate version checks in CI to catch drift.
Conclusion: Master Extension Loading for Robust, Realistic Tests
Loading Chrome extensions in Selenium isn’t just a technical exercise—it’s a strategic lever for building test suites that mirror real user environments. By preloading CRX files or unpacked folders via ChromeOptions, you unlock powerful testing scenarios: validating authentication flows with password managers, testing ad-blocking resilience, or debugging complex state with developer tools extensions. But with great power comes responsibility: extensions introduce security risks, compatibility challenges, and maintenance overhead. The key is discipline—audit permissions, lock versions, verify behavior, and integrate extension management into your CI/CD pipeline as a first-class concern.
Whether you’re writing Python scripts for a startup or managing Java-based test suites for an enterprise, the principles remain constant: use absolute paths, preload before driver initialization, validate extension side effects, and stay proactive about MV3 migrations and security advisories. Document your decisions, automate your checks, and treat extensions like any other test dependency—version-controlled, audited, and monitored.
Now go forth and load those extensions—your test suite will thank you, your security team will sleep better, and your end users will benefit from more realistic, reliable automation. If you hit snags, revisit the troubleshooting sections above, lean on the cited resources, and don’t hesitate to ask the Selenium community for help. Happy testing!
Was this article helpful?