How to Install a ZIP Plugin in WordPress: 5 Simple Steps
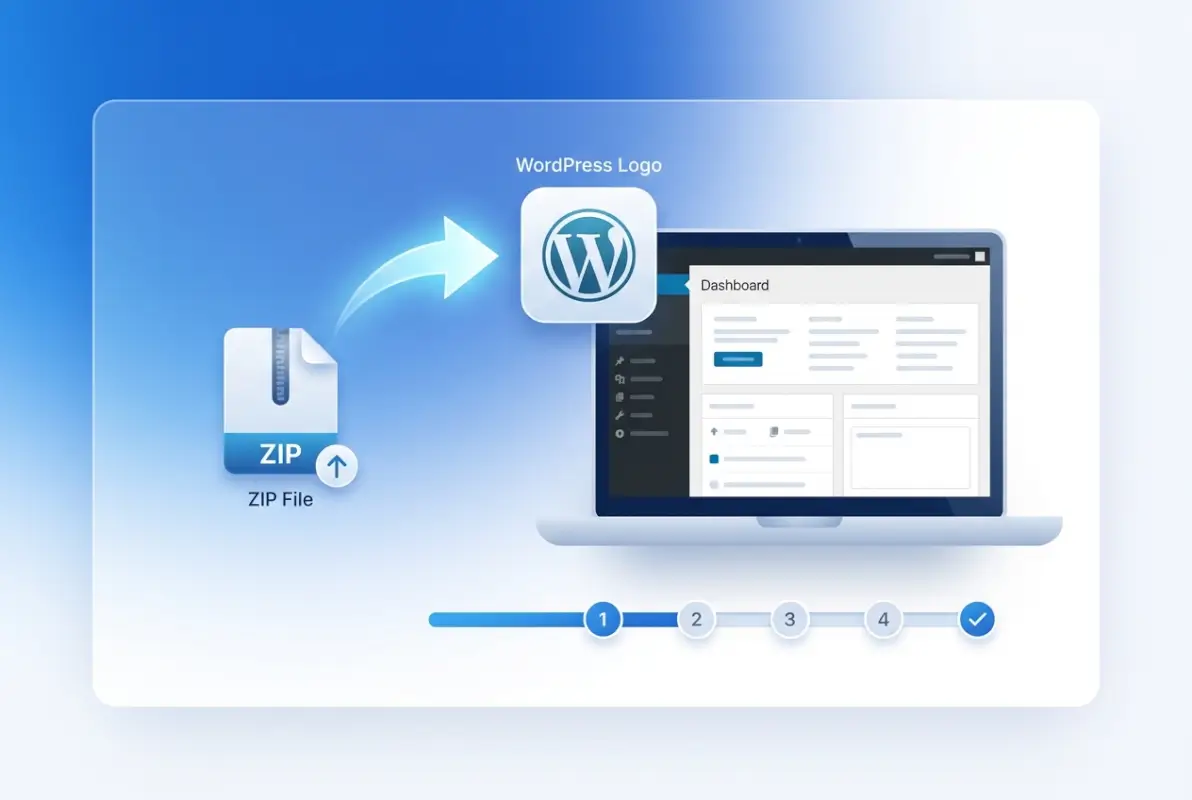
Installing a WordPress plugin from a ZIP file might sound technical, but it’s actually one of the most straightforward ways to add powerful functionality to your site—especially when you’re working with premium themes, third-party tools, or custom-built plugins that aren’t available in the official WordPress repository. I remember the first time I needed to install a premium plugin; I was intimidated by the process, but once I understood the simple five-step workflow, it became second nature.

Here’s what makes ZIP-based installation so valuable: it gives you complete control over what you install and when. Unlike repository plugins that update automatically, ZIP installations let you carefully vet each version, test compatibility in staging environments, and maintain precise version control across multiple sites. This level of control is critical when you’re managing client sites, running mission-critical e-commerce platforms, or working with custom development workflows that require specific plugin versions.
However (and this is crucial), ZIP installation comes with responsibility. Because you’re bypassing WordPress’s built-in vetting process, you must verify your source, confirm compatibility, and maintain rigorous backup practices. In this comprehensive guide, we’ll walk through the exact five-step process to install ZIP plugins safely, explore troubleshooting solutions for common issues, and share best practices that will keep your WordPress site secure and performing at its best.
TL;DR – Quick Takeaways
- Five simple steps – Navigate to Plugins > Add New > Upload Plugin, choose your ZIP file, install, activate, and configure
- Source verification is critical – Only install plugins from trusted vendors, WordPress.org downloads, or licensed premium providers
- Backup before installing – Always maintain current backups and test in staging environments when possible
- Alternative methods exist – FTP/SFTP and WP-CLI offer backup installation routes for restricted hosting environments
- Regular updates matter – ZIP-installed plugins won’t auto-update; you’ll need to manually re-install newer versions
Preparing Your ZIP Plugin File: What You Need Before Starting
Before you even log into your WordPress dashboard, take a moment to verify what you’re about to install. This preliminary step separates professional site administrators from those who end up with compromised sites or broken functionality. The ZIP file itself should come from one of three sources: the official WordPress.org repository (downloaded manually), a reputable premium plugin vendor with proper licensing, or a trusted third-party developer whose credentials you’ve thoroughly vetted.
When evaluating a ZIP plugin file, look for several key indicators of legitimacy. First, confirm the file extension is actually .zip and not something masquerading as a ZIP file (like .zip.exe or other suspicious combinations). Second, if you’re purchasing or downloading a premium plugin, verify you’re on the official vendor website—phishing sites often create near-identical domains to distribute malicious code. Third, check the file size; if a sophisticated plugin weighs only 50KB, that’s a red flag worth investigating.
Premium plugin vendors typically provide ZIP files through customer portals or license management systems. When you purchase a plugin from established marketplaces or directly from developers, you’ll usually receive a download link via email or through your account dashboard. Keep these ZIP files organized in a dedicated folder on your computer, labeled with version numbers and download dates. This organization becomes invaluable when you need to rollback a problematic update or install the same plugin across multiple sites.
One aspect often overlooked: compatibility verification before installation. Most reputable plugin developers include a readme.txt file inside the ZIP archive that specifies minimum WordPress version, PHP requirements, and “Tested up to” information. If you’re running WordPress 6.4 and the plugin was last tested on WordPress 5.2, proceed with extreme caution—or better yet, contact the developer to confirm current compatibility. The few minutes spent on this verification can prevent hours of troubleshooting broken functionality.
Accessing Your WordPress Dashboard and Upload Interface
Now that your ZIP file is verified and ready, log into your WordPress admin dashboard using your administrator credentials. You’ll need full admin privileges for plugin installation—editor or contributor roles won’t have access to this functionality. Once logged in, look for the “Plugins” menu item in the left sidebar navigation. Hovering over “Plugins” reveals a submenu; click on “Add New” to access WordPress’s plugin installation interface.
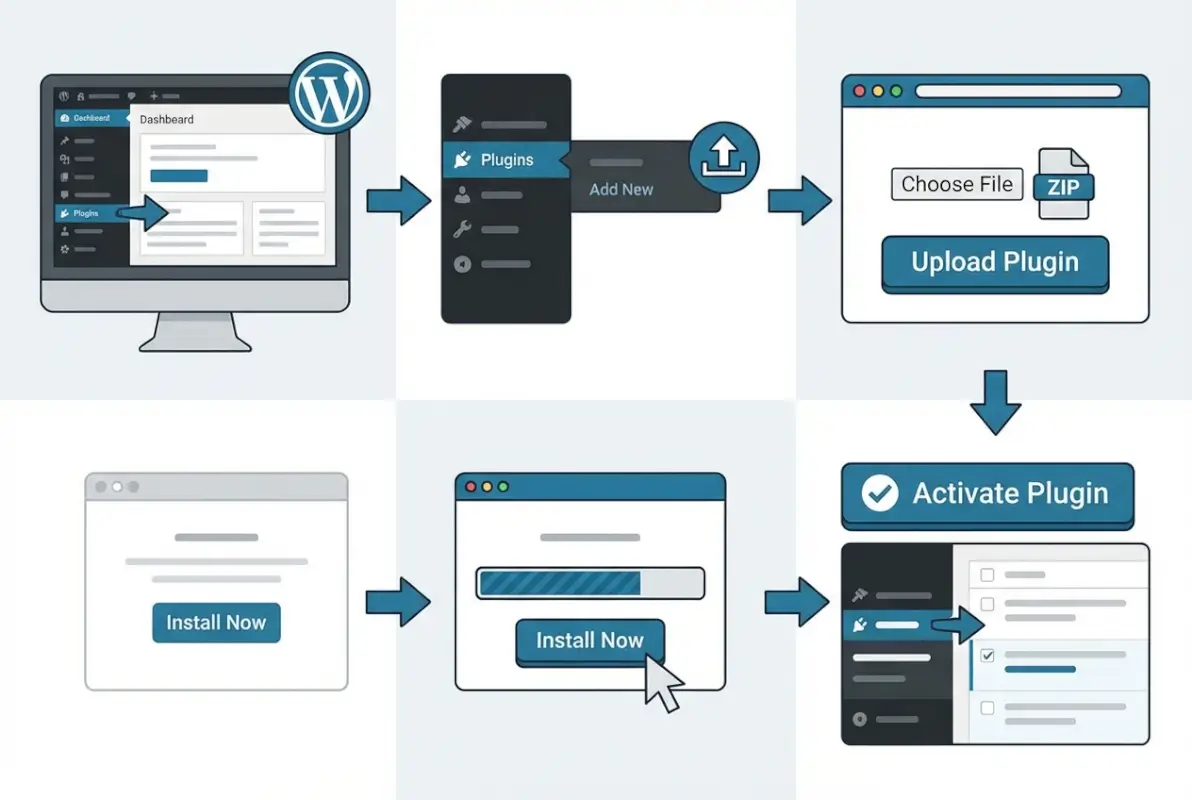
The “Add New” screen typically displays featured and popular plugins from the WordPress.org repository, along with a search function for finding specific plugins by name or functionality. What you’re looking for is less obvious: at the very top of this screen, next to the “Add Plugins” heading, you’ll find an “Upload Plugin” button. This button is your gateway to ZIP-based installation. Click it, and the interface transforms to show a simple file upload form.
This upload interface is deliberately straightforward—WordPress wants to make plugin installation accessible even to users without technical backgrounds. You’ll see a “Choose File” button (the exact label varies slightly across browsers and operating systems) and brief instructions reminding you that you can install plugins in ZIP format. Some modern WordPress installations also support drag-and-drop functionality here, though the traditional “Choose File” method remains the most reliable across all hosting environments.
The Upload and Installation Process: Step by Step
Click the “Choose File” button and navigate to where you saved your verified plugin ZIP file. Select the file and click “Open” (or your operating system’s equivalent). You’ll notice the filename now appears next to the “Choose File” button, confirming WordPress has recognized your selection. Below this, you’ll see an “Install Now” button—this is what triggers the actual upload and installation process.
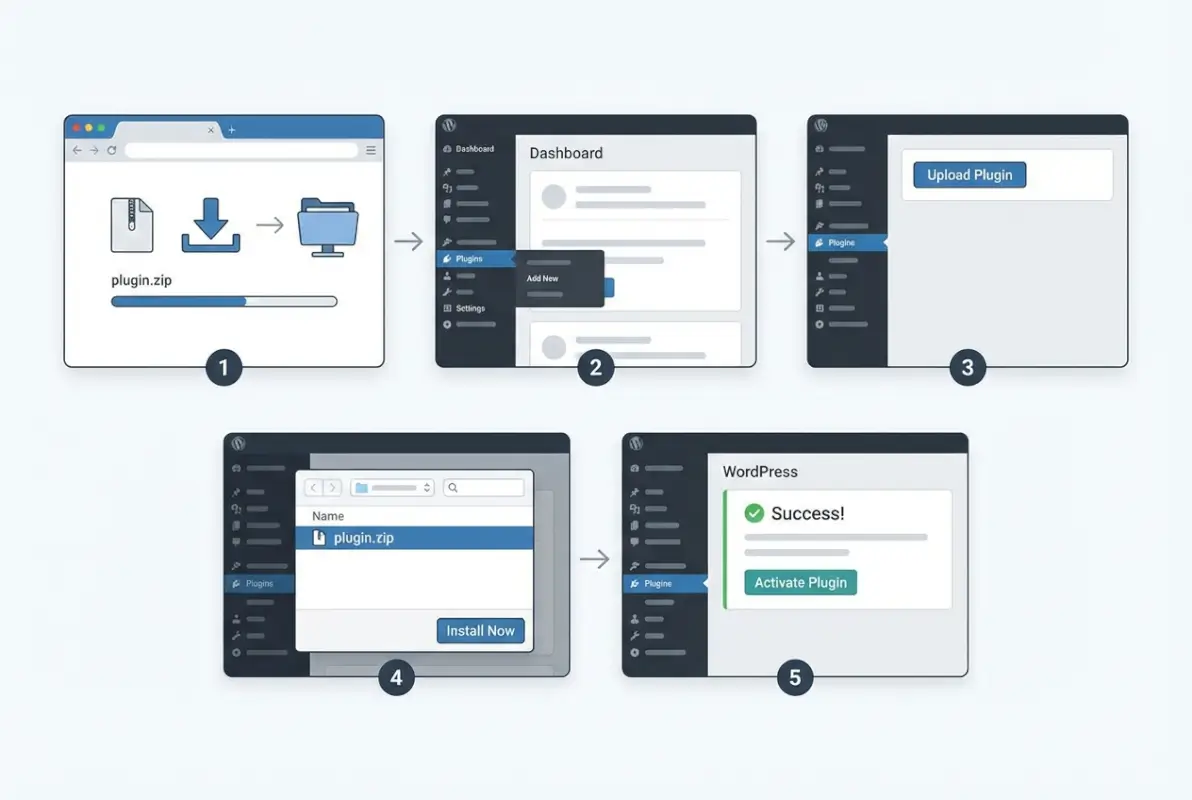
When you click “Install Now,” several things happen behind the scenes. WordPress uploads the ZIP file to your server’s temporary directory, extracts the contents to verify it’s a valid plugin package, checks for naming conflicts with existing plugins, and then copies the extracted plugin folder to your /wp-content/plugins/ directory. This entire process typically takes 5-30 seconds depending on file size and server speed. You’ll see a progress indicator during upload, followed by installation messages as WordPress processes the package.
If everything proceeds smoothly, you’ll land on a success screen with a message like “Plugin installed successfully.” This screen includes two primary options: “Activate Plugin” (which we’ll cover in the next section) and “Return to Plugin Installer.” Don’t navigate away just yet—there’s valuable information on this success screen that many users overlook. WordPress often displays the plugin version number, author information, and a brief description pulled from the plugin’s header file.
| Installation Method | Best For | Technical Level | Speed |
|---|---|---|---|
| Dashboard Upload | Most users, single installations | Beginner | Fast |
| FTP/SFTP Upload | Large files, restricted hosts | Intermediate | Medium |
| WP-CLI | Bulk installs, automation | Advanced | Very Fast |
| Repository Search | Free plugins, auto-updates | Beginner | Fast |
Some hosting environments require FTP credentials during plugin installation. This happens when WordPress doesn’t have direct write access to the plugins directory due to strict file permission settings. If WordPress prompts you for FTP credentials, you’ll need to enter your FTP hostname (usually your domain or hosting server address), FTP username, and FTP password. These credentials are different from your WordPress login—you’ll find them in your hosting control panel or the welcome email your host sent when you first signed up.
For reference, if you’re managing a directory-based site or using business directory providers to structure your content, the plugin installation process remains identical regardless of your site’s specific niche or content organization.
Activation and Initial Configuration
After successful installation, the “Activate Plugin” link is your next step. Clicking this link tells WordPress to load the plugin’s code and make its functionality available to your site. Activation typically happens instantly, and you’ll be redirected to your main Plugins management screen with a confirmation message at the top: “Plugin activated.” The newly activated plugin will now appear in your plugins list with a blue highlight to draw your attention to it.
Here’s where many users make a critical mistake: they assume activation equals configuration. In reality, most plugins require some setup before they deliver value. Look for new menu items in your WordPress sidebar—many plugins add their own top-level menu or submenu items under Settings, Tools, or even create entirely new admin sections. Premium plugins often display a “Getting Started” or “Quick Setup” wizard immediately after activation; take advantage of these guided setups rather than diving directly into advanced settings.
Common configuration tasks include connecting to third-party services (APIs, payment processors, email marketing platforms), setting permissions and user roles, choosing display options, and configuring performance settings like caching or database optimization. Don’t rush this process. I’ve seen countless WordPress sites where plugins were installed but never properly configured, resulting in security vulnerabilities or features that simply don’t work as intended.
Check your site’s front-end immediately after activation and configuration. Open your site in a new browser tab (preferably in incognito or private mode to bypass cached versions) and navigate to areas where the new plugin should be active. If you installed a security plugin, verify that protection features are actually monitoring your site. If you added an SEO plugin, confirm that meta tags are generating correctly. This immediate verification catches issues while the installation process is still fresh in your mind.
Some plugins require additional PHP extensions, memory limits, or server configurations to function optimally. If your newly activated plugin displays warnings about missing requirements, don’t ignore them—these warnings indicate functionality that won’t work until you address the underlying server issue. Contact your hosting provider if you need help adjusting PHP settings or installing server extensions; reputable hosts will handle these requests quickly, especially if you explain they’re required for proper plugin functionality.
Verification, Security Checks, and Ongoing Maintenance
Plugin verification goes beyond simply confirming it’s active. Run through the plugin’s primary features to ensure everything functions as documented. If it’s a contact form plugin, submit a test form and verify receipt. If it’s a caching plugin, check that cache files are generating and serving correctly. If it’s a backup plugin, trigger a manual backup and confirm files are being created. This functional testing reveals issues immediately rather than discovering them during a crisis when you actually need the plugin to work.

Security verification is equally important. Check that the plugin doesn’t introduce new admin users, doesn’t modify core WordPress files, and doesn’t create suspicious database entries. Reputable security scanning tools (many available as WordPress plugins themselves) can audit newly installed plugins for known vulnerabilities or malicious code. If you’re managing client sites or processing sensitive customer data, this scanning step isn’t optional—it’s a professional requirement.
Monitor your site’s performance metrics before and after plugin installation. Tools like Google PageSpeed Insights or GTmetrix provide baseline performance scores that help you identify plugins causing slowdowns. A well-coded plugin should have minimal impact on page load times; if your site suddenly takes three seconds longer to load after installing a new plugin, that’s a significant problem worth addressing. Sometimes the solution is better caching, sometimes it’s plugin configuration adjustment, and sometimes you need to find an alternative plugin that accomplishes the same goal more efficiently.
Create a maintenance schedule for ZIP-installed plugins. Unlike repository plugins that notify you of available updates within the WordPress dashboard, ZIP-installed plugins require manual monitoring. Bookmark the plugin developer’s website, subscribe to their newsletter, or set calendar reminders to check for updates quarterly. When updates are available, download the new ZIP, deactivate the current version, install the updated ZIP following the same process we’ve covered, and reactivate. Yes, it’s more manual work than repository plugins—but this is the trade-off for using premium or custom solutions.
Document everything. Seriously. Create a simple spreadsheet or text file listing every ZIP-installed plugin, including the source URL, version number, installation date, license key (if applicable), and any custom configurations you’ve applied. This documentation becomes invaluable when you’re troubleshooting conflicts, migrating sites, or handing off management to another administrator. I learned this lesson the hard way after spending hours trying to remember where I’d downloaded a specific plugin version that worked perfectly before an update broke compatibility.
Alternative Installation Methods for Advanced Scenarios
While the WordPress dashboard upload method works for most situations, certain scenarios require alternative approaches. Large plugin files (over 100MB) often exceed server upload limits imposed by hosting providers. In these cases, FTP or SFTP installation provides a reliable workaround. You’ll need an FTP client like FileZilla or Cyberduck, your hosting FTP credentials, and a bit more technical comfort navigating file systems.
The FTP installation process involves connecting to your server, navigating to the /wp-content/plugins/ directory, and uploading the extracted plugin folder (not the ZIP file itself). This is a crucial distinction—you must unzip the plugin on your local computer first, then upload the resulting folder to your server. After the upload completes, return to your WordPress dashboard’s Plugins page, where the newly uploaded plugin will appear in your plugin list ready for activation.
wp plugin install plugin-name.zip --activate handles upload, extraction, and activation in one line. For developers managing multiple sites or deploying staging environments, WP-CLI is genuinely transformative.Some hosting environments—particularly managed WordPress hosts like WP Engine or Kinsta—may restrict or completely disable plugin uploads through the dashboard for security reasons. These hosts typically provide their own plugin management interfaces or require FTP for custom plugin installation. If you’re working within these environments, familiarize yourself with your host’s specific requirements before attempting plugin installations. Most managed hosts maintain detailed documentation on their approved installation methods.
For sites built around directory functionality, such as when managing escape rooms business directory categories or other specialized listings, the installation method doesn’t change—but the plugins you choose might require additional configuration to properly integrate with directory structures and taxonomies.
Troubleshooting Common ZIP Plugin Installation Issues
Even with careful preparation, plugin installations sometimes fail. The most common error message—”The uploaded file exceeds the upload_max_filesize directive in php.ini”—indicates your server’s PHP configuration limits file uploads to a size smaller than your plugin ZIP. Solutions include asking your host to increase this limit, using FTP installation instead, or in some cases, splitting large plugin packages (though this requires advanced PHP knowledge and isn’t recommended for most users).
“Destination folder already exists” errors occur when a plugin folder with the same name already exists in your plugins directory. This typically happens when you’re trying to reinstall or update a plugin without first removing the old version. The solution is straightforward: deactivate and delete the existing plugin through the WordPress Plugins menu, then proceed with your ZIP installation. Just remember—deleting a plugin removes its settings and data, so export configurations first if you need to preserve them.
“The package could not be installed. The plugin contains no files” or similar messages indicate the ZIP file structure doesn’t match WordPress’s expectations. WordPress looks for a specific folder structure inside the ZIP—a main plugin folder containing the plugin PHP files. If the ZIP file contains loose PHP files without a containing folder, or if there are multiple nested folders, WordPress can’t properly extract and install the package. The solution usually requires re-creating the ZIP with correct structure or contacting the plugin developer for a properly formatted package.
Compatibility conflicts manifest in various ways: white screens of death, error messages, broken layouts, or features that simply don’t work. When you suspect a plugin conflict, deactivate all other plugins temporarily, then reactivate them one by one while testing functionality. This process identifies which specific plugin is conflicting with your new installation. Once identified, search for known compatibility issues between the two plugins, check if updates are available, or contact developers to report the conflict. Sometimes you’ll need to choose between conflicting plugins based on which is more essential to your site’s functionality.
Memory limit errors (“Allowed memory size of X bytes exhausted”) indicate the plugin requires more PHP memory than your server currently allocates. Reputable plugins list their memory requirements in documentation; if you’re hitting these limits, contact your hosting provider to request an increase. Most modern WordPress sites should run with at least 256MB of PHP memory; if your host restricts you to less, it may be time to consider a hosting upgrade.
Best Practices for Long-Term Plugin Management
Establishing a plugin audit schedule prevents the common problem of “plugin bloat”—sites running dozens of plugins, many inactive or outdated. Quarterly audits should review each installed plugin, asking: Is this still necessary? Is it updated regularly? Does it overlap functionality with other plugins? Could multiple plugins be replaced by a single comprehensive solution? Deactivating and removing unnecessary plugins reduces security vulnerabilities, improves performance, and simplifies troubleshooting.
| Security Practice | Frequency | Priority Level |
|---|---|---|
| Full site backup | Before each plugin install | Critical |
| Plugin version documentation | At installation | High |
| Security vulnerability scan | Weekly | High |
| Plugin update check | Monthly | Medium |
| Plugin audit and cleanup | Quarterly | Medium |
Staging environments are non-negotiable for professional WordPress management. A staging site—an exact copy of your production site on a separate URL or subdomain—lets you test plugin installations, updates, and configurations without risking your live site. Many managed WordPress hosts include staging environments as a standard feature. If yours doesn’t, you can create staging sites manually or use plugins designed for this purpose. The workflow is simple: test everything in staging first, verify it works correctly, then replicate those changes on your production site.
Version control becomes increasingly important as your site grows in complexity. For ZIP-installed plugins, maintain an organized archive of previous plugin versions. If an update introduces bugs or breaks compatibility, you can quickly rollback to the previous working version while you troubleshoot or wait for the developer to release a fix. Cloud storage services make version archiving effortless—create a folder structure like “PluginName/2024/v1.5.3/” and you’ll always know where to find specific versions.
License management deserves special attention for premium plugins. Many premium plugins verify licenses through API calls to the developer’s server; if your license expires or isn’t properly activated, you may lose access to updates or even core functionality. Keep a secure spreadsheet or password manager entry documenting all plugin licenses, including purchase dates, renewal dates, license keys, and the number of sites each license covers. Set calendar reminders for renewals to avoid unexpected functionality losses.
When managing specialized sites, such as those using business directories for startups, plugin selection becomes even more critical. Directory-focused plugins often handle custom post types, taxonomies, and user submissions—functionality that requires careful compatibility consideration with your existing plugin ecosystem.
Understanding the WordPress Plugin Ecosystem Context
WordPress powers a substantial portion of the web, creating an enormous ecosystem of themes, plugins, and services. This dominance brings both advantages and challenges. The advantage: massive community support, extensive documentation, and plugins for virtually any functionality you can imagine. The challenge: with thousands of plugins available, quality varies dramatically from excellent professional tools to abandoned projects that haven’t been updated in years.
The WordPress plugin repository (WordPress.org/plugins) hosts over 60,000 free plugins, each required to meet baseline quality and security standards before approval. This vetting process provides some assurance, though it’s not foolproof. Premium plugins sold outside the repository don’t undergo this centralized review, making your own due diligence even more critical. Check plugin reviews on independent WordPress news sites, search for security audit results, and investigate the developer’s reputation within the WordPress community.
Plugin abandonment represents a significant ecosystem challenge. Developers stop maintaining plugins for various reasons—they move to different projects, companies go out of business, or open-source volunteers lose interest. An abandoned plugin might continue working for years, or it might suddenly break with a WordPress core update. This is why checking “last updated” dates is crucial. If a plugin hasn’t been updated in over two years, proceed with caution regardless of how well it currently works. Looking for actively maintained alternatives protects you from future compatibility issues.
The relationship between WordPress core development and the plugin ecosystem continues evolving. WordPress regularly introduces new features and deprecates old functions, requiring plugin developers to update their code accordingly. Major WordPress releases (like the transition to block-based editing with Gutenberg) can break plugins that haven’t been updated to accommodate new architecture. This dynamic reinforces why keeping plugins updated—or choosing plugins with active development—is essential for long-term site stability.
For context, if you’re also working on strategies like understanding why companies delete business directory info, you’ll recognize that plugin management shares similar principles: careful evaluation, ongoing monitoring, and willingness to remove elements that no longer serve your site’s goals.
Related Installation Methods and Workflow Alternatives
The standard WordPress plugin search and install workflow—browsing the repository directly from your dashboard—remains the simplest path for free plugins. Click Plugins > Add New, search for functionality you need, review ratings and active installation counts, click “Install Now,” then activate. This method provides automatic update notifications and one-click updates, making it ideal when suitable repository plugins meet your needs. The ZIP installation method we’ve detailed becomes necessary only when repository options don’t exist or don’t meet specific requirements.
WP-CLI deserves deeper exploration for anyone managing multiple WordPress sites or working in development environments. After installing WP-CLI on your server, plugin management becomes remarkably efficient. The command wp plugin install [plugin-slug] --activate handles repository plugins, while wp plugin install /path/to/plugin.zip --activate manages ZIP installations. You can even script bulk installations across multiple sites, installing and configuring entire plugin suites with a single script execution. This level of automation is particularly valuable for agencies managing dozens or hundreds of client sites.
Certain vendors and marketplaces provide their own installation mechanisms. Envato Market, for example, offers a plugin that manages automatic updates for plugins purchased through ThemeForest or CodeCanyon. Similarly, some premium plugin vendors provide license-key-based automatic updates that mimic the repository experience while maintaining the vendor’s control over distribution. When choosing premium plugins, consider whether the vendor offers these convenience features—they significantly reduce long-term maintenance burden.
Git-based workflows represent advanced territory but offer tremendous benefits for development teams. Storing your WordPress site in version control lets you track every plugin installation, update, and configuration change. When combined with proper .gitignore configuration (typically excluding WordPress core and user-uploaded content), you maintain a complete, reversible history of your site’s plugin ecosystem. This approach requires comfort with Git and command-line tools, but for teams building custom WordPress solutions, it’s the gold standard for collaboration and deployment.
For those also dealing with manual processes in other areas, such as learning to install WordPress plugins manually through FTP, the conceptual understanding carries over—both approaches emphasize understanding the underlying file structure and not depending solely on automated systems.
Frequently Asked Questions
How do I install a WordPress plugin from a ZIP file?
Navigate to Plugins > Add New in your WordPress dashboard, click “Upload Plugin,” select your verified ZIP file, click “Install Now,” then click “Activate” once installation completes. Always verify the plugin source and maintain current backups before installing any plugin from a ZIP file.
Can I install a plugin ZIP if I don’t have FTP access?
Yes, the standard WordPress dashboard upload method (Plugins > Add New > Upload Plugin) works entirely through your web browser and doesn’t require FTP access. FTP is only needed as an alternative installation method for large files exceeding upload limits or in restricted hosting environments.
What should I do if my ZIP plugin won’t upload or install?
First, verify the ZIP file isn’t corrupted by re-downloading from the official source. Check that it’s a genuine ZIP file (not misnamed or double-zipped), confirm compatibility with your WordPress and PHP versions, and verify your server’s upload_max_filesize setting allows files of that size. If issues persist, try FTP installation instead.
Is installing WordPress plugins from ZIP files safe?
ZIP installation is safe when the file comes from trusted sources like WordPress.org downloads, licensed premium vendors, or reputable developers. Always verify the source, check recent reviews and security reports, maintain backups, and scan plugins with security tools after installation to minimize risk.
How do I update a plugin that was installed from a ZIP file?
Download the latest plugin ZIP from the official source, deactivate (but don’t delete) the current version in your WordPress dashboard, install the new ZIP following the standard upload process, then reactivate. Some premium plugins offer license-based automatic updates that simplify this process once configured.
What’s the difference between repository installation and ZIP upload?
Repository installation provides automatic update notifications, one-click updates, and WordPress’s baseline security vetting. ZIP installation offers access to premium or custom plugins not available in the repository but requires manual update monitoring and carries higher responsibility for source verification and security scanning.
Should I deactivate conflicting plugins before installing from ZIP?
You don’t need to deactivate plugins before installation, but if you suspect compatibility issues, testing with other plugins temporarily deactivated helps isolate conflicts. This is particularly important for plugins that modify similar functionality (multiple SEO plugins, multiple caching plugins, etc.).
How can I verify a ZIP plugin’s authenticity and integrity?
Download only from official vendor websites or WordPress.org, verify SSL certificates during download, check file hashes if provided by the developer, scan with security tools before installation, research the plugin name plus “security vulnerability,” and review recent user feedback on independent WordPress forums or news sites.
What file permissions are needed for plugin installation?
WordPress needs write access to the /wp-content/plugins/ directory, typically requiring 755 permissions for directories and 644 for files. If WordPress prompts for FTP credentials during installation, your hosting environment has stricter permissions requiring explicit authentication for file system changes.
Can I install multiple plugins from ZIP files at once?
The WordPress dashboard upload interface handles one ZIP file at a time. For bulk installations, use WP-CLI commands in a script, or use FTP to upload multiple extracted plugin folders simultaneously to the /wp-content/plugins/ directory, then activate them individually through the WordPress dashboard.
Taking Control of Your WordPress Plugin Management
Installing WordPress plugins from ZIP files gives you granular control over your site’s functionality, access to premium tools that extend beyond repository limitations, and the flexibility to work with custom-developed solutions tailored to your specific needs. This five-step process—verifying sources, accessing the upload interface, installing the ZIP, activating and configuring, then verifying operation—forms the foundation of professional WordPress site management.
The responsibility that comes with ZIP-based installation shouldn’t be intimidating; it should be empowering. You’re taking an active role in your site’s security and performance rather than passively accepting whatever automated systems provide. This mindset shift—from WordPress user to WordPress administrator—separates hobbyist sites from professional web properties that serve real business objectives.
- Create a backup of your current site before your next plugin installation
- Audit your current plugins and document which were installed via ZIP versus repository
- Set up a staging environment for testing future plugin installations
- Establish a calendar reminder for quarterly plugin security and update reviews
- Bookmark official sources for your essential premium plugins to streamline future updates
Remember that every plugin you add creates an ongoing maintenance commitment. Choose wisely, install carefully, monitor continuously, and remove aggressively when plugins no longer serve your site’s goals. The most stable, secure, and performant WordPress sites aren’t those with the most plugins—they’re sites where every plugin has been deliberately chosen, properly configured, and actively maintained by an administrator who understands exactly what each plugin contributes to the site’s success.
Whether you’re managing a personal blog, a business directory connecting specialized markets, or an enterprise e-commerce platform, the ZIP installation workflow remains consistent. Master this process, combine it with rigorous security practices and regular backups, and you’ll have the confidence to extend your WordPress site’s capabilities without compromising stability or security. Your WordPress site is only as strong as your weakest plugin—make sure each one earns its place.