How to Install Google Services Plugin: A Step-by-Step Guide

Generating summary...
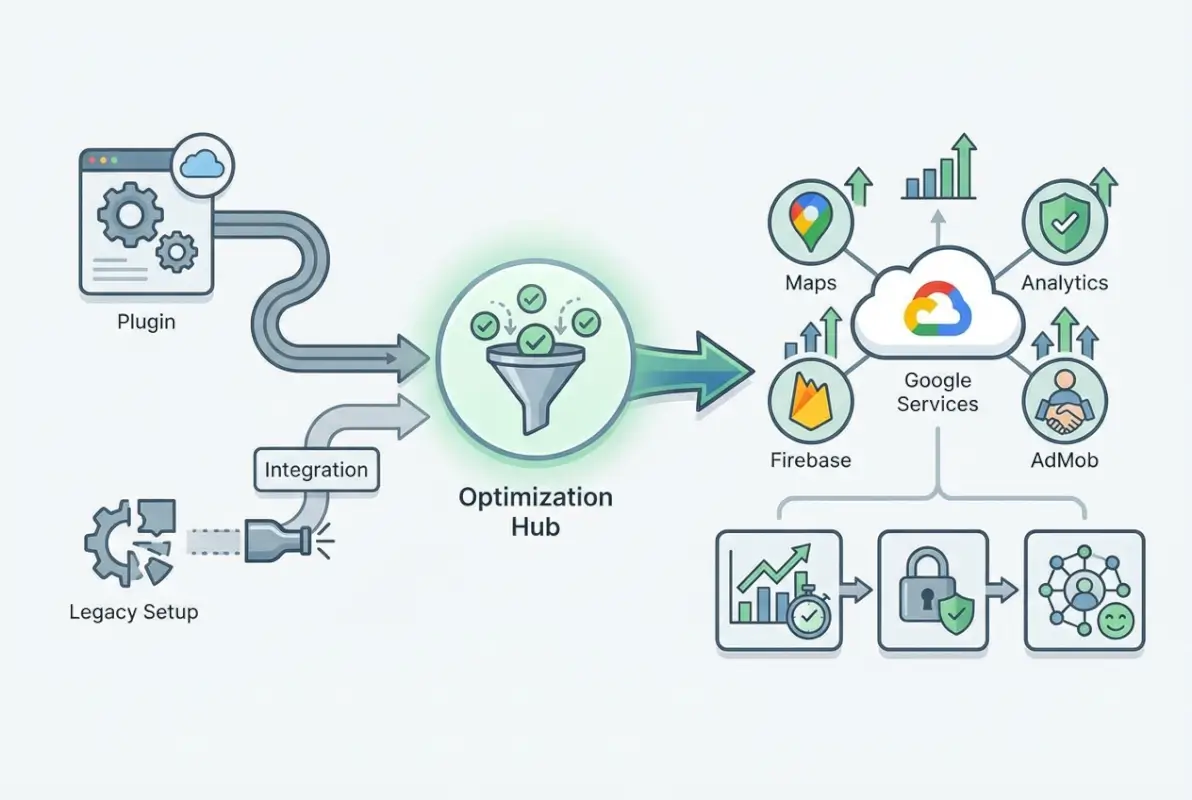
Installing the Google Services plugin might sound like just another checkbox in your Android development workflow, but here’s something most tutorials won’t tell you: this single plugin is the gatekeeper to billions of user interactions across nearly three-quarters of the world’s mobile devices. When you wire up com.google.gms.google-services correctly, you’re not just adding Firebase Analytics or Cloud Messaging—you’re plugging into an ecosystem that powers everything from location-aware experiences to secure authentication flows that users actually trust.
I remember the first time I tried to integrate Firebase into a production app without fully understanding what the Google Services plugin actually does. The build succeeded, the app launched, but analytics events never reached the console. Turns out, I’d placed the google-services.json file in the wrong directory and applied the plugin in the wrong order. That experience taught me that this seemingly simple plugin is actually doing heavy lifting behind the scenes, parsing configuration files and wiring dependencies in ways that aren’t immediately obvious from the Gradle syntax alone.
TL;DR – Quick Takeaways
- Google Services plugin is essential – It processes google-services.json and enables Firebase/Google APIs across your Android app
- Correct plugin order matters – Apply the plugin at the bottom of your app-level build.gradle to avoid configuration issues
- Firebase BoM simplifies versioning – Use the Bill of Materials to manage compatible Firebase library versions automatically
- Device compatibility checks are crucial – Not all devices have Google Play services; implement runtime checks to handle gracefully
- Keep everything synchronized – Match your plugin version with Android Gradle Plugin and Firebase SDK versions to prevent build failures
Prerequisites and Sanity Check
Before diving into installation steps, let’s make sure your development environment is actually ready for the Google Services plugin. This isn’t just about having Android Studio installed—it’s about having the right versions aligned across your toolchain.

You’ll need a reasonably modern Android Studio installation (Arctic Fox or newer is recommended, though later versions offer better Firebase integration). The Google Services plugin has specific compatibility requirements with the Android Gradle Plugin (AGP), and mismatches here cause cryptic build errors that waste hours of debugging time. Open your project-level build.gradle file and verify you can see both the project-level and module-level Gradle files clearly in your project structure—these are where you’ll be making changes.
Check that you have network access to Google’s Maven repositories. Some corporate environments block external Maven repos, which prevents Gradle from downloading the plugin and Firebase dependencies. If you’re behind a corporate proxy, you’ll need to configure Gradle’s proxy settings before proceeding. The plugin itself is lightweight, but the Firebase libraries it enables can add several megabytes to your dependency tree, so be prepared for slightly longer initial sync times.
Your project structure should have at least one app module (typically named “app”) with its own build.gradle file. Multi-module projects require special attention—each module that uses Firebase needs its own configuration, though we’ll cover that nuance later. For now, confirm you can navigate to app/build.gradle and see the existing dependencies block where you declare libraries.
Create or Prepare Your Firebase Project
The Google Services plugin doesn’t work in isolation; it needs configuration data that comes from Firebase Console. This is where many developers hit their first roadblock, because the relationship between your Android app, the Firebase project, and the google-services.json file isn’t always intuitive.

Head to the Firebase Console and either create a new project or select an existing one. When registering your Android app, you’ll be asked for your package name—this must match exactly what’s in your AndroidManifest.xml file under the package attribute. Get this wrong and the plugin will silently fail to initialize Firebase services, which is frustrating because your build will succeed but features won’t work at runtime.
The SHA-1 certificate fingerprint is optional for basic Firebase features but required for Google Sign-In, Dynamic Links, and other authentication-related services. You can add SHA-1 fingerprints later, but if you know you’ll need these features, grab your debug and release keystore fingerprints now using the keytool command. Many developers forget to add the release SHA-1 and then wonder why authentication works in debug builds but fails in production.
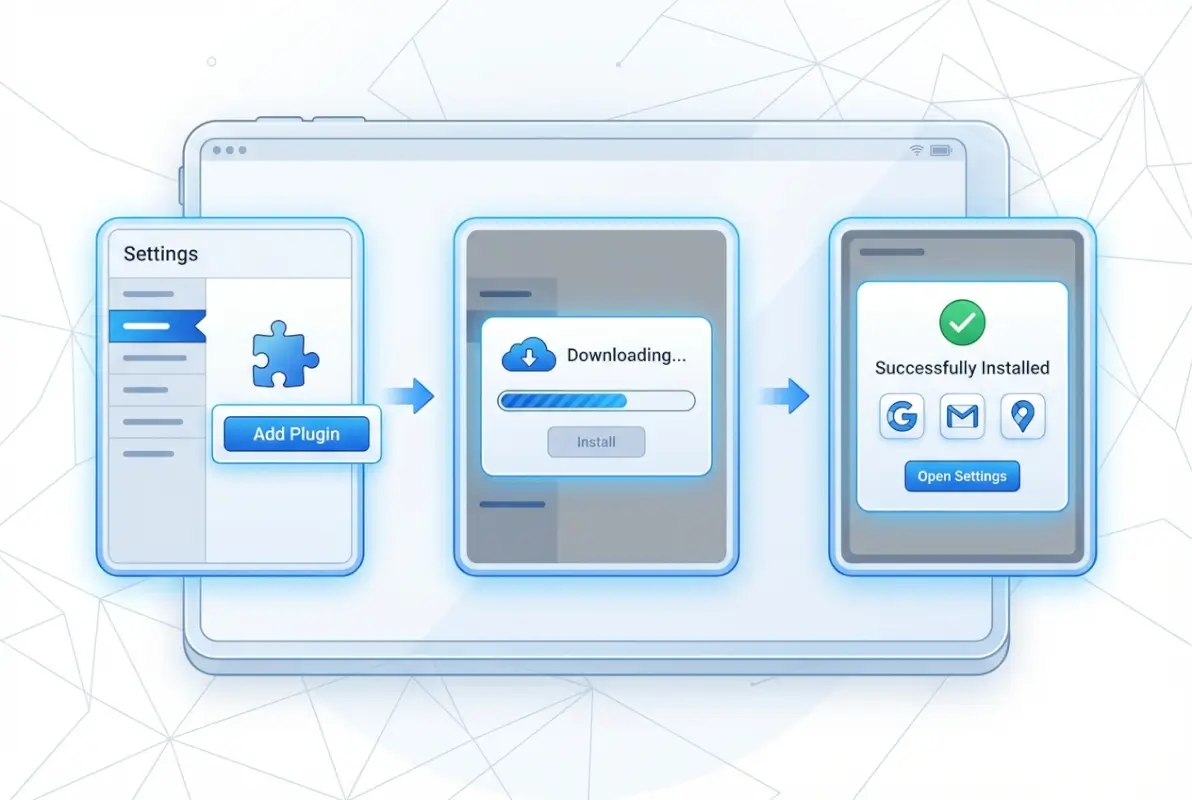
Once you download google-services.json, place it directly in your app module’s root directory—that’s app/google-services.json, at the same level as your app/build.gradle file. Not in app/src, not in app/src/main, but at app/ itself. The Google Services plugin looks for this file in a specific location during the build process, and if it’s not there, you’ll get build errors complaining about a missing configuration file. After placing the file, switch to Android view in Android Studio’s project navigator to confirm you see google-services.json listed under the app module.
Add the Google Services Gradle Plugin to Your Project
Now comes the actual plugin installation, which happens in two stages: declaring the plugin as a project dependency, then applying it to your app module. The order and location of these declarations matter more than most documentation lets on.
Open your project-level build.gradle file (the one in your project root, not the one inside the app folder). In the buildscript dependencies block, add the Google Services plugin classpath. If you’re using Groovy DSL, it looks like this:
buildscript {
    dependencies {
        classpath 'com.google.gms:google-services:4.4.0'
    }
}
For Kotlin DSL projects, the syntax is slightly different but the concept is identical. Always check for the latest stable version on Maven Central or the official Google documentation—version 4.4.0 was current as of recent releases, but newer versions often fix compatibility issues with the latest Android Gradle Plugin versions. One thing I’ve learned from experience: don’t blindly upgrade to the absolute newest version without checking release notes, sometimes cutting-edge versions have breaking changes that aren’t immediately obvious.
After adding the classpath dependency, sync your project. Gradle will download the plugin, which usually takes just a few seconds. Next, open your app-level build.gradle file (the one inside the app module folder) and apply the plugin. Here’s where placement becomes critical—add this line at the very bottom of the file, after all your dependencies:
apply plugin: 'com.google.gms.google-services'For projects using the newer plugins DSL syntax (plugins { }), you can declare it as id 'com.google.gms.google-services' inside the plugins block, though you still need the project-level classpath declaration. After adding the plugin application line, run another Gradle sync and then execute a clean build (Build > Clean Project, then Build > Rebuild Project). If everything is configured correctly, the build should succeed without warnings related to google-services.
Watch the Build Output window during the sync. You should see messages indicating that the Google Services plugin is processing your google-services.json file and generating configuration values. If you see warnings about missing google-services.json or version mismatches, address those immediately before proceeding to add Firebase dependencies.
Add Firebase and Google Play Services Dependencies
With the plugin installed and active, you can now declare the actual Firebase and Google Play services libraries your app will use. This is where the Firebase Bill of Materials (BoM) becomes your best friend for avoiding version conflicts.
The Firebase BoM is a special dependency that manages versions of all Firebase libraries automatically, ensuring they’re mutually compatible. In your app-level build.gradle dependencies block, add the platform dependency first, then declare individual Firebase libraries without specifying versions:
dependencies {
    implementation platform('com.google.firebase:firebase-bom:32.7.0')
    implementation 'com.google.firebase:firebase-analytics'
    implementation 'com.google.firebase:firebase-auth'
    implementation 'com.google.firebase:firebase-firestore'
}
Notice how the Firebase libraries don’t have version numbers—the BoM handles that automatically. This approach eliminates the common mistake of mixing incompatible Firebase library versions, which causes runtime crashes that are painful to debug. You can still override specific library versions if you have a compelling reason, but in most cases, trusting the BoM is the safer choice.
| Firebase Library | Use Case | Additional Setup Required |
|---|---|---|
| firebase-analytics | Event tracking, user properties | None—works with google-services.json |
| firebase-auth | Email/password, social login | Enable auth methods in Console |
| firebase-firestore | NoSQL cloud database | Create database, set security rules |
| firebase-messaging | Push notifications | Implement service, request permission |
If you’re using Google Play services APIs that aren’t part of Firebase—like Maps, Location, or specific Play services components—you’ll declare those as separate dependencies with explicit version numbers. The Google Play services libraries use a different versioning scheme than Firebase, and they’re not managed by the Firebase BoM. For example:
implementation 'com.google.android.gms:play-services-location:21.0.1'
implementation 'com.google.android.gms:play-services-maps:18.2.0'
Every time you add or update dependencies, sync your project and run a build to catch any version conflicts early. The Android Gradle Plugin will usually flag incompatible version combinations, but some conflicts only surface at runtime. Testing on both emulators and physical devices after dependency changes is a habit that saves debugging time later, especially when you’re working with something as fundamental as plugin installations across different environments.
Verify Google Play Services Availability on Devices
Here’s an aspect that catches even experienced developers off guard: not every Android device in the wild has Google Play services installed or up to date. Devices sold in certain markets, custom ROMs, and some enterprise deployments lack Google Play services entirely, which means your Firebase-dependent features will fail at runtime even though your build succeeded.

The solution is implementing a runtime check using the GoogleApiAvailability class. Before making any calls to Firebase or Google Play services APIs, verify availability and prompt users to update or install if necessary:
GoogleApiAvailability apiAvailability = GoogleApiAvailability.getInstance();
int resultCode = apiAvailability.isGooglePlayServicesAvailable(this);

if (resultCode != ConnectionResult.SUCCESS) {
    if (apiAvailability.isUserResolvableError(resultCode)) {
        apiAvailability.getErrorDialog(this, resultCode, 9000).show();
    } else {
        // Device doesn't support Google Play services
        // Show appropriate fallback UI
    }
}
This check should happen early in your app’s lifecycle, typically in your main activity’s onCreate or in your Application class initialization. The error dialog that the API provides gives users actionable steps to resolve the issue—updating Play services through the Play Store or downloading the necessary components.
While the vast majority of devices have Play services, the 2% that don’t often represent specific user segments—privacy-conscious users with degoogled devices, users in markets with restricted Google access, or corporate devices with custom configurations. How you handle these edge cases depends on your app’s core value proposition. If Firebase is essential to your app’s functionality, you might show an error screen explaining that Play services are required. If it’s supplementary (like analytics), you can degrade gracefully and continue offering core features.
For apps targeting global markets, consider implementing analytics to track how often users hit the “Play services unavailable” scenario. This data helps you make informed decisions about whether to invest in alternative solutions for these users. In some cases, the numbers justify building a completely separate experience that doesn’t rely on Google infrastructure, similar to how directory platforms handle diverse data sources.
Optional Advanced Plugins and Tooling
The Google Services plugin is actually part of a larger ecosystem of Gradle plugins that Google provides for Android development. While com.google.gms.google-services is the one you’ll interact with most directly, there are related plugins that become relevant as your project grows in complexity.
The OSS Licenses plugin (com.google.android.gms.oss-licenses-plugin) automatically generates a screen listing all open-source libraries your app uses, which helps with compliance and attribution requirements. If you’re distributing through Google Play, this plugin can save you from manual license documentation headaches. Add it to your project-level build.gradle classpath and apply it in your app module just like you did with google-services.
For projects with strict version matching requirements—perhaps you’re working with enterprise dependencies or custom Google Play services versions—the strict-version-matcher-plugin helps enforce that all Play services libraries use the same version number. This prevents scenarios where you accidentally mix version 17.x.x of one library with 18.x.x of another, which can cause subtle runtime incompatibilities.
Multi-module Firebase setups require special attention to where google-services.json lives. Each app module (if you have multiple) needs its own google-services.json file from Firebase Console. If you have library modules that use Firebase, they should depend on the app module’s Firebase configuration rather than having their own—the plugin processes the JSON file at the application level, not the library level.
For dynamic feature modules (on-demand modules that use Android App Bundles), the Google Services plugin behavior gets more nuanced. The base module must have the plugin applied, and feature modules inherit the configuration. If you’re building a complex modularized app architecture, review Google’s official documentation on applying the plugin across modules, because the build order and plugin application sequence become critical.
Common Troubleshooting and Best Practices
Even when you follow the steps precisely, the Google Services plugin integration can fail in subtle ways. Let’s cover the issues I’ve encountered most frequently and how to resolve them efficiently.
Version mismatches cause probably 70% of Google Services plugin problems. The plugin version must be compatible with your Android Gradle Plugin version, and both must work with your Firebase library versions. When you upgrade AGP (which happens with major Android Studio updates), check the Google Services plugin compatibility matrix. Gradle usually provides helpful error messages about version incompatibilities, but sometimes the error is obscure—something like “DefaultConfiguration could not be resolved”—which actually means a version conflict.
| Symptom | Likely Cause | Solution |
|---|---|---|
| Build succeeds but Analytics shows no data | google-services.json not found or wrong location | Verify file is at app/google-services.json, rebuild |
| “Plugin with id ‘com.google.gms.google-services’ not found” | Classpath not declared in project-level build.gradle | Add classpath dependency at project level, sync |
| Firebase Auth fails only in release builds | Release SHA-1 fingerprint not registered in Console | Add release keystore SHA-1 to Firebase Console |
| Duplicate class errors with androidx libraries | Firebase library using old support libs | Update Firebase BoM to latest version |
The google-services.json file needs updating whenever you modify your Firebase project configuration—adding new apps, enabling new services, changing API keys, etc. The Firebase Console makes it easy to download a fresh copy, but developers often forget to replace the old file in their project. I’ve seen teams debug non-existent issues for hours before realizing they were using a google-services.json file from six months ago that was missing new configuration values.
Multi-flavor builds (like free vs. premium versions of your app) sometimes need different Firebase projects and therefore different google-services.json files. You can place flavor-specific configuration files in src/flavorName/ directories, and the build system will pick the correct one. However, this setup requires careful testing to ensure each flavor gets the right configuration, especially when deploying to production.
When troubleshooting, enable verbose Gradle logging with ./gradlew build --info from the command line. This shows exactly what the Google Services plugin is doing during the build process—which JSON file it’s reading, what values it’s extracting, and any warnings or errors it encounters. This verbose output often reveals configuration issues that the standard build output hides.
Network issues during the first build after adding the plugin can cause Gradle to cache incomplete dependency downloads. If you see weird errors about corrupted JARs or missing classes, try clearing your Gradle cache (./gradlew clean --refresh-dependencies) and rebuilding. This forces Gradle to re-download all dependencies from scratch, which often resolves mysterious build failures.
Security and Compliance Considerations
The security posture around Firebase configuration files and API keys deserves more attention than it typically gets in quickstart guides. While google-services.json doesn’t contain secret credentials in the traditional sense, it does include your Firebase project identifiers and API keys that are tied to usage quotas and security rules.
Committing google-services.json to version control is generally acceptable for private repositories because the file doesn’t grant direct access to your Firebase backend—your security rules and authentication requirements provide the actual security layer. However, if you publish your repository publicly (like an open-source app), consider using environment-specific configuration or Firebase Hosting to avoid exposing even these identifiers unnecessarily.
API keys in google-services.json are restricted to your app’s package name through Firebase’s built-in safeguards, so even if someone extracts the keys from your APK, they can’t use them in a different app context. Still, it’s worth setting up Firebase App Check to add an extra verification layer that confirms requests are coming from your legitimate app, not a cloned or tampered version.
For apps handling sensitive data, audit what Firebase services you’re actually using and remove any unnecessary dependencies. Each Firebase library you include expands your app’s attack surface, so if you added firebase-database but ended up using Firestore instead, remove the unused dependency. This principle applies broadly, much like how you’d optimize a membership directory structure by removing unused features that add complexity without value.
ProGuard and R8 obfuscation work with Firebase libraries out of the box because Google provides appropriate keep rules embedded in the libraries. However, if you’re using custom ProGuard rules or aggressive optimization settings, test thoroughly to ensure Firebase initialization and API calls aren’t being optimized away. The Firebase Crashlytics library, in particular, has specific ProGuard requirements for proper stack trace symbolication.
Validation and Post-Install Checks
After completing the installation steps, systematic validation prevents the frustrating scenario where everything seems fine until you try to use Firebase features in production. These checks take maybe 10 minutes but can save days of debugging later.
Run a clean build from Android Studio’s Build menu, watching the Build Output window carefully. Look for any warnings related to google-services—even if the build succeeds, warnings often indicate configuration issues that will cause runtime failures. The plugin should output a line confirming it found and processed your google-services.json file, including which Firebase services are configured.
Deploy your app to a test device (preferably a physical device with Play services, not just an emulator) and verify that Firebase Analytics is receiving events. The Firebase Console’s DebugView feature shows real-time event data from devices with debug logging enabled, which is invaluable for confirming your integration works end-to-end. Enable debug mode on your test device with this adb command:
adb shell setprop debug.firebase.analytics.app YOUR_PACKAGE_NAMECheck Logcat for Firebase initialization messages when your app launches. You should see log entries confirming that Firebase is initializing, connecting to the backend, and registering your installation. If you don’t see these logs, either Firebase didn’t initialize (configuration problem) or logging is disabled (build variant issue).
For apps using Firebase Authentication, test the authentication flow on your test device to verify that sign-in methods work correctly. Each authentication provider (email/password, Google Sign-In, Facebook, etc.) has its own configuration requirements beyond just the Google Services plugin, so test each method you’ve enabled to confirm the end-to-end flow.
If you’re using Firestore or Realtime Database, make a simple read/write operation from your test app to confirm database connectivity. Database permission errors often only appear at runtime, and you’ll want to catch these during testing rather than after launch. The Firebase Console’s database rules simulator lets you test rules before deploying them, which is helpful when you’re working through the integration process, similar to how invitation scripts need testing before mass deployment.
Quick Reference Snippets
For convenience, here are the complete configuration snippets you’ll need, ready for copying into your project. These assume you’re using Groovy DSL; adapt syntax if you’re using Kotlin DSL.
Project-level build.gradle (root directory):
buildscript {
    repositories {
        google()
        mavenCentral()
    }
    dependencies {
        classpath 'com.android.tools.build:gradle:8.1.0'
        classpath 'com.google.gms:google-services:4.4.0'
    }
}
App-level build.gradle (app/ directory):
plugins {
    id 'com.android.application'
}

android {
    namespace 'com.example.yourapp'
    compileSdk 34

    defaultConfig {
        applicationId "com.example.yourapp"
        minSdk 21
        targetSdk 34
        versionCode 1
        versionName "1.0"
    }
}

dependencies {
    implementation platform('com.google.firebase:firebase-bom:32.7.0')
    implementation 'com.google.firebase:firebase-analytics'
    implementation 'com.google.firebase:firebase-auth'
    implementation 'com.google.firebase:firebase-firestore'

    // Other dependencies...
}

apply plugin: 'com.google.gms.google-services'
Notice the plugin application at the bottom—this placement is intentional. The plugin needs to run after all dependencies are declared so it can properly process the Firebase configuration and wire up the necessary build-time code generation.
Runtime Play services availability check:
private void checkPlayServices() {
    GoogleApiAvailability availability = GoogleApiAvailability.getInstance();
    int resultCode = availability.isGooglePlayServicesAvailable(this);

    if (resultCode != ConnectionResult.SUCCESS) {
        if (availability.isUserResolvableError(resultCode)) {
            availability.getErrorDialog(this, resultCode,
                REQUEST_CODE_PLAY_SERVICES).show();
        } else {
            Log.e(TAG, "Device doesn't support Google Play services");
            finish();
        }
    }
}
These snippets represent the minimal viable configuration for most Firebase-enabled Android apps. Your specific needs might require additional configuration, but this foundation works for the majority of use cases I’ve encountered across dozens of projects.
Frequently Asked Questions
What is the Google Services Gradle plugin and why do I need it?
The Google Services Gradle plugin (com.google.gms.google-services) processes your google-services.json configuration file during the build process, extracting Firebase project settings and wiring them into your Android app. Without this plugin, Firebase libraries cannot initialize properly because they lack the necessary configuration data like project IDs and API keys that the plugin embeds in your APK.
Do I need to add Google Play services if I’m using Firebase only?
Yes, most Firebase features depend on Google Play services being available on the target device. The Firebase SDK uses Play services APIs under the hood for functionality like Analytics, Authentication, and Cloud Messaging. You should implement runtime checks using GoogleApiAvailability to handle devices that lack Play services gracefully rather than crashing.
How do I get the google-services.json file?
Create or open your Firebase project in the Firebase Console, navigate to Project Settings, and select your Android app (or add a new one if needed). Download the google-services.json file from the app configuration page and place it in your app/ module directory at the root level, not inside src or any subdirectory. The file must be at app/google-services.json exactly.
Which versions should I use for the plugin and Firebase libraries?
Use the latest stable Google Services plugin version that’s compatible with your Android Gradle Plugin version, typically 4.3.x or 4.4.x. For Firebase libraries, use the Firebase BoM (Bill of Materials) which automatically manages compatible versions across all Firebase dependencies. Check Google’s release notes when upgrading AGP to ensure plugin compatibility.
How do I update Firebase dependencies safely?
Update the Firebase BoM version in your app-level build.gradle to a newer stable release, sync your project, and run a clean build. Test all Firebase features thoroughly on physical devices before deploying to production. The BoM ensures all Firebase libraries upgrade together to compatible versions, preventing version mismatch issues that cause runtime crashes.
Can I use Google Services plugin in multi-module projects?
Yes, apply the plugin at the app module level in each application module that uses Firebase. Library modules should not apply the plugin directly but can use Firebase dependencies that are resolved through the app module. Each app module needs its own google-services.json file placed in that module’s root directory, not in shared library modules.
What if my device doesn’t have Google Play services?
Implement runtime checks using GoogleApiAvailability.isGooglePlayServicesAvailable() to detect missing or outdated Play services. If the error is user-resolvable, display the provided error dialog that guides users to install or update Play services. For non-resolvable cases, either disable Firebase-dependent features or show an appropriate message explaining the limitation to users.
Why does my Firebase configuration work in debug but fail in release builds?
This typically happens when your release keystore’s SHA-1 fingerprint isn’t registered in Firebase Console. Firebase Authentication and some other features verify your app’s signing certificate, so you must add both debug and release SHA-1 fingerprints to your Firebase project settings. Extract your release SHA-1 using keytool and add it in the Firebase Console.
Can I use different google-services.json files for different build flavors?
Yes, place flavor-specific google-services.json files in src/flavorName/ directories and the build system will use the appropriate file for each flavor. This is useful when you have separate Firebase projects for development, staging, and production environments. Ensure each Firebase project has the correct app configuration to avoid data mixing between environments.
How do I troubleshoot “google-services.json not found” errors?
Verify the file exists at exactly app/google-services.json (or moduleName/google-services.json for custom modules), not in src or any subdirectory. Check that you applied the plugin at the bottom of your app-level build.gradle file. Run Gradle sync and clean build. If errors persist, check your .gitignore isn’t excluding the JSON file accidentally and verify file permissions allow read access.
Take Control of Your Firebase Integration
The Google Services plugin might seem like just another build configuration detail, but it’s actually the foundation that makes Firebase’s powerful backend services accessible from your Android app. When you understand not just the mechanical steps but the why behind each configuration choice, you move from blindly copying snippets to making informed architecture decisions that scale with your project.
Your Next Steps
Start with Analytics to verify your integration, then incrementally add Firebase features as your app’s needs grow. Test each addition on real devices with varying Play services configurations to catch edge cases early. Keep your dependencies updated through the BoM, and remember that the Firebase Console is your source of truth for configuration—when in doubt, re-download google-services.json and rebuild.
The Android ecosystem’s scale—with billions of active devices and millions of apps competing for user attention—means that reliable backend integration isn’t optional anymore. Firebase gives you authentication, databases, analytics, and messaging infrastructure that would take months to build from scratch, and the Google Services plugin is the key that unlocks all of it with just a few Gradle declarations and a configuration file.
Don’t treat this as a one-time setup task, the Android development landscape evolves constantly with new AGP versions, Firebase features, and best practices. Bookmark the official Google and Firebase documentation, check release notes when you upgrade dependencies, and participate in developer communities where people share real-world integration experiences. The combination of solid fundamentals (what you’ve learned here) and staying current with ecosystem changes will keep your Firebase integration robust as your app grows.
Whether you’re building a local business directory that needs location services and user reviews, or a social app requiring authentication and real-time data sync, the Google Services plugin provides the foundation. Test thoroughly, validate on diverse devices, and remember that the time you invest in understanding this integration pays dividends every time you add a new Firebase feature or onboard a new team member who needs to understand your app’s architecture.
Was this article helpful?