How to Install a Plugin Theme in WordPress: 5 Simple Steps

Installing a WordPress plugin or theme doesn’t have to be overwhelming, yet many site owners approach it with a mix of excitement and dread. Will it break the site? Will it slow everything down? Here’s what the tutorials don’t tell you: the installation itself is usually straightforward—it’s the preparation and post-install validation that separate a smooth deployment from a headache. WordPress powers over 42% of all websites on the internet, which means millions of people are clicking “Install Now” every day without thinking twice. The difference between a professional deployment and a disaster often comes down to five deliberate steps that take more thought than time. Whether you’re adding your first contact form plugin or switching to a bold new theme, this guide will walk you through a repeatable workflow that minimizes risk and maximizes confidence.

TL;DR – Quick Takeaways
- Plan before you click Install – Back up your site, verify compatibility, and check plugin/theme update history before adding anything new
- Use trusted sources first – The official WordPress.org directory offers vetted, regularly updated plugins and themes with transparent user reviews
- Test everything after activation – Check front-end display, admin functionality, forms, and site speed to catch conflicts early
- Keep maintenance top of mind – Regular updates, periodic backups, and removing unused plugins/themes are essential security hygiene
- Have a rollback plan – Know how to deactivate, restore from backup, or contact support if something breaks
Before You Install Anything
The most common mistake WordPress users make is treating installation like impulse shopping. You see a plugin with a catchy name or a theme with a stunning demo, you click Install, and suddenly your site layout is broken or your load time has doubled. I remember installing a “lightweight” SEO plugin years ago without checking its requirements—it turned out to conflict with my caching setup and brought my homepage to a crawl. That experience taught me that a few minutes of planning can save hours of troubleshooting.

Define Your Goal
Start by asking yourself exactly what you need. Are you adding a plugin to handle contact forms, improve SEO, or add e-commerce functionality? Or are you installing a theme to refresh your site’s design? This distinction matters because themes control your site’s entire visual structure, while plugins add specific features. Knowing your goal helps you evaluate whether a solution is overkill (a full page builder when you just need a simple gallery) or underpowered (a basic contact form when you need advanced lead tracking).
Consider your site type too. A personal blog has different needs than a membership site or an online store. Compatibility issues often arise when plugins assume a certain type of setup—some e-commerce plugins, for example, expect WooCommerce to be installed, while others work standalone. Similar guidance applies to themes; some are built specifically for blogs, others for portfolios or corporate sites.
Backup Your Site
This is non-negotiable. Before you install or activate anything, create a full backup of your WordPress site—files and database. Many hosting providers offer automated daily backups (check your control panel or ask support), but you should also have a manual backup taken right before the install. If your host doesn’t provide easy backups, use a plugin like UpdraftPlus or BackWPup to create a snapshot you can restore quickly.
Why is this so critical? Because even reputable plugins and themes can conflict with your existing setup in unexpected ways. A backup gives you a one-click restore point if something goes sideways.
Check Compatibility and Requirements
Every plugin and theme page includes compatibility information—look for “Tested up to” (which WordPress version it supports) and “Requires PHP” (the minimum PHP version). If your site is running WordPress 6.2 and a plugin hasn’t been tested past 5.9, proceed with caution. Similarly, if your hosting environment runs PHP 7.4 but a plugin requires PHP 8.0, you’ll need to upgrade your PHP version or find an alternative.
Also check for required plugins. Some themes depend on specific page builders or frameworks; if the documentation mentions “Requires Elementor” or “Built on Genesis Framework,” you’ll need those installed first. This is especially common with premium themes from marketplaces like ThemeForest.
Security Considerations
Trust matters. Prioritize plugins and themes from the official WordPress.org Plugin Directory and Theme Directory, where code undergoes review and community scrutiny. Check the “Last Updated” date—if a plugin hasn’t been updated in over a year, it may be abandoned or incompatible with recent WordPress releases.
Read user reviews and support forum activity. A five-star plugin with zero recent support replies is a red flag; active developers respond to questions and release regular updates. For premium themes and plugins from third-party marketplaces, verify the seller’s reputation, check for ongoing support, and ensure they offer refunds or guarantees.
Find the Right Fit
Once you’ve done your homework, it’s time to locate the exact plugin or theme you need. WordPress makes this surprisingly easy from within your admin dashboard, but knowing where to look—and what to look for—streamlines the process and reduces the chance of picking the wrong solution.
How to Search in WordPress Admin
For plugins, navigate to Plugins > Add New in your WordPress dashboard. You’ll see a search bar at the top right; enter keywords related to the functionality you need (e.g., “contact form,” “SEO,” “social share”). WordPress will display plugins from the official directory, sorted by relevance and popularity. Each result shows the plugin name, author, star rating, number of active installations, and a brief description.
For themes, go to Appearance > Themes > Add New. The interface is similar: a search bar and filters (popular, latest, favorites) let you browse thousands of free themes. You can preview any theme by clicking the “Preview” button, which shows how your existing content would look with that theme applied—no commitment required.
If you’re installing a premium or third-party plugin/theme that you’ve purchased elsewhere, you’ll use the Upload option instead (we’ll cover that in Step 3). But for most users, the built-in directory search is the fastest and safest route.
Read Official Docs and Plugin/Theme Details
Click through to the plugin or theme’s detail page before installing. Look for:
- Active Installations: A plugin with millions of active installs has a proven track record, though niche plugins with smaller user bases can be equally solid if they’re well-maintained.
- Last Updated: Recent updates (within the last few months) indicate active development. An update from two years ago suggests the plugin may no longer be supported.
- Support Forum Activity: Scroll through recent support threads. Are users getting timely responses? Are reported bugs being acknowledged and fixed?
- Changelog: The version history shows what’s been fixed and added. Frequent updates addressing security or compatibility are positive signs.
For themes, pay attention to whether the theme is “block-based” (built for the full-site editor introduced in WordPress 5.9+) or “classic” (using traditional PHP templates). Block themes are the future, but many classic themes remain popular and well-supported. Similar guidance applies if you plan to install plugin Laravel developer guide for advanced customization—knowing your theme’s architecture helps avoid conflicts.
Verify Source Legitimacy
Stick to reputable sources. The official WordPress directories are your safest bet. If you’re considering a plugin or theme from a third-party marketplace (ThemeForest, CodeCanyon, Elegant Themes, etc.), check the vendor’s history, update frequency, and support reputation. Avoid downloading “nulled” or pirated premium themes/plugins—they often contain malware, lack updates, and violate licensing terms.
| Source | Pros | Cons |
|---|---|---|
| WordPress.org Directory | Free, vetted, community reviews, easy updates | Limited premium features, variable quality |
| Premium Marketplaces | Advanced features, dedicated support, regular updates | Cost, potential bloat, vendor lock-in |
| Developer’s Own Site | Direct support, often cutting-edge features | Less community feedback, harder to compare |
| Nulled/Pirated | Free (initially) | Malware risk, no updates, no support, illegal |
When in doubt, ask for recommendations in WordPress communities or check trusted blogs for “best [category] plugins” roundups. Just keep in mind that affiliate marketing drives many recommendations, so cross-reference multiple sources.
Installation Methods
With your backup in place and your chosen plugin or theme verified, you’re ready to install. WordPress offers several methods, each suited to different scenarios. Most users will stick to the built-in uploader, but knowing the alternatives—especially manual upload and FTP—can be a lifesaver when the standard method fails or when you’re working with premium products.
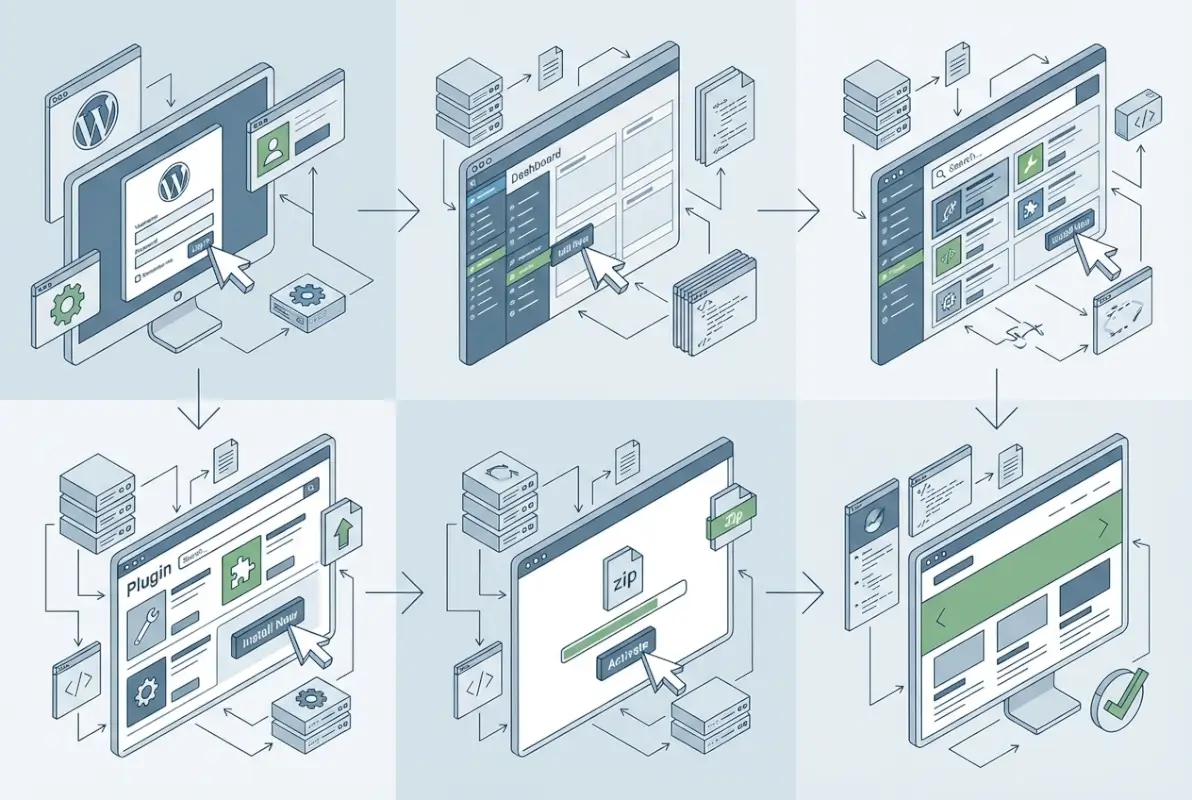
Built-in Uploader (Install Now / Activate)
This is the simplest and most common path. For plugins listed in the WordPress.org directory, go to Plugins > Add New, search for your plugin, and click the Install Now button next to the correct result. WordPress downloads and installs the plugin automatically. Once installation completes, the button changes to Activate—click it to enable the plugin on your site.
For themes, the process is nearly identical: Appearance > Themes > Add New, search, click Install, then Activate (or Live Preview to test first). Activating a theme immediately applies it to your entire site, so preview thoroughly if you’re unsure.
This method works only for free plugins and themes hosted in the official directories. If you’ve purchased a premium item or downloaded a plugin from a developer’s website, you’ll need to upload the .zip file manually.
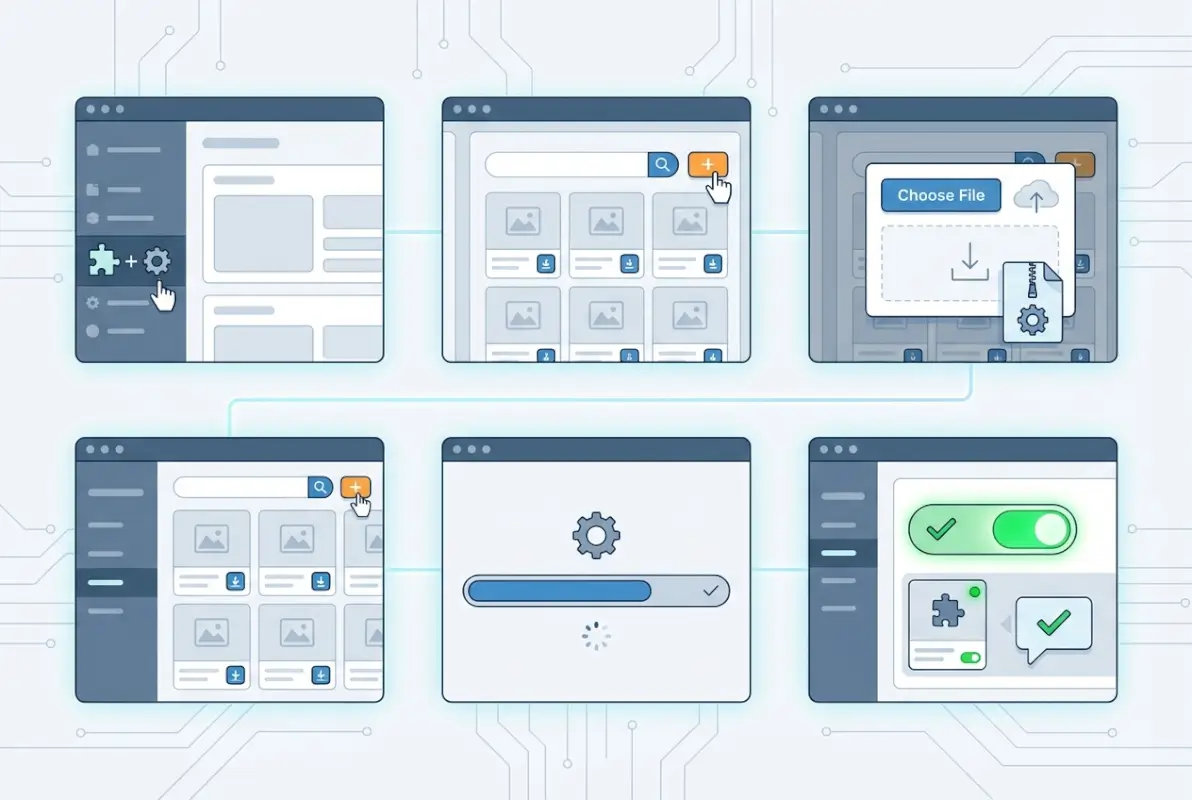
Upload from .zip (Upload Plugin / Upload Theme)
When you have a .zip file (from a premium purchase, a GitHub repository, or any external source), use the upload option. For plugins, go to Plugins > Add New > Upload Plugin at the top of the page. Click Choose File, select your .zip file, then click Install Now. WordPress extracts and installs the plugin, and you’ll see the Activate Plugin link once it’s done.
For themes, navigate to Appearance > Themes > Add New > Upload Theme, choose your .zip file, and click Install Now. After installation, you can activate the theme immediately or preview it first to ensure it displays correctly with your content.
Make sure the .zip file is properly formatted—sometimes vendors bundle extra documentation or license files in a parent folder, which can cause upload errors. If you get an error like “The package could not be installed,” try extracting the .zip locally, locating the actual plugin or theme folder inside, and re-zipping just that folder before uploading.
Alternative Methods (FTP/SFTP or WP-CLI for Advanced Users)
If your dashboard upload fails (due to server restrictions, file size limits, or permissions issues), you can manually install via FTP or SFTP. Connect to your server using an FTP client like FileZilla, navigate to /wp-content/plugins/ (for plugins) or /wp-content/themes/ (for themes), and upload the extracted plugin or theme folder there. Once uploaded, return to your WordPress admin dashboard and activate the plugin/theme as usual.
For developers comfortable with the command line, WP-CLI offers a streamlined installation method. Commands like wp plugin install [plugin-slug] --activate or wp theme install [theme-slug] --activate let you install and activate in one step, directly from your server’s SSH terminal. This is especially useful for bulk installs or automated deployments. If you’re managing multiple sites or need to install plugin Minecraft server guide steps for gaming-related WordPress projects, WP-CLI can save significant time.
Whatever method you choose, do not install multiple plugins that do the same thing. For example, don’t activate two SEO plugins or two caching plugins simultaneously—they’ll conflict, sometimes catastrophically. Test one solution at a time, and remove what you’re not using.
Activate, Configure, and Test
Installation is just the beginning. Activation tells WordPress to load the plugin or theme into your site’s runtime, but most plugins and themes require some configuration before they deliver value. Skipping this step—or worse, skipping the testing that follows—can leave you with a half-functional feature or a broken site that you don’t notice until a visitor complains.

Activate the Plugin/Theme and Adjust Settings
After clicking Activate, you’ll usually see a success message and be redirected to the plugin list (for plugins) or the theme customizer (for themes). Many plugins add a new menu item in your WordPress admin sidebar—look for the plugin’s name or check under Settings or Tools. Open the plugin’s settings page and review the default options.
Don’t assume defaults are optimal. For example, a contact form plugin might default to sending submissions to the WordPress admin email, but if you use a team inbox, you’ll want to change that. An SEO plugin might enable XML sitemaps by default, which is great—unless you already have a sitemap generated by another plugin (conflict alert). For related directory projects, understanding key steps launch successful business directory can guide which plugins to prioritize and configure first.
For themes, activating usually opens the WordPress Customizer or the full-site editor (depending on whether it’s a classic or block theme). Spend time adjusting colors, fonts, header/footer layouts, and widget areas to match your brand. If your new theme supports custom menus, assign your navigation menus in Appearance > Menus. Preview changes before publishing to avoid breaking your live site’s navigation or layout.
Configure Essential Options
Depending on the plugin or theme, you may need to configure:
- Permissions and roles: If the plugin adds new user roles (e.g., a membership plugin creating “subscriber” or “member” roles), verify that permissions align with your site’s security model.
- Security settings: Some plugins (firewalls, security scanners) have aggressive defaults that can lock out legitimate users or block certain features. Tune these carefully.
- Performance options: Caching plugins, image optimizers, and lazy-load plugins often require manual setup to avoid conflicts with existing optimization tools. If you already use a CDN or server-level caching, configure the plugin to avoid double-caching.
- Integrations: Many plugins connect to third-party services (Google Analytics, Mailchimp, payment gateways). You’ll need to enter API keys or authenticate accounts. Have these credentials ready before activation so you can complete setup in one session.
Read the plugin or theme’s documentation—most reputable developers include setup guides or wizards. Some premium themes even offer one-click demo imports that pre-configure layouts and sample content, though you should still review and customize everything before going live.
Test Site Integrity
This is where many people drop the ball. After activating and configuring, open your site in a private/incognito browser window (to avoid seeing a cached version) and systematically check:
- Front-end visuals: Browse your homepage, key landing pages, blog posts, and any custom post types. Look for layout breaks, missing images, broken fonts, or color mismatches. Test on mobile and desktop.
- Admin behavior: Click through your admin dashboard menus. Does everything load? Are there any PHP error messages at the top of pages (yellow or red warnings)?
- Interactive elements: If you installed a contact form, submit a test message. If you added a slider, verify that slides advance correctly. If you enabled a shopping cart, try adding a product to cart and proceeding to checkout.
- Site speed: Use a tool like GTmetrix or Google PageSpeed Insights to run a quick speed test. A plugin that adds heavy JavaScript or unoptimized images can tank your load time—if you see a sudden drop in performance, investigate plugin settings or consider an alternative.
If you find issues, deactivate the plugin or theme immediately, restore from your pre-install backup if necessary, and troubleshoot. Look for conflicts with other plugins, theme compatibility issues, or server configuration problems. Consulting the plugin’s support forum or documentation often reveals known conflicts and workarounds.
Long-Term Care
Installing a plugin or theme is not a one-and-done event. The WordPress ecosystem evolves constantly—new features, security patches, and compatibility updates roll out regularly. Treating your site like a living system, rather than a static artifact, ensures it remains secure, fast, and functional over time.

Update Cadence and Version Compatibility
WordPress core, themes, and plugins all release updates independently. Your dashboard will display update notifications when new versions are available (look for the orange or red badge on the Updates menu item). Establish a routine—weekly or biweekly—to review and apply updates. Before updating, take a fresh backup and check the changelog to see what’s changed. Major version updates (e.g., plugin v2.0 to v3.0) sometimes introduce breaking changes, so read release notes carefully.
When WordPress itself updates to a new major version, wait a few days before updating your site. This gives plugin and theme developers time to test compatibility and release patches if needed. For minor security releases, however, update immediately—those patches address vulnerabilities that attackers actively exploit.
If you manage multiple WordPress sites, consider using a management platform like ManageWP or MainWP to monitor updates and backups centrally. It saves hours of manual login-and-update repetition.
Security Hygiene (Disable/Remove Unused Plugins/Themes)
Every inactive plugin or theme on your server is a potential security risk. Even if deactivated, the code files remain accessible, and vulnerabilities in outdated plugins can be exploited. Periodically audit your installed plugins and themes—if you haven’t used something in months, delete it entirely (not just deactivate). WordPress will only let you delete inactive items, so deactivate first if needed.
Keep only one unused theme (like a default theme such as Twenty Twenty-Four) as a fallback in case your active theme breaks. Delete old versions of themes you no longer use. For plugins, if you’re testing multiple solutions (e.g., trying three different form builders), remove the ones you didn’t choose once you’ve made a decision.
Backup Strategy Continuity
The backup you took before installation is now outdated. Set up an automated backup schedule if you haven’t already—daily backups for active sites, weekly for static or low-traffic sites. Store backups off-site (cloud storage like Google Drive, Dropbox, or Amazon S3) so a server failure doesn’t wipe out both your site and your backups.
Test your backups periodically by performing a test restore on a staging site. A backup that can’t be restored is worthless. Many backup plugins offer one-click restore, but understanding the manual restore process (via FTP and phpMyAdmin) is valuable insurance.
Monitor Site Performance and Error Logs
After each update cycle, check your site’s front end and run a speed test. If performance degrades, identify which plugin or theme update caused the slowdown—check changelog notes or deactivate recent additions one by one to isolate the culprit. If you have access to your server’s error logs (usually via cPanel or your host’s support), review them periodically for PHP warnings or errors. These logs reveal issues that don’t always surface visually but can degrade performance or break features under certain conditions.
Some hosting providers offer performance monitoring dashboards or alerts for high CPU usage or slow database queries. If your host provides these tools, use them—they can catch problems before they affect visitors. For directory-focused sites, ensuring fast performance and uptime is critical; you might also want to list your business on Facebook directory and similar platforms to drive traffic, which makes site reliability even more important.
This statistic underscores why maintenance isn’t optional—it’s the single most effective defense against attacks. Staying current with updates dramatically reduces your risk profile.
If Things Go Wrong
Despite your best efforts, conflicts and issues can still arise. A plugin update might introduce a bug, a theme might clash with a newly installed plugin, or a server change might break compatibility. Knowing how to respond quickly minimizes downtime and frustration.
Deactivate or Rollback to Previous Version
If a newly installed plugin or theme causes problems, deactivate it immediately via Plugins or Appearance > Themes. If the admin dashboard is inaccessible due to a fatal error (white screen of death), you can deactivate plugins manually via FTP: navigate to /wp-content/plugins/, rename the problematic plugin’s folder (e.g., from example-plugin to example-plugin-disabled), and WordPress will automatically deactivate it.
Some plugins offer rollback functionality—look for a “Rollback” link on the plugin’s row in the plugin list, or install a plugin like WP Rollback that adds this feature to all plugins and themes. Rolling back to the previous version can restore functionality while you wait for the developer to fix the new version.
Restore from Backup and Re-Test
If deactivation doesn’t solve the issue or you’ve lost data, restore your pre-install backup. Most backup plugins offer a one-click restore button; follow the instructions carefully, as restoring overwrites your current site. After restoring, test the site thoroughly to confirm everything is back to normal, then investigate the root cause of the problem before attempting to reinstall the plugin or theme. Similar troubleshooting logic applies if you’re trying to install plugin Bludit simple steps on another platform—backups and rollback plans are universal best practices.
When to Seek Official Support
If you’ve tried deactivating, rolling back, and restoring but issues persist, reach out for help. For free plugins and themes from WordPress.org, post in the official support forum for that plugin or theme. Include details: WordPress version, PHP version, active plugins, and a description of the problem with screenshots or error messages.
For premium products, contact the developer’s support team via their official website or support ticket system. Premium support often responds faster and can provide tailored troubleshooting. If the issue appears to be a conflict between multiple plugins, provide a list of all active plugins and their versions—developers can often spot known conflicts immediately.
For hosting-related issues (server configuration, file permissions, etc.), contact your web host’s support. They can check server logs, adjust PHP settings, or increase resource limits that may be causing installation or activation failures.
Terminal Checklist (Concise)
Use this quick checklist every time you install a plugin or theme:
- ✅ Confirm compatibility and source: Check “Tested up to,” “Last Updated,” and reviews; prefer official directories or reputable vendors.
- ✅ Backup complete: Take a fresh, manual backup of files and database right before install.
- ✅ Install via recommended method: Use the dashboard uploader for directory items, manual .zip upload for premium, or FTP/WP-CLI if needed.
- ✅ Activate and configure: Don’t skip settings—review defaults and adjust for your site’s needs.
- ✅ Test thoroughly: Check front-end, admin, forms, mobile display, and site speed; monitor browser console for errors.
- ✅ Plan for updates and maintenance: Schedule regular update reviews, remove unused plugins/themes, and keep automated backups running.
Following this checklist transforms plugin and theme installation from a gamble into a predictable, low-risk process. You’ll spend less time troubleshooting and more time building the site you envisioned.
Frequently Asked Questions
How do I install a WordPress plugin?
Navigate to Plugins > Add New in your WordPress dashboard, search for the plugin by name or keyword, then click Install Now next to the correct result. Once installation completes, click Activate to enable the plugin. For plugins not in the directory, use Upload Plugin to install a .zip file, then activate.
How do I install a WordPress theme?
Go to Appearance > Themes > Add New, search for a theme, and click Install. After installation, click Activate to apply the theme to your site. For custom or premium themes, use Upload Theme to install a .zip file. Preview the theme before activating if you want to see how it looks with your content first.
Should I install free plugins from the WordPress directory?
Yes, the WordPress.org Plugin Directory is the safest source for free plugins. Look for plugins with recent updates (within the last few months), strong user reviews, and active support forums. Always back up your site before installing any plugin, and verify compatibility with your WordPress and PHP versions.
What if a plugin breaks my site after install?
Immediately deactivate the plugin from Plugins in your dashboard. If you can’t access the admin, rename the plugin folder via FTP to force deactivation. Restore from your pre-install backup if necessary, then investigate conflicts or consult the plugin’s support forum. Check error logs and browser console for specific error messages to share with support.
Do hosting providers offer easier plugin/theme installation?
Many managed WordPress hosts (like Kinsta, WP Engine, SiteGround) provide one-click plugin/theme installers, auto-update options, and staging environments for testing. Some hosts also curate recommended plugins or offer pre-installed suites for common needs (SEO, caching, security). Check your host’s documentation or support for platform-specific installation guides.
How often should I update WordPress plugins and themes?
Review and apply updates weekly or biweekly. For critical security patches, update immediately. Before updating, take a fresh backup and read the changelog to check for breaking changes. Major version updates may require additional testing, so consider using a staging site to preview updates before applying them to your live site.
Can I install multiple plugins that do the same thing?
No—activating multiple plugins with overlapping functionality (e.g., two SEO plugins, two caching plugins) almost always causes conflicts. Choose one solution per task, test it thoroughly, then remove alternatives. If you need to compare options, test each one individually on a staging site before deciding which to keep on your live site.
What does “Tested up to” mean on a plugin page?
“Tested up to” indicates the latest WordPress version the plugin developer has tested the plugin against. If your WordPress version is newer than the “Tested up to” version, the plugin may still work, but proceed with caution and back up first. Check recent support forum posts to see if others report compatibility issues.
Is it safe to use nulled or pirated plugins and themes?
No—nulled plugins and themes often contain malware, backdoors, or malicious code that can compromise your site and steal data. They lack updates and support, violate licensing terms, and can result in legal consequences. Always purchase or download from official, legitimate sources only.
How do I know if a plugin is causing a conflict?
Deactivate all plugins except the suspected one, then test your site. If the issue disappears, reactivate plugins one by one until the conflict reappears—the last plugin you activated is the culprit. Also check browser console (F12) and server error logs for specific error messages that name conflicting plugins or functions.
Strong, Actionable Conclusion
Installing a plugin or theme in WordPress is straightforward when you follow a disciplined, five-step process: plan and back up before you start, locate and verify the right solution, install using the appropriate method, activate and test thoroughly, then maintain with regular updates and backups. This workflow transforms what could be a risky, ad-hoc task into a repeatable, low-stress routine that protects your site and maximizes the value of every addition you make.
WordPress powers a significant portion of the web precisely because it makes extending functionality so accessible—but accessibility without discipline leads to bloated, vulnerable sites. By treating every installation as a deliberate decision, backed by a safety net (your backup) and followed by validation (your testing), you ensure that your site grows stronger with each new plugin or theme, rather than more fragile.
Take Action Now
- Audit your current plugins and themes—remove anything you’re not actively using.
- Set up an automated backup solution if you don’t have one already.
- Create a staging environment (many hosts offer this free) to test new plugins and updates before applying them live.
- Document your site’s plugin/theme configuration so you can replicate it if you ever need to rebuild or migrate.
Whether you’re just starting out or you’ve been running WordPress sites for years, a methodical installation process pays dividends in uptime, security, and peace of mind. Apply these five steps to your next plugin or theme install, and you’ll notice the difference immediately—less guesswork, fewer surprises, and a site that works exactly as you intended.