How to Install a Plugin for WordPress: A Beginner’s Guide
Generating summary...
You’ve probably heard that WordPress plugins can transform your website from a basic blog into a powerful, feature-rich platform—but here’s what most guides won’t tell you: installing the wrong plugin, or installing the right one incorrectly, can break your site faster than you can say “white screen of death.” I remember the first time I confidently clicked “Install Now” on a plugin that promised to “boost SEO instantly,” only to watch my site slow to a crawl and my error logs explode with warnings. That painful lesson taught me that plugin installation isn’t just about clicking buttons, it’s about understanding what you’re adding to your site’s ecosystem and why it matters.
The truth is, plugins are both WordPress’s greatest strength and its biggest vulnerability. With over 60,000 plugins available in the official directory alone, the power to extend your site’s functionality is immense—but so is the potential for disaster if you don’t approach installation with a strategic mindset. Whether you want to add a contact form, optimize for search engines, or protect against hackers, there’s almost certainly a plugin for that. The real question isn’t whether plugins can help you (they absolutely can), but rather how to choose, install, and maintain them without compromising your site’s speed, security, or stability.
TL;DR – Quick Takeaways
- Plugins extend WordPress functionality without requiring custom code, but poor choices can slow your site or create security vulnerabilities
- Always backup before installing any new plugin and test on staging environments when possible to avoid breaking your live site
- Quality indicators matter – check recent updates, active installations, support responsiveness, and compatibility before clicking install
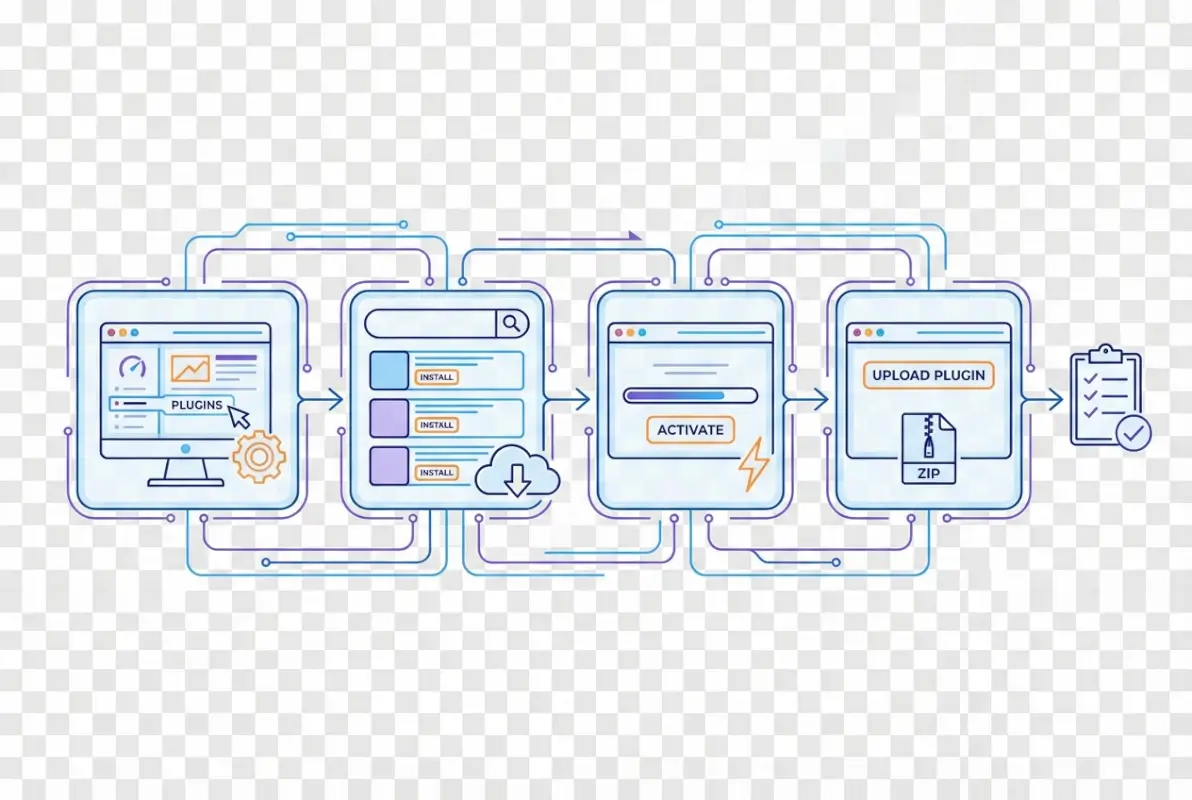
- Installation is simple via Plugins > Add New > Search > Install Now > Activate, or upload ZIP files for premium plugins
- Maintenance is critical – keep plugins updated, audit regularly, and remove unused ones to maintain security and performance
- Conflicts happen – learn to diagnose plugin clashes with themes or other plugins, and know when to seek support or find alternatives
Understanding WordPress Plugins
At its core, a WordPress plugin is a piece of software that integrates with your WordPress installation to add new features or modify existing functionality. Think of WordPress as a house with a solid foundation and basic rooms—plugins are like adding a security system, upgraded appliances, or a home theater. They hook into WordPress’s architecture using standardized APIs, which means they can extend your site without requiring you to edit core files (something you should never do anyway).
But here’s what beginners often miss: plugins aren’t magic wands that just “work.” They’re code that executes every time someone visits your site, and poorly written plugins can introduce database queries that slow page loads, create security vulnerabilities through outdated libraries, or conflict with other plugins that try to modify the same parts of WordPress. Understanding this reality helps you approach plugin selection with appropriate caution rather than installing everything that sounds useful.
What a WordPress Plugin Does (and What It Doesn’t)
Plugins can add contact forms, create ecommerce stores, optimize images, improve SEO, add social sharing buttons, implement caching, enhance security, and accomplish thousands of other specific tasks. They work by “hooking” into WordPress at specific points—when a page loads, when content is saved, when a user logs in, etc. This hook system is powerful because it allows plugins to modify behavior without changing WordPress core files.
However, plugins cannot magically fix fundamental problems with your hosting environment, theme code, or content strategy. A caching plugin won’t fix a terribly slow server, an SEO plugin won’t rank poor content, and a security plugin won’t protect you if your password is “admin123.” Plugins augment and enhance, they don’t replace good practices or proper infrastructure.
Difference Between Official WordPress.org Plugins and Third-Party Marketplaces
The official WordPress.org Plugin Directory hosts free plugins that have undergone a review process to ensure they meet basic quality and security standards. These plugins are GPL-licensed (free as in freedom, not just price), which means you can modify and redistribute them. The directory provides centralized updates, user ratings, support forums, and transparency about installation counts and recent updates.
Third-party marketplaces like CodeCanyon, commercial plugin developers’ own websites, and membership platforms offer both free and premium plugins. Premium plugins typically provide dedicated support, more advanced features, regular updates, and sometimes better documentation. The trade-off? You’re trusting individual developers or companies rather than a community-vetted repository, and you need to manage updates and licenses separately.
| Aspect | WordPress.org Directory | Third-Party/Premium |
|---|---|---|
| Review Process | Initial code review for security basics | Varies by marketplace/developer |
| Support | Community forums (variable quality) | Usually dedicated support tickets |
| Cost | Free (may have paid add-ons) | Often paid with annual renewals |
| Updates | Automatic through WordPress | Requires license key/separate system |
| Transparency | Public ratings, install counts, update history | Variable (some provide testimonials/reviews) |
Why Plugin Quality Matters (Updates, Compatibility, Security)
Plugin quality directly impacts three critical areas: security vulnerabilities, compatibility with WordPress core updates and other plugins, and performance. A well-maintained plugin receives regular updates that patch security holes, adapt to new WordPress versions, and fix bugs. An abandoned plugin becomes a liability—attackers actively search for sites running outdated plugins with known vulnerabilities.
Quality also shows in code efficiency. Some plugins make dozens of unnecessary database queries on every page load, while well-coded alternatives accomplish the same task with minimal overhead. The difference between a quality plugin and a poorly written one can literally be the difference between a site that loads in under a second versus one that takes five seconds or times out entirely.
How Plugins Affect Site Speed and Performance
Every active plugin adds some overhead—it’s unavoidable. The question is whether that overhead is proportional to the value provided. A plugin that adds one small database query and executes clean code might add 10-20 milliseconds to your load time, which is negligible. A bloated plugin might add 2-3 seconds by loading unnecessary JavaScript libraries, making inefficient database calls, or processing data poorly.
Performance impact compounds. Five mediocre plugins might individually seem acceptable, but together they create a slow site. This is why designing user-friendly directories and other professional sites requires careful plugin auditing—you need to measure actual impact, not just assume plugins are “fine.”
Preparing to Install Plugins
Preparation separates successful plugin installations from disaster stories. The few minutes you spend before clicking “Install Now” can save hours of troubleshooting later. Think of it like preparing for surgery—you wouldn’t want your doctor to skip the pre-op checklist, and you shouldn’t skip your pre-installation checklist either.
The preparation phase is where you define your actual need, research candidates, verify compatibility, and create safety nets. Rushing this process is how sites end up with fifteen plugins that all do similar things, conflicting functionality, and performance degradation that creeps up gradually until suddenly your site is unbearably slow.
Define Your Goal (Backup, SEO, Forms, Security, Performance)
Start with a clear, specific goal. Instead of “improve SEO,” try “add structured data markup for articles” or “optimize image alt tags automatically.” Specific goals help you evaluate whether a plugin actually solves your problem or just adds unnecessary features that bloat your site.
Common plugin categories include:
- Security: Firewall rules, login protection, malware scanning, two-factor authentication
- Performance: Caching, image optimization, code minification, lazy loading
- SEO: Meta tag management, XML sitemaps, schema markup, redirect handling
- Forms: Contact forms, registration forms, surveys, payment collection
- Backups: Automated backups to cloud storage, one-click restore, scheduled backups
- Content: Page builders, galleries, sliders, social sharing buttons
Each category has dozens of options, which is why starting with a clear goal prevents decision paralysis and ensures you evaluate plugins against specific criteria rather than vague impressions.
Check WordPress Version Compatibility and PHP Requirements
Before installing any plugin, verify it’s compatible with your WordPress version and your server’s PHP version. You can find your WordPress version in the dashboard footer or under Dashboard > Updates. To check PHP version, look in your hosting control panel or use a plugin like “Display PHP Version” (ironically, you need to trust this plugin first).
Plugin pages in the WordPress directory clearly state “Tested up to: WordPress 6.X” and “Requires PHP: 7.4” (or similar). If a plugin hasn’t been tested with your WordPress version, it doesn’t automatically mean it won’t work—many plugins continue functioning across multiple WordPress versions without updates. However, untested plugins carry higher risk of incompatibility, especially if WordPress made significant changes in recent versions.
Backup Your Site Before Installing New Plugins
This cannot be overstated: backup before installing or updating plugins. A complete backup includes your database (where all your content, settings, and user data live) and your files (themes, plugins, uploads). Most quality hosting providers offer automated backups, but don’t rely solely on those—know how to create and restore backups yourself.
Manual backup options include plugins like UpdraftPlus or BackupBuddy, or using your hosting control panel’s backup tools. For advanced users, command-line tools and direct database exports work well. The key is having a backup that’s recent (ideally taken minutes before the plugin installation) and accessible even if your WordPress dashboard becomes inaccessible.
Evaluate Plugin Credibility (Ratings, Support Responsiveness, Recent Updates)
Credibility indicators tell you whether a plugin is likely to be reliable, secure, and supported. Here’s what to check on the plugin’s WordPress.org page:
- Active installations: Higher numbers suggest broader usage and more community testing, but don’t automatically assume popular equals best for your needs
- Last updated: Plugins updated within the past few months show active maintenance; gaps longer than 6-12 months raise red flags
- Support forum activity: Browse recent support threads—are questions answered promptly? By the developer or community? Are critical issues acknowledged?
- Ratings distribution: Look beyond the star average; check if recent reviews are positive or if quality has declined over time
- Compatibility reports: Users can report whether the plugin works with their WordPress version; check these reports for your version
For premium plugins from third-party sources, research the developer’s reputation through searches, reviews on independent sites, and community discussions. Established companies with years of track record present lower risk than brand-new developers with no public history.
Security Considerations and Least-Privilege Plugin Choices
The principle of least privilege applies to plugins: only install what you actually need, and choose plugins that request minimal permissions. Some plugins require extensive permissions to function (a backup plugin needs read access to everything, a security plugin needs deep system access), but a simple contact form shouldn’t need administrator-level capabilities.
Review what data a plugin collects, whether it connects to external services, and whether it stores sensitive information. Read the plugin’s privacy policy if available. Be particularly cautious of plugins that require API keys to third-party services unless you understand exactly what data is being transmitted and why.
How to Find a Plugin (From WordPress.org and Trusted Sources)
Finding the right plugin is part art, part science. The WordPress.org Plugin Directory contains tens of thousands of options, and effective searching requires understanding how to filter, evaluate, and compare candidates. Beyond the official directory, premium marketplaces and developer sites offer additional options—but navigating these requires even more careful vetting.
The challenge isn’t finding a plugin that claims to solve your problem (you’ll find dozens), but identifying which one actually solves it well, maintains security and compatibility, and won’t slow your site to a crawl. This is where many beginners stumble—they search for “SEO plugin,” see twenty options with glowing descriptions, and pick randomly or based on which has the flashiest marketing.
Using the WordPress.org Plugin Directory Search and Filters
The official plugin directory at WordPress.org offers search and filtering that most people underutilize. Start with a keyword search related to your goal—”contact form,” “backup,” “security,” etc. Then apply filters:
- Popular: Sorts by active installations, showing widely-used plugins first
- Recommended: Curated selections that WordPress.org team considers quality options
- Favorites: Shows plugins you’ve favorited (useful for tracking candidates across sessions)
- Featured: Highlighted plugins, though be aware this includes sponsored positions in some contexts
You can also search directly from your WordPress admin dashboard under Plugins > Add New. This interface provides the same search functionality but allows immediate installation without leaving your admin panel. The search results show plugin names, descriptions, ratings, active installation counts, and whether they’re compatible with your WordPress version.
When comparing similar plugins, open each in a new tab and systematically compare their features, update frequency, support quality, and user feedback. Don’t just install the first result—the top-ranked plugin isn’t always the best fit for your specific needs. Sometimes a less popular plugin with focused functionality serves you better than a bloated “Swiss Army knife” plugin trying to do everything.
Reading the Plugin Page: Active Installations, Last Updated, Compatible WordPress Version
Every plugin page in the directory presents standardized information that tells you most of what you need to know. Here’s how to interpret the key indicators:
| Indicator | What It Tells You | Red Flags |
|---|---|---|
| Active Installations | How many sites currently use it; higher numbers suggest reliability | Very low numbers (under 1,000) mean less community testing |
| Last Updated | When the developer last released an update | More than 12 months ago suggests abandonment |
| Tested up to | Highest WordPress version confirmed compatible | More than 2 major versions behind current WordPress |
| PHP Version | Minimum PHP required; modern plugins require 7.4+ | Requiring outdated PHP (5.6 or below) suggests old code |
| Ratings | User satisfaction; look at distribution not just average | Recent drop in ratings or surge of 1-star reviews |
The “View details” link on each plugin reveals additional information: changelog (shows what’s been fixed or added in recent versions), screenshots (shows the plugin’s interface), installation instructions, and frequently asked questions. Reading changelogs helps you understand whether the developer actively addresses bugs and security issues or just adds cosmetic features.
Checking Support Forums and Author Responsiveness
Support forum activity reveals more about a plugin’s health than any marketing copy. Navigate to the “Support” tab on the plugin page and look for:
- Response time: How quickly do support questions get answered? By whom (developer or community volunteers)?
- Resolution rate: Are issues actually resolved, or do threads end with frustrated users giving up?
- Common problems: Do you see the same issue reported repeatedly without fixes? That’s a major red flag
- Tone and quality: Professional, helpful responses suggest a developer who cares; dismissive or absent responses suggest trouble ahead
Pay special attention to unresolved threads about security vulnerabilities, data loss, or conflicts with popular plugins/themes. If multiple users report the same critical issue without developer acknowledgment, look elsewhere regardless of how appealing the plugin seems otherwise.
When to Consider Premium/Paid Plugins and Marketplaces Cautiously
Premium plugins make sense when you need advanced features, dedicated support, or specialized functionality not available in free alternatives. Situations that justify premium plugins include:
- Business-critical functionality (e.g., ecommerce, membership sites, booking systems)
- Complex integrations with third-party services
- Advanced features that require ongoing development investment
- Priority support when you can’t afford downtime
However, premium doesn’t automatically mean better. Some free plugins outperform paid alternatives in quality, security, and features. Before buying, verify the developer’s reputation, read independent reviews (not just testimonials on their site), and understand the license terms—does the price include updates? For how long? What happens if you stop paying?
For marketplaces like CodeCanyon, research is crucial because quality varies dramatically. Check the developer’s other products, read negative reviews carefully (what problems did buyers encounter?), and verify the product is actively maintained. When developing business directory apps or similar professional projects, the investment in premium plugins might be justified—but only after thorough vetting.
Author Reputation and Plugin Maintenance Indicators
Plugin author reputation matters enormously. Established developers with multiple quality plugins and years of consistent updates represent low risk. New developers with one plugin and no track record present higher risk—not because they’re necessarily incompetent, but because you can’t predict whether they’ll maintain the plugin long-term.
Check the developer’s profile on WordPress.org to see their other plugins, how long they’ve been contributing, and their overall track record. External searches for the developer or company name can reveal reviews, discussions, and any controversies. For commercial plugins, business longevity indicates stability—a company that’s been around for five years is likelier to support their product than a brand-new startup that might pivot or disappear.
Step-by-Step: Installing a Plugin (Live WordPress Admin Experience)
The actual installation process is straightforward once you’ve done your research and preparation. WordPress provides two primary installation methods: searching and installing directly from the WordPress.org directory through your admin panel, or uploading a plugin file (typically for premium or custom plugins). Both methods take just minutes, though the post-installation configuration can range from simple to complex depending on the plugin.
Most beginners can install plugins successfully on their first try—it’s genuinely that user-friendly. The real skill lies in knowing what to do after installation: how to configure settings appropriately, how to verify the plugin is working correctly, and how to troubleshoot when things go wrong. Let’s walk through both installation methods step-by-step.
How to Install from WordPress.org (Search > Install > Activate)
Installing a plugin from the WordPress.org directory through your admin panel is the most common and safest method for beginners. Here’s the complete process:
- Log into your WordPress admin panel (usually yoursite.com/wp-admin) using your administrator credentials
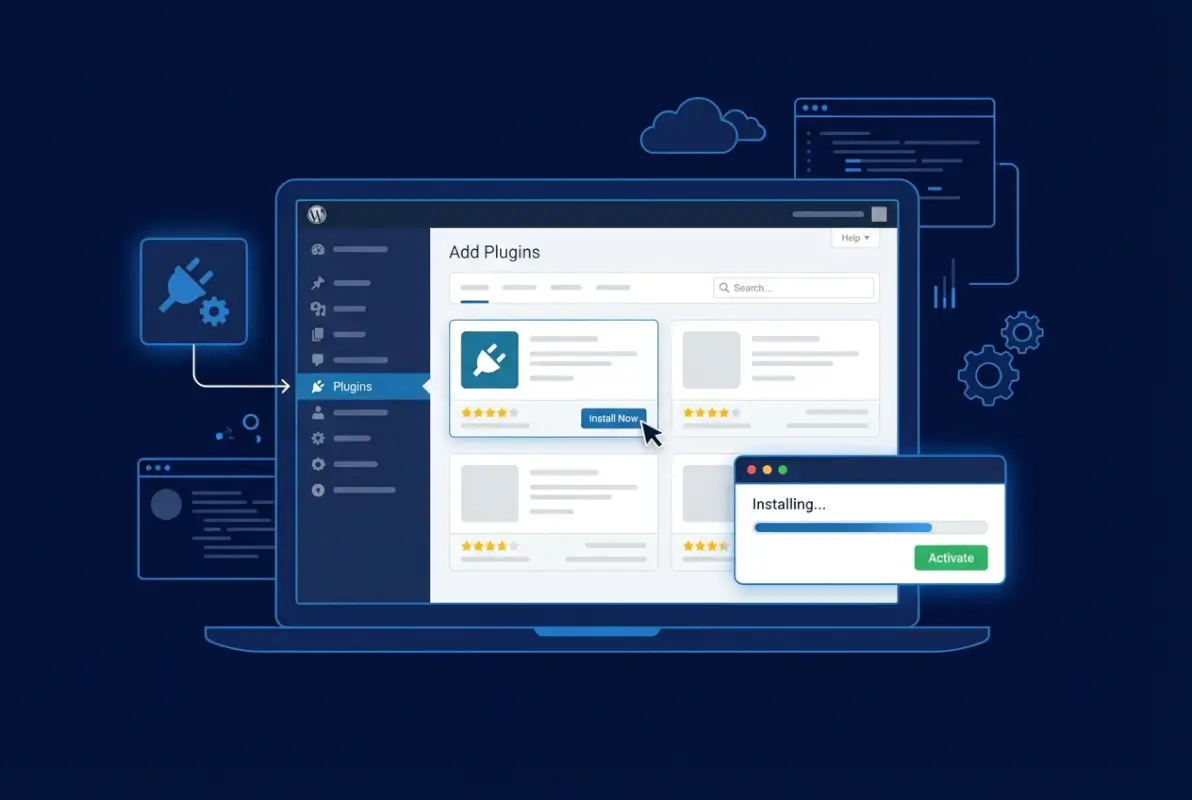
- Navigate to Plugins > Add New in the left sidebar menu
- Use the search box in the upper right to search for your desired plugin by name or keyword
- Review the search results and locate the plugin you’ve researched—verify it’s the correct one by checking the author name and description
- Click “Install Now” on the plugin card (WordPress downloads and installs the plugin files automatically)
- Wait for installation (usually 5-30 seconds depending on plugin size and your connection speed)
- Click “Activate” once the installation completes (this enables the plugin on your site)
After activation, most plugins either display a setup wizard, add new menu items in your WordPress admin sidebar, or add settings under existing menus (like Settings > Plugin Name). Some plugins work immediately with default settings, while others require configuration before they do anything useful.
Installing via Upload (ZIP File) for Premium or Custom Plugins
Premium plugins, custom-developed plugins, or plugins from third-party marketplaces require manual upload since they’re not in the WordPress.org directory. The process is only slightly more complex:
- Download the plugin ZIP file from the developer’s website, marketplace, or wherever you purchased/obtained it
- Go to Plugins > Add New in your WordPress admin
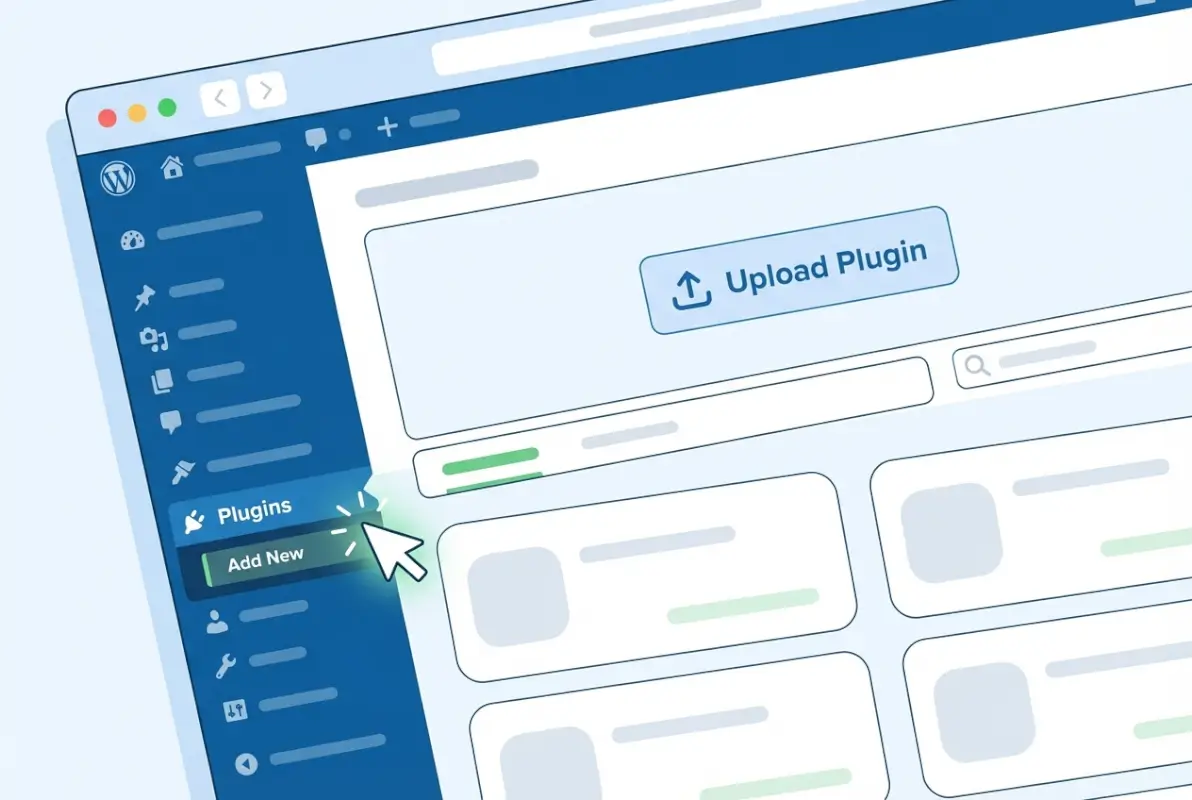
- Click “Upload Plugin” near the top of the page
- Click “Choose File” and select the ZIP file you downloaded (do not unzip it first—upload the ZIP directly)
- Click “Install Now” and WordPress will upload and extract the plugin automatically
- Click “Activate Plugin” once installation completes
Important considerations for uploaded plugins: make sure you’re downloading from the legitimate source (phishing and malware distribution through fake plugin sites is a real problem), keep the download file for your records in case you need to reinstall, and understand that uploaded plugins won’t receive automatic updates through WordPress—you’ll need to manually update them when new versions are released.
Activating and Configuring the Plugin (Initial Setup Wizards)
Activation makes the plugin’s code execute on your site, but it doesn’t necessarily mean the plugin is configured correctly. Many modern plugins include setup wizards that walk you through initial configuration—don’t skip these. They often set crucial settings that determine whether the plugin works optimally for your specific needs.
Common configuration steps include:
- Connecting external services: API keys for services like Google Analytics, email providers, or payment processors
- Choosing operational modes: Aggressive vs. balanced vs. conservative settings for caching, security, or optimization
- Selecting features: Enabling or disabling specific functionality within a multi-feature plugin
- Setting permissions: Determining which user roles can access plugin features
- Initial scans or audits: Security plugins might scan your site, backup plugins might create an initial backup
After initial setup, familiarize yourself with the plugin’s settings location. Most plugins add a menu item in the WordPress admin sidebar, place settings under Settings > Plugin Name, or add options to existing WordPress menus (like Appearance for theme-related plugins). Knowing where to find settings prevents frustration later when you need to adjust configuration.
Basic Post-Install Checks: Permissions, Conflict Checks, and Plugin Compatibility
After activating and configuring a new plugin, perform these verification steps before considering the installation complete:
- Test the core functionality: If you installed a contact form, send yourself a test message; if you installed caching, verify pages still load correctly; if you installed security features, confirm they’re not blocking legitimate access
- Check for visual breaks: Browse your site’s front end and verify your theme still looks correct—some plugins inject CSS or JavaScript that can conflict with theme styling
- Monitor site speed: Use your browser’s developer tools (F12, Network tab) or a tool like GTmetrix to compare page load times before and after plugin activation
- Review error logs: If your hosting provides error logs, check for PHP warnings or errors that appeared after plugin activation (they might not break your site immediately but could cause problems later)
- Test on different devices: Mobile versus desktop display can reveal issues that aren’t apparent on one device type
If you notice problems during these checks, you’ve likely discovered a plugin conflict or compatibility issue. Don’t ignore small glitches—they often worsen over time or indicate deeper problems that will cause failures later. For guidance on installing multiple plugins efficiently, especially when setting up new sites, understanding these verification steps becomes even more critical.
Managing Updates and Deactivation/Removal Guidelines
Plugin management doesn’t end with installation. WordPress notifies you when plugin updates are available (a number badge appears next to “Plugins” in your admin menu). You can update plugins individually or in bulk from the Plugins > Installed Plugins page.
Update best practices:
- Backup before major updates: Especially for complex plugins like page builders or ecommerce platforms
- Read update changelogs: Understand what’s changing—sometimes updates introduce breaking changes that require theme or configuration updates
- Test on staging first: If you have a staging environment, update there first and verify everything works before updating production
- Update promptly for security patches: Don’t delay security updates—vulnerabilities are often exploited within days of patch releases
To deactivate a plugin (disable it without deleting), click “Deactivate” on the Plugins page. The plugin stays installed but stops executing, and your settings are preserved. To completely remove a plugin, first deactivate it, then click “Delete”—this removes all plugin files and usually (but not always) removes the plugin’s database entries and settings.
Post-Install: Configuration, Testing, and Maintenance
The difference between a plugin working adequately and working optimally lies in post-installation attention. Configuration, ongoing testing, and regular maintenance separate sites that leverage plugins effectively from sites that just accumulate plugins without strategy. This phase is where many beginners falter—they install a plugin, see it “works,” and never revisit settings or consider whether it’s actually delivering value proportional to its overhead.

Think of plugins like appliances in your home: installing a refrigerator isn’t enough, you need to set the right temperature, clean the coils periodically, and monitor whether it’s actually keeping food fresh. Similarly, an installed plugin requires ongoing attention to configuration, performance monitoring, and regular updates to remain secure and effective.
Basic Configuration Patterns (Where to Find Settings, Common Fields)
Plugins typically place settings in one of several standard locations within WordPress admin:
- Dedicated top-level menu: Major plugins often add their own menu item in the sidebar (e.g., “WooCommerce,” “Yoast SEO”)
- Settings submenu: Many plugins add an entry under Settings (e.g., Settings > Plugin Name)
- Tools submenu: Utility plugins often place options under Tools
- Existing menu integration: Content-related plugins might add options under Posts or Pages
- Toolbar (admin bar): Some plugins add quick-access items to the WordPress admin bar at the top of your screen
Common settings you’ll encounter across most plugins include:
| Setting Type | Purpose | Typical Options |
|---|---|---|
| General/Basic | Enable/disable core features | On/off toggles, feature selection checkboxes |
| Advanced | Fine-tune plugin behavior | Technical parameters, exclusion rules, custom code |
| Integrations | Connect external services | API keys, account credentials, service selection |
| Appearance | Customize visual presentation | Colors, layouts, display options |
| Permissions | Control user access | Role-based access, capability management |
Don’t change advanced settings unless you understand what they do. Many plugins ship with sensible defaults that work well for most use cases. When you do adjust settings, change one thing at a time and test the impact before making additional changes—this makes troubleshooting easier if something breaks.
Conflict Avoidance (Disable Conflicting Plugins, Test Changes on Staging if Possible)
Plugin conflicts occur when two plugins try to modify the same WordPress functionality, load competing JavaScript libraries, or clash in their database operations. Common conflict scenarios include:
- Two caching plugins (causing unpredictable caching behavior)
- Multiple SEO plugins (generating duplicate meta tags or conflicting sitemaps)
- Security plugins with overlapping features (creating redundant protection or blocking legitimate actions)
- Page builders that don’t work well together (especially when mixed with theme builders)
Conflict prevention strategies:
- Avoid functional overlap: Don’t install multiple plugins that do essentially the same thing
- Research known conflicts: Before installing, search for “[plugin A] conflicts with [plugin B]” if you know you’re using potentially conflicting plugins
- Use staging environments: Test new plugins on a copy of your site before installing on production
- Enable conflict detection: Some plugins (particularly page builders) include diagnostic modes that identify conflicting scripts or styles
- Keep detailed records: Document when you install plugins and what you configure—this makes correlating problems with recent changes much easier
If you suspect a conflict but aren’t sure which plugin is causing it, use the “binary search” troubleshooting method: deactivate half your plugins, test if the problem persists, then narrow down by reactivating half of the deactivated group until you identify the culprit.
Performance and Security Hygiene (Only Keep Necessary Plugins, Regular Updates)
Plugin hygiene means regularly auditing what you have installed and removing anything that isn’t actively providing value. Every plugin carries security risk, performance overhead, and maintenance burden—unused plugins waste resources without benefit. When you’re monetizing business directories or running commercial sites, performance directly impacts revenue, making plugin hygiene even more critical.
Monthly or quarterly plugin audits should ask:
- Is this plugin still being used for its intended purpose?
- Has the plugin been updated recently, or is it potentially abandoned?
- Does this plugin have known security vulnerabilities?
- Could this plugin’s functionality be achieved with existing plugins or WordPress core features?
- Is the performance impact of this plugin justified by its benefit?
Remove plugins that fail these tests. Deactivation alone isn’t sufficient—inactive plugins still consume disk space and can potentially be exploited if they contain vulnerabilities, so delete plugins you’re not using.
Backups and Rollback Strategies if Something Goes Wrong
Despite careful preparation, plugin installations sometimes break things. Having a rollback strategy turns a potential disaster into a minor inconvenience. Your rollback plan should include:
- Recent backups: Daily automated backups stored off-site (not just on your web server)
- Quick restore process: Know exactly how to restore from backup—have you actually tested the restore process?
- Database rollback capability: Understand how to restore just the database if only that was affected
- File access: FTP or file manager credentials to manually remove plugins if your admin panel becomes inaccessible
- Hosting support contact: Know how to reach your host’s support if you need help restoring access
When a plugin breaks your site badly enough that you can’t access the admin panel, you can manually disable plugins by renaming their folders via FTP or file manager. Navigate to wp-content/plugins/ and rename the problematic plugin’s folder (add “-disabled” to the end). WordPress will deactivate the plugin, usually restoring access to your site.
Ongoing Maintenance: Monitoring Updates, Support Channels, and Deprecation Awareness
Plugin maintenance is an ongoing commitment, not a one-time task. Establish routines for:
- Weekly update checks: Review available updates and apply security patches promptly
- Monthly full updates: Apply all available updates (after backing up) to keep everything current
- Quarterly audits: Review all installed plugins for necessity, performance, and maintenance status
- Deprecation monitoring: Watch for notices that plugins will be discontinued or replaced
Stay informed about security vulnerabilities by subscribing to WordPress security newsletters or following reputable security blogs. When vulnerabilities are disclosed for plugins you use, update immediately—attackers often exploit known vulnerabilities within hours of public disclosure.
Troubleshooting Common Plugin Issues
Even with careful installation and maintenance, plugin problems occasionally occur. Conflicts emerge when you update WordPress core or add new plugins, performance issues creep in gradually, and mysterious errors appear without obvious cause. Effective troubleshooting requires systematic diagnosis rather than panicked plugin deletion—the latter often makes problems worse by removing functionality without addressing root causes.
Plugin Conflicts with Themes or Other Plugins
Conflicts typically manifest as broken layouts, missing functionality, JavaScript errors, or PHP warnings. Symptoms include buttons that don’t work, forms that won’t submit, pages that display incorrectly, or features that simply stop functioning. Diagnosing conflicts systematically:
- Identify the symptom precisely: What specifically isn’t working? When did it start?
- Check for recent changes: Did you recently update plugins, WordPress core, or your theme?
- Review browser console errors: Open your browser’s developer tools (F12) and check the Console tab for JavaScript errors
- Deactivate plugins systematically: Deactivate all plugins, then reactivate them one at a time, testing after each reactivation
- Switch to a default theme: Temporarily switch to a WordPress default theme (like Twenty Twenty-Three) to rule out theme conflicts
Once you’ve identified the conflicting plugin or theme, check support forums for known conflicts and solutions, contact the developer for assistance, or search for alternative plugins that provide similar functionality without conflicts.
White Screen of Death or Error Messages Post-Install
The “White Screen of Death” (WSOD)—a completely blank page with no error message—is WordPress’s cryptic way of saying something failed catastrophically. PHP fatal errors, memory exhaustion, or syntax errors in plugin code commonly cause this. Recovery steps:
- Enable WordPress debugging: If you can access files via FTP, edit wp-config.php and add:
define('WP_DEBUG', true);anddefine('WP_DEBUG_LOG', true);to generate error logs - Check error logs: Look in wp-content/debug.log or your hosting error logs for specific error messages
- Increase memory limit: In wp-config.php, try adding:
define('WP_MEMORY_LIMIT', '256M'); - Manually disable plugins: Via FTP, rename the wp-content/plugins folder to plugins-disabled, which deactivates all plugins
- Restore from backup: If nothing else works, restore from your most recent backup
After recovering, investigate what caused the WSOD before attempting to reinstall the problematic plugin. Often the solution requires updating PHP version, increasing server resources, or finding an alternative plugin.
Performance Regression and Caching Interplay
Performance problems after plugin installation usually stem from inefficient database queries, excessive HTTP requests, or conflicts with caching systems. Diagnosis requires measurement—use tools like Query Monitor (a plugin itself) to identify performance bottlenecks, or browser developer tools to analyze page load times and resource loading.
Caching plugins particularly complicate troubleshooting because they can mask problems or create seemingly random behavior when cached and fresh versions of pages display differently. When troubleshooting, always clear all caches—plugin cache, browser cache, CDN cache, and server cache—before testing changes.
Safe Mode Testing and Diagnostic Steps
WordPress doesn’t have a built-in “safe mode,” but you can simulate one through various methods:
- Troubleshooting Mode plugin: Some hosts offer one-click troubleshooting mode that disables plugins only for administrators while keeping the site functional for visitors
- Health Check & Troubleshooting plugin: Provides a troubleshooting mode that lets you test with plugins disabled without affecting live visitors
- Staging environments: Clone your site to staging and troubleshoot there without risking the live site
Systematic diagnostic steps follow this pattern: isolate variables (test one thing at a time), document observations (what changed when you made each adjustment), replicate the problem (can you make it happen consistently?), and research solutions (search for error messages and symptoms).
How to Obtain Help: Support Forums, Plugin Authors, and WordPress Community Resources
When you can’t solve a problem independently, quality support sources include:
- Plugin support forums: On WordPress.org, each plugin has a support forum—search existing threads first, then post detailed questions including WordPress version, PHP version, active plugins, and steps to reproduce the problem
- Plugin developer support: Premium plugins usually offer ticket-based support—be specific and provide system information when requesting help
- WordPress.org support forums: General WordPress questions can be asked in the broader forums
- Stack Exchange: WordPress Stack Exchange hosts technical Q&A with experienced developers
- Community groups: Local WordPress meetups, Facebook groups, and Reddit communities offer peer support
When asking for help, provide context: what you were trying to accomplish, what you expected to happen, what actually happened, steps to reproduce the problem, and relevant system information. Vague questions like “it doesn’t work” rarely get useful answers, but detailed problem descriptions with error messages usually receive helpful responses quickly.
Security, Updates, and Ongoing Care
Plugin security isn’t optional or paranoid—it’s essential maintenance that prevents data breaches, site defacement, malware infections, and the associated costs of cleanup and reputation damage. The intersection of plugins and security creates unique challenges because you’re trusting third-party code to execute on your server with substantial privileges, potentially accessing your database, files, and user data.
Importance of Timely Updates and Patching Vulnerable Plugins
Security vulnerabilities in WordPress plugins are discovered regularly. Responsible developers patch vulnerabilities quickly and release updates, but those updates only protect your site if you actually install them. The window between vulnerability disclosure and exploitation can be measured in hours—automated bots scan the web for vulnerable sites almost immediately after vulnerability details become public.
Recent examples underscore the urgency: popular plugins with millions of installations have disclosed critical vulnerabilities that allowed attackers to take complete control of websites. Sites that updated promptly remained secure; sites that delayed faced compromise, malware injection, or worse. This isn’t theoretical risk—it’s documented, ongoing threat activity.
Update priorities:
- Security patches: Install immediately, preferably within hours of release
- Compatibility updates: Install promptly to maintain compatibility with WordPress core updates
- Feature updates: Can be deferred slightly but shouldn’t be ignored long-term
How to Audit Plugins for Security and Reliability
Regular security audits should evaluate each plugin against multiple criteria:
- Update frequency: When was the last update? Abandoned plugins pose security risks
- Vulnerability history: Search “plugin name vulnerability” to check if it has a history of security issues
- Code quality indicators: Does it follow WordPress coding standards? Reviews from developers can reveal code quality concerns
- Permissions and capabilities: What can the plugin access? Does it request excessive permissions?
- External connections: Does it phone home to external services? What data does it transmit?
Third-party security scanners like Wordfence, Sucuri, or iThemes Security can identify known vulnerabilities in your installed plugins and alert you to security risks. These scans should run regularly, not just once during setup.
Handling Abandoned or Unmaintained Plugins (Risks and Alternatives)
Abandoned plugins—those that haven’t been updated in 18+ months—present difficult decisions. They might work perfectly now but represent accumulating security debt. As WordPress evolves, PHP advances, and security standards change, unmaintained code becomes increasingly vulnerable.
When you discover an abandoned plugin on your site:
- Research alternatives: Look for maintained plugins with similar functionality
- Assess criticality: How essential is this plugin’s functionality? Can you live without it or use a different approach?
- Test replacement: On staging, try alternative plugins and verify they work with your site
- Plan migration: Document the abandoned plugin’s settings and create a migration plan to the replacement
- Execute transition: Replace the abandoned plugin during a maintenance window, with full backups and rollback plan ready
Never keep abandoned plugins “just in case” or because replacement seems inconvenient. The security risk compounds over time, and eventually, you’ll face forced migration under crisis conditions when a vulnerability is exploited.
Backup and Recovery Planning
Comprehensive backup strategy includes:
- Automated daily backups: Database and files, stored off-site (not just on your web server)
- Retention policy: Keep at least 30 days of daily backups, plus monthly backups for longer-term retention
- Verified restores: Actually test restore procedures quarterly—backups you can’t restore are useless
- Multiple backup methods: Use both hosting backup services and plugin-based backups for redundancy
- Off-site storage: Store backups in cloud storage (Dropbox, Google Drive, Amazon S3) separate from your web host
Document your restore process step-by-step so that during an actual emergency, you’re following established procedure rather than figuring things out under pressure. Include contact information for hosting support and any other resources you might need during recovery.
Alternatives to Plugins: When to DIY or Use Built-in Features
Not every feature requires a plugin. WordPress has evolved substantially over the years, incorporating functionality that once required plugins into core features. The block editor (Gutenberg), for example, provides layout and design capabilities that previously required page builder plugins. Understanding when plugins add genuine value versus when they’re solving problems that don’t exist anymore helps maintain lean, performant sites.
WordPress Built-in Features and Blocks (Gutenberg)
Modern WordPress includes powerful built-in functionality often overlooked in favor of plugins:
- Block patterns: Pre-designed block layouts for common page sections without page builder plugins
- Full Site Editing: Block themes allow complete site design without separate theme builders
- Media handling: Basic image editing, galleries, and media management without utility plugins
- User management: Built-in roles and capabilities handle many permission scenarios without user management plugins
- Widgets and menus: Core widget and menu systems cover standard navigation and sidebar needs
Before installing a plugin, ask whether WordPress core already provides the functionality, perhaps through features you haven’t explored yet. The block editor’s capabilities surprise many users who assume they need plugins for layouts and designs actually achievable with core blocks.
Lightweight Approaches Versus Feature-Bloat
Feature-bloat occurs when plugins try to be everything to everyone, including massive codebases with dozens of features when you only need two or three. A contact form plugin that includes email marketing, CRM integration, payment processing, and analytics might sound impressive, but if you only want contact forms, the extra code slows your site without providing value.
Lightweight plugin philosophy prioritizes doing one thing exceptionally well rather than doing twenty things adequately. When comparing plugins, consider whether simpler alternatives might serve your actual needs better than feature-rich “Swiss Army knife” plugins. For scenarios like promoting business directories on Facebook, focused plugins that handle specific tasks often outperform all-in-one solutions.
Evaluating Whether a Feature Should Be Implemented With a Plugin or Custom Code
Custom code (in theme functions or a site-specific plugin) makes sense when:
- You need very specific functionality not available in existing plugins
- Available plugins are overkill for your simple need
- You want complete control over implementation and updates
- The feature is unique to your site and unlikely to be useful elsewhere
Plugins make sense when:
- The functionality is complex and would require significant development time
- Existing quality plugins already solve your problem well
- You need ongoing updates and maintenance from plugin developers
- The feature requires broad compatibility testing across multiple WordPress versions
The breakeven point varies based on your technical skills and available time. For developers, writing custom code for simple features might take less time than researching, testing, and configuring plugins. For non-technical users, plugins almost always represent better value than hiring custom development.
Performance-Minded Approach to Feature Parity
Performance-minded WordPress means constantly asking “is this feature worth its performance cost?” Every animation, every social sharing button, every related posts widget consumes resources. Measure actual performance impact using tools like Query Monitor or browser developer tools, then decide whether each feature’s value justifies its overhead.
Sometimes the best plugin decision is installing no plugin at all—accepting that your site doesn’t need every possible feature, focusing instead on the features that genuinely serve your users and business goals. This minimalist approach typically results in faster, more reliable sites that provide better user experiences than feature-packed alternatives that try to do everything.
Case Study: Common Plugin Categories and Example Workflows
Understanding how plugins work in practice requires examining real workflows for common use cases. Let’s walk through typical scenarios you’ll encounter when building and maintaining WordPress sites, with specific examples of how to approach each category strategically.
Contact Forms (Setup and Test Submissions)
Contact forms are among
Was this article helpful?