How to Install a Plugin in Laravel: A Developer’s Guide

Generating summary...
If you’re building or maintaining a Laravel application, you’ll inevitably need to extend its capabilities with third-party packages—what many developers casually call “plugins.” But here’s something most tutorials won’t tell you upfront: the term “plugin” is actually a bit of a misnomer in Laravel’s ecosystem. Unlike WordPress or Joomla, Laravel doesn’t have a formal “plugin” architecture. Instead, it relies on Composer packages with an elegant auto-discovery system that makes installation surprisingly painless—when you know the right approach. The problem? Many developers waste hours troubleshooting compatibility issues, missing service providers, or published assets that never appear, simply because they skipped a critical step or misunderstood how Laravel’s package discovery actually works.
TL;DR – Quick Takeaways
- Composer is your gateway – Nearly all Laravel packages install via
composer require, not manual downloads - Auto-discovery handles most setup – Laravel 5.5+ automatically registers service providers for compatible packages
- Publishing is often required – Config files, migrations, and assets usually need
php artisan vendor:publishafter installation - Version compatibility matters – Always check package documentation for Laravel version support before installing
- Security isn’t automatic – Only install packages from trusted sources and review maintainer reputation on Packagist
Overview of Laravel Plugins and Packages
Let’s clear up the terminology first, because understanding the distinction will save you confusion later. In Laravel’s world, everything is technically a “package”—reusable code libraries that extend your application’s functionality. Some developers call them plugins, extensions, or bundles, but Laravel’s official documentation consistently uses “package.” This isn’t just semantic pedantry; it reflects how Laravel’s architecture treats these components.
A package can be as simple as a collection of helper functions or as complex as a full-featured CMS. The key characteristic is that packages are distributed through Composer, PHP’s dependency manager, and they integrate with Laravel’s service container. Some packages are framework-agnostic (meaning they work with any PHP project), while others are Laravel-specific with tight framework integration through service providers and facades.
What Counts as a “Plugin” vs. a “Package” in Laravel
Here’s the practical difference: when someone says “Laravel plugin,” they usually mean a Laravel-specific package that provides complete functionality out of the box—think of authentication systems like Laravel Passport, debugging tools like Telescope, or media management libraries like Spatie Media Library. These packages deeply integrate with Laravel’s architecture, registering routes, publishing migrations, and hooking into the application lifecycle.
Framework-agnostic packages, on the other hand, might be general PHP libraries that happen to work in Laravel. For example, Guzzle (an HTTP client) or Carbon (a datetime library) aren’t specifically “Laravel packages,” but they’re commonly used in Laravel projects. The installation process is identical for both types, which is one of Laravel’s strengths—Composer doesn’t care about the distinction.
What You’ll Typically Install
Most Laravel packages you’ll encounter come from Packagist, the main Composer repository. Browse there first when you need functionality—chances are someone’s already solved your problem. Popular categories include payment gateways (Stripe, Cashier), API tools (Laravel Sanctum, Passport), admin panels (Nova, Filament), and utilities for everything from image manipulation to PDF generation.
The typical package includes a service provider (the bootstrap code that registers the package with Laravel), optional facades (convenient static interfaces to package functionality), configuration files, and sometimes database migrations or publishable assets like JavaScript or CSS files. Modern packages leverage Laravel’s auto-discovery feature, which we’ll cover shortly—it’s honestly one of the framework’s best time-savers.
Prerequisites
Before installing any package, you need three things: PHP (matching Laravel’s version requirements), Composer installed globally or in your project, and an existing Laravel application. Laravel 10 requires PHP 8.1 or higher, but if you’re still on Laravel 8 or 9, check the specific PHP version requirements in the official documentation. Running php -v and composer -V in your terminal will confirm you’re ready to proceed.
Your Laravel project should be in a working state—all existing Composer dependencies installed, no broken migrations, and ideally version-controlled with Git so you can roll back if something goes wrong. I’ve seen developers try to troubleshoot package issues only to realize their core Laravel installation was already broken, wasting hours on the wrong problem.
Preparation and Prerequisites
Jumping straight into composer require without checking compatibility is a recipe for frustration. Spend two minutes on preparation and you’ll avoid hours of debugging later. This isn’t theoretical advice—I once spent an entire afternoon troubleshooting why a package’s migrations wouldn’t run, only to discover I’d installed a version designed for Laravel 9 into a Laravel 8 project. The error messages were cryptic and completely unhelpful.
Check Laravel Version and Package Compatibility
First, confirm your Laravel version with php artisan --version or by checking the laravel/framework version in your composer.json. Then, visit the package’s documentation—usually linked from its Packagist page—and look for a compatibility table or installation instructions specifying which Laravel versions are supported. This information is typically in the README file on GitHub.
Some packages maintain separate branches for different Laravel versions. For example, version 3.x might support Laravel 9, while version 4.x supports Laravel 10. Installing the wrong major version will lead to class not found errors, method signature mismatches, or subtle bugs that surface days later. When in doubt, check the package’s GitHub issues—someone else has probably already asked about version compatibility.
Update Composer and Vendor Autoload
Before adding new packages, run composer update to ensure your existing dependencies are current and compatible. This might seem counterintuitive (why update everything when you just want to add one package?), but Composer needs to resolve the entire dependency tree, and outdated packages can block new installations with cryptic version conflict errors.
After any Composer operation, the autoload files regenerate automatically, but if you’ve manually edited files in the vendor directory (which you shouldn’t do, but sometimes debugging demands it), run composer dump-autoload to refresh the autoloader. This command rebuilds the class map and ensures PHP can find all your dependencies.
Installing a Plugin via Composer (Core Workflow)
Now we get to the actual installation process, which is remarkably straightforward once you understand the underlying mechanics. Composer handles all the heavy lifting—downloading files, resolving dependencies, updating your composer.json, and registering autoload paths. Your job is simply to tell Composer what you want and then configure any Laravel-specific features the package provides.
Discover the Right Package on Packagist
Head to Packagist and search for your desired functionality. The search results show package names (in vendor/package format), download counts, and star ratings—useful popularity indicators but not the whole story. Click through to the package detail page to check the last update date, number of dependents (other packages using it), and required PHP/Laravel versions.
Read the GitHub repository’s README carefully. Well-maintained packages include clear installation instructions, feature lists, and examples. Check the issues tab for unresolved bugs or common problems. If a package hasn’t been updated in two years and has dozens of open issues about compatibility with recent Laravel versions, that’s a red flag—look for alternatives or forks that are actively maintained.
| Quality Indicator | Green Flag | Red Flag |
|---|---|---|
| Last Update | Within 6 months | Over 18 months ago |
| Documentation | Comprehensive with examples | Sparse or outdated |
| Open Issues | Active responses from maintainers | Many unresolved, no maintainer replies |
| Test Coverage | Has tests, CI badges present | No tests or CI setup |
Run the Standard Installation Command
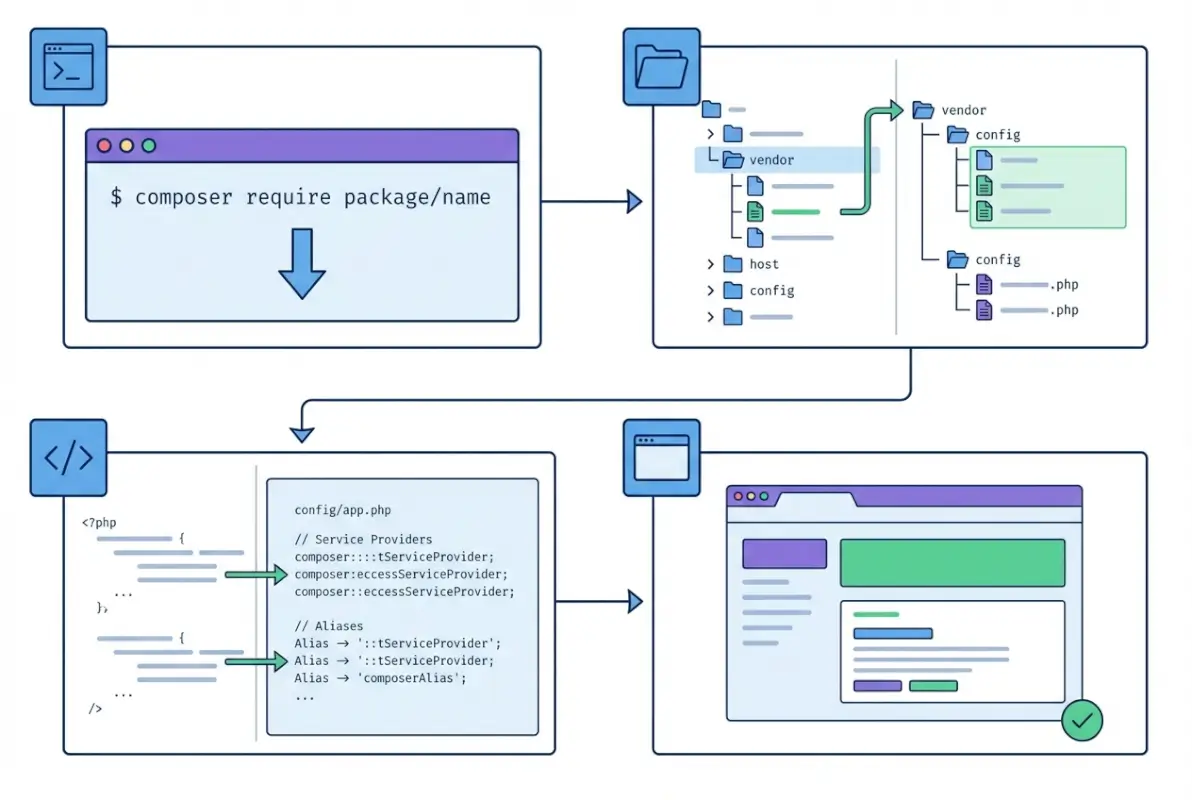
Once you’ve found the right package, installation is usually a single command: composer require vendor/package-name. For example, to install the popular Spatie Permission package, you’d run composer require spatie/laravel-permission. Composer will download the package and all its dependencies, add entries to your composer.json and composer.lock files, and update the autoloader.
Watch the terminal output for any errors or warnings. If Composer reports version conflicts, read the message carefully—it usually tells you exactly which package versions are incompatible. Sometimes you’ll need to specify a version constraint: composer require vendor/package:^2.0 to install version 2.x but not 3.x. The caret (^) means “compatible with,” allowing minor version updates but not major version bumps.
The installation process should complete in seconds to minutes depending on package size and your internet connection. When it finishes, you’ll see a list of installed packages and any post-install scripts that ran. Don’t ignore post-install messages—packages sometimes output important configuration instructions.
Automatic Package Discovery (Laravel 8+)
Here’s where Laravel gets really elegant. Since version 5.5 (and improved in subsequent versions), Laravel supports automatic package discovery. When a package includes a laravel section in its composer.json with provider and alias information, Laravel automatically registers the service provider and facades without any manual configuration on your part.
This means for most modern packages, you’re essentially done after composer require. No editing config/app.php, no manual provider registration. Laravel scans the installed packages, finds the discovery configuration, and handles registration during the framework’s bootstrap process. You can verify auto-discovery worked by running php artisan package:discover—it lists all auto-discovered packages and their providers.
Post-Install Steps (Vendor/Autoload, Assets, Migrations, Etc.)
Even with auto-discovery, most packages require additional setup steps. The most common is publishing configuration files with php artisan vendor:publish --provider="Vendor\Package\ServiceProvider". This copies the package’s default config file from the vendor directory to your application’s config directory, where you can customize settings without modifying vendor files (which would get overwritten on updates).
Some packages include database migrations for creating required tables. After publishing, run php artisan migrate to execute them. Others might publish views, language files, or public assets (CSS, JavaScript, images). The package documentation should specify which publish commands are necessary—many packages support tagged publishing, letting you publish only specific resource types: php artisan vendor:publish --tag=config or --tag=migrations.
Here’s a typical post-install workflow for a package that needs everything:
- Run
composer require vendor/package - Publish config:
php artisan vendor:publish --provider="Vendor\Package\ServiceProvider" - Review and edit
config/package.phpas needed - Run migrations:
php artisan migrate - Clear cache:
php artisan config:clearandphp artisan cache:clear
That last step—clearing caches—is easy to forget but critical in production environments where Laravel caches configuration for performance. After publishing new config files, the cached version is stale, and your changes won’t take effect until you clear it, especially when working with WordPress plugin installations that require similar cache management.
Verifying Installation
Before proceeding, verify the package installed correctly. Check that the vendor directory contains the package: ls vendor/vendor-name/package-name. If you published config files, verify they exist in config/. If the package provides artisan commands, run php artisan list and look for the new commands in the output.
Many packages include a “test” route or command for verification. For example, Laravel Debugbar shows up in your browser’s toolbar once installed. If something’s not working, check storage/logs/laravel.log for error messages—often the problem is a missing PHP extension or misconfigured environment variable.
Manual Installation and Non-Composer Scenarios
While Composer is the standard and strongly recommended approach, occasionally you’ll encounter scenarios requiring manual intervention. Maybe you’re working with a private package not on Packagist, testing a package under development, or dealing with a legacy codebase that predates modern Laravel conventions. These situations are rare but worth understanding, especially as you explore directory solutions that may have custom installation requirements.
When You Might Install Without Composer Require
Private repositories or in-house packages not published to Packagist can still use Composer by adding a custom repository to your composer.json. Add this to the root level of your composer.json:
"repositories": [
    {
        "type": "vcs",
        "url": "https://github.com/your-company/private-package"
    }
]
Then run composer require your-company/private-package as normal. Composer will clone from the specified repository. For local development packages, use a path repository: "type": "path", "url": "../local-packages/my-package". This lets you develop a package and test it in a Laravel application simultaneously without publishing to Packagist.
Truly manual installation—copying files directly into your Laravel app without Composer—is strongly discouraged. You lose dependency management, autoloading, and easy updates. If you absolutely must do this (for example, with ancient code that has no composer.json), create a packages directory in your project root, add it to your application’s composer.json autoload paths, and manually register service providers. But seriously, convert it to a proper Composer package first if at all possible.
Package Discovery and Service Provider Registration (If Auto-Discovery Is Not Available)
Some older packages or those that intentionally disable auto-discovery require manual service provider registration. Open config/app.php and find the providers array. Add the package’s service provider class to the list:
'providers' => [
    // ...
    Vendor\Package\PackageServiceProvider::class,
]
If the package provides facades, register them in the aliases array in the same file:
'aliases' => [
    // ...
    'PackageFacade' => Vendor\Package\Facades\PackageFacade::class,
]
This is exactly how Laravel worked before auto-discovery existed, and it’s still necessary when a package doesn’t support the feature or when you’ve disabled auto-discovery for specific packages in your composer.json (which you might do to control loading order or conditionally load packages based on environment).
Validation, Testing, and Debugging
Installation is only half the battle. The real test is whether the package works correctly in your specific environment and integrates smoothly with your existing code. I’ve seen packages install perfectly on local development machines only to break spectacularly in production because of missing PHP extensions or environment-specific configuration differences.

Common Issues and Quick Checks
The most frequent installation problem is version conflicts. Composer’s error messages about this are actually quite good—they tell you which package requires which version of a dependency and why they conflict. The solution usually involves either updating other packages to make versions compatible or specifying a different version of the package you’re installing that works with your current dependencies.
Missing PHP extensions cause cryptic errors. For example, a package requiring the GD image library will fail with “Class ‘GD’ not found” or similar if the extension isn’t installed. Check your PHP configuration with php -m to list loaded extensions. If something’s missing, install it through your system’s package manager (apt, yum, brew) and restart your web server or PHP-FPM.
Permission issues particularly affect packages that write to storage or cache directories. Laravel expects storage/ and bootstrap/cache/ to be writable by the web server user. Run chmod -R 775 storage bootstrap/cache and chown -R www-data:www-data storage bootstrap/cache (adjusting the user/group for your system) to fix this.
| Error Type | Common Cause | Quick Fix |
|---|---|---|
| Class not found | Autoload not refreshed | Run composer dump-autoload |
| Method not found | Version mismatch | Check package version compatibility |
| Config not found | Not published | Run php artisan vendor:publish |
| Database error | Migrations not run | Run php artisan migrate |
Security Considerations
Every package you install increases your application’s attack surface. Treat Composer packages like you’d treat any third-party code—with healthy skepticism. Check the package maintainer’s reputation, look for security advisories in the GitHub security tab, and review the code yourself if it handles sensitive data or has filesystem access.
Run composer audit regularly to check for known vulnerabilities in your dependencies. This command queries a security advisory database and warns you about packages with disclosed security issues. When vulnerabilities are found, update affected packages immediately—security updates are one case where you shouldn’t delay, similar to how you’d approach securing a business directory platform.
Be especially cautious with packages that request broad permissions or execute system commands. Read through the service provider code to understand what the package does during bootstrap. If something seems suspicious (unexpected network calls, file operations outside the project directory, eval() usage), investigate further before deploying to production.
composer require with packages from unknown sources in production without testing in a development environment first. A malicious package can execute arbitrary code during installation.Maintaining Plugins Over Time
Package maintenance doesn’t end at installation. Run composer update regularly (monthly is a good cadence) to get bug fixes and security patches. But—and this is crucial—test updates in a staging environment before applying them to production. Breaking changes happen, and a package update that breaks your application at 2 AM is nobody’s idea of fun.
Use semantic versioning constraints wisely in your composer.json. The ^ operator ("vendor/package": "^2.0") allows minor and patch updates but blocks major version jumps, giving you automatic security fixes while preventing breaking changes. The ~ operator is more conservative, allowing only patch updates.
Before major Laravel version upgrades, audit your packages for compatibility. The Laravel Shift service automates much of this, checking package compatibility and updating your composer.json accordingly. Alternatively, check each package’s documentation or GitHub releases for Laravel version support information.
Advanced Scenarios
Once you’re comfortable with basic package installation, these advanced techniques will help you handle edge cases and optimize your workflow. These aren’t necessary for every project, but when you need them, they’re invaluable—much like understanding monetization strategies becomes critical when scaling a directory platform.
Package Discovery (Auto-Discovery) Configuration
You can control auto-discovery behavior in your application’s composer.json. To disable auto-discovery entirely (not recommended unless you have specific needs), add:
"extra": {
    "laravel": {
        "dont-discover": "*"
    }
}
More useful is selectively disabling specific packages while leaving auto-discovery enabled for others:
"extra": {
    "laravel": {
        "dont-discover": [
            "vendor/problematic-package"
        ]
    }
}
This is helpful when a package’s service provider conflicts with your application’s setup or when you want to conditionally register it based on environment. After disabling auto-discovery for a package, manually register its provider in config/app.php or in a custom service provider where you can add logic around registration.
Package authors configure auto-discovery in their package’s composer.json using the extra.laravel section. If you’re developing packages yourself, this is what you’d add:
"extra": {
    "laravel": {
        "providers": [
            "Vendor\\Package\\ServiceProvider"
        ],
        "aliases": {
            "PackageFacade": "Vendor\\Package\\Facades\\PackageFacade"
        }
    }
}
Publishing and Customizing Package Resources
The vendor:publish command is more powerful than basic usage suggests. Use tags to publish specific resource types: php artisan vendor:publish --tag=config publishes only config files, --tag=migrations only migrations, and so on. This is cleaner than publishing everything when you only need to customize configuration.
You can also publish and customize package views. When a package publishes views to resources/views/vendor/package-name/, Laravel will use your customized versions instead of the package’s originals. This lets you modify blade templates without editing vendor files. Change the HTML, add your own CSS classes, inject additional data—whatever your project needs.
For assets like JavaScript or CSS, packages typically publish to public/vendor/package-name/. After publishing, you’re free to modify these files, but remember that updates to the package won’t update your published versions. For this reason, many developers prefer compiling package assets into their own asset pipeline (using Laravel Mix or Vite) rather than using published versions directly.
Working with Multiple Environments
Package configuration often needs to differ between development, staging, and production environments. Use environment variables in published config files rather than hardcoding values. For example, instead of:
'api_key' => 'sk-test-123456789',Use:
'api_key' => env('PACKAGE_API_KEY'),Then set PACKAGE_API_KEY differently in each environment’s .env file. This keeps sensitive credentials out of version control and makes environment-specific configuration explicit.
For packages that should only load in certain environments (like debugging tools only in development), register them conditionally in app/Providers/AppServiceProvider.php:
public function register()
{
    if ($this->app->environment('local')) {
        $this->app->register(\Vendor\DebugPackage\ServiceProvider::class);
    }
}
Composer also supports dev dependencies (packages only installed in development) via composer require --dev vendor/package. These packages won’t be installed in production if you use composer install --no-dev, saving disk space and reducing potential security surface.
Real-World Reference and Ecosystem Context
Understanding the broader Laravel ecosystem helps you make informed decisions about which packages to trust and how to integrate them effectively. Laravel’s package ecosystem is mature and vibrant, with thousands of well-maintained packages solving common problems, similar to how business directories have evolved into comprehensive platforms.
Ecosystem Signals and Adoption Trends
Laravel continues to rank among the most popular PHP frameworks, with strong community support and active development. The framework’s longevity (over a decade of releases) and backward compatibility focus mean packages developed several years ago often still work with modern Laravel versions, though you should always check.
Package quality has improved significantly over the years. Most popular packages now include automated tests, continuous integration, and regular updates. The community has coalesced around best practices: semantic versioning, auto-discovery support, comprehensive documentation, and responsive issue handling. These patterns make the ecosystem more reliable and predictable.
When evaluating packages, consider the “Spatie standard”—packages from Spatie, a Belgian development company, are consistently high-quality with excellent documentation and maintenance. They’re not the only source of quality packages, but they set a benchmark others follow. Other reliable sources include packages maintained by Laravel core team members or those with the “laravel” vendor prefix (official Laravel packages).
Related Tooling and Plugin Ecosystems
Composer itself has an installer plugin system that packages can use to customize their installation. The composer/installers package provides framework-specific installation paths—it’s why Laravel packages install to specific directories within vendor/ and why Composer knows how to handle Laravel-specific features.
Tools like Laravel IDE Helper improve the development experience by generating IDE-friendly files that enable autocomplete for Laravel’s magic methods and facades. These meta-packages don’t add functionality but make working with the framework and installed packages more pleasant.
The Laravel ecosystem also includes alternative package managers and registries for specific use cases. For example, Laravel Nova (a premium admin panel package) has its own package repository for Nova-specific packages. These specialized ecosystems work alongside Packagist, not replacing it.
Quick-Start Cheat Sheet (Checklist)
Here’s a condensed checklist you can reference for every package installation. Bookmark this section or copy it to your project’s documentation for quick reference during development.
Package Installation Checklist
- Pre-flight checks
- Confirm Laravel version:
php artisan --version - Check package compatibility in documentation
- Update Composer dependencies:
composer update
- Confirm Laravel version:
- Installation
- Find package on Packagist or via documentation
- Run:
composer require vendor/package - Watch for errors or version conflicts
- Configuration
- If auto-discovery applies, verify with
php artisan package:discover - Otherwise, manually register provider in
config/app.php - Publish resources:
php artisan vendor:publish --provider="..." - Edit published config files as needed
- If auto-discovery applies, verify with
- Database setup
- Run migrations:
php artisan migrate - Seed test data if provided:
php artisan db:seed
- Run migrations:
- Verification
- Check vendor directory:
ls vendor/vendor-name/ - Confirm published files in
config/,database/migrations/, etc. - Run package artisan commands:
php artisan list - Clear caches:
php artisan config:clear && php artisan cache:clear - Test package functionality in your application
- Check vendor directory:
- Security & maintenance
- Review package code for sensitive operations
- Run security audit:
composer audit - Document the package’s purpose in your project README
- Schedule regular updates:
composer updatemonthly
This checklist covers 95% of package installations. The remaining 5%—custom repositories, complex configuration, or unusual deployment scenarios—will require package-specific documentation, but this foundation applies universally.
Frequently Asked Questions
Do I always need to run composer require to install a Laravel plugin?
Yes, for nearly all modern Laravel packages. Composer is the standard package manager for PHP and Laravel’s ecosystem is built around it. While technically possible to install packages manually, doing so bypasses dependency management, autoloading, and update mechanisms. Alternative methods like path repositories or VCS repositories still use Composer under the hood—just with different source locations.
What is Laravel auto-discovery, and do I always need to register providers manually?
Auto-discovery is a feature introduced in Laravel 5.5 that automatically registers service providers and facades for compatible packages. If a package supports auto-discovery (most modern ones do), you don’t need to manually add the provider to config/app.php—Laravel handles it automatically during bootstrap. Older packages or those that intentionally disable the feature still require manual registration.
How do I publish a package’s config or migrations after installation?
Use the artisan vendor:publish command with the package’s service provider class: php artisan vendor:publish --provider="Vendor\Package\ServiceProvider". Many packages also support tagged publishing for specific resource types: --tag=config for configuration files only, --tag=migrations for database migrations, or --tag=views for blade templates. Check the package documentation for available tags and recommended publish workflow.
How can I verify a plugin installed correctly?
Check multiple indicators: ensure the package exists in the vendor/ directory, confirm published config files appear in config/, verify migrations were created in database/migrations/, and test any artisan commands the package provides. Run php artisan package:discover to see if auto-discovery registered the package, and check storage/logs/laravel.log for any errors during bootstrap.
What are common security best practices when installing plugins?
Only install packages from trusted sources like Packagist with verified maintainers. Review the package’s GitHub repository for open security issues, check the last update date, and read through the code if it handles sensitive data. Run composer audit regularly to check for known vulnerabilities. Avoid running Composer commands with elevated privileges, and test all packages in a development environment before deploying to production.
Are there authoritative sources that describe the official Laravel packaging workflow?
Yes, Laravel’s official documentation includes a comprehensive Package Development section covering package structure, auto-discovery configuration, service provider registration, and resource publishing. The Composer documentation also details repository types, dependency resolution, and package management fundamentals. These are the definitive sources for understanding Laravel’s packaging architecture and best practices.
Can I install Laravel packages without Packagist?
Yes, through custom Composer repositories. Add a VCS repository (GitHub, GitLab, Bitbucket) or path repository (local filesystem) to your composer.json file, then run composer require as normal. This is useful for private packages, in-house development, or testing packages before publishing. The Composer documentation covers repository configuration in detail for various scenarios.
What should I do if a package causes version conflicts?
Read Composer’s conflict error message carefully—it specifies which package versions are incompatible and why. Solutions include updating your other dependencies to compatible versions, installing a different version of the new package that works with your current dependencies, or in rare cases, temporarily using –ignore-platform-reqs (with caution). The composer why-not command helps diagnose version conflicts.
How do I uninstall a Laravel package completely?
Run composer remove vendor/package to uninstall the package and remove it from composer.json. Then manually delete any published files from config/, database/migrations/, resources/views/vendor/, and public/vendor/. If the package created database tables, write and run a migration to drop them. Finally, remove any service provider or facade registrations if you added them manually to config/app.php.
Are dev dependencies different from regular dependencies?
Yes, dev dependencies (installed via composer require --dev) are packages needed only during development, like testing frameworks or debugging tools. They appear in composer.json’s require-dev section and aren’t installed in production when you run composer install --no-dev. This reduces production application size and attack surface by excluding development-only code.
Conclusion
Installing Laravel packages doesn’t have to be mysterious or intimidating once you understand the underlying mechanics. Composer handles the heavy lifting, auto-discovery eliminates most manual configuration, and the vendor:publish workflow gives you granular control over customization. The key is following the standard pattern—verify compatibility, run composer require, publish resources, configure as needed, and test thoroughly.
What separates experienced Laravel developers from beginners isn’t memorizing every artisan command or package configuration option—it’s understanding the principles behind package management and knowing where to look when something goes wrong. Read package documentation carefully, check version compatibility before installing, maintain packages regularly with updates, and always test in a development environment before deploying to production.
The Laravel ecosystem continues to grow and mature, with thousands of packages solving common problems and an active community supporting them. Whether you’re adding authentication, payment processing, admin panels, or specialized functionality, there’s likely a well-maintained package that fits your needs. Install confidently, configure thoughtfully, and your Laravel applications will benefit from the collective expertise of thousands of developers who’ve solved these problems before you.
Ready to Level Up Your Laravel Project?
Start by auditing your current packages with composer audit, then explore Packagist for solutions to your next feature requirement. Remember: the best package is one that’s actively maintained, well-documented, and trusted by the community. Happy coding!
Was this article helpful?