How to Add Your Business to Google in 6 Simple Steps (2024 Guide)

Visual overview of How to Add Your Business to Google in 6 Simple Steps (2024 Guide)

Getting your business to show up on Google isn’t rocket science, but surprisingly many business owners still don’t know where to start. The truth is, if you’re not visible on Google Search and Maps, you’re essentially invisible to the majority of potential customers searching for what you offer. I’ve watched countless small businesses transform their customer acquisition just by properly setting up their Google presence—and it takes less time than you’d think.

Here’s what most business owners miss: your Google Business Profile (formerly Google My Business) is often the first thing people see when they search for your company or services in your area. It shows up before your website, before your social media, before everything. That makes it arguably the most important piece of digital real estate you own—and it’s completely free.

TL;DR – Quick Takeaways

  • Claim your spot first – Check if your business already exists on Google Maps before creating a new listing
  • Verification is mandatory – Usually takes 5-7 days via postcard, but it’s required to manage your listing
  • Complete equals credible – Businesses with full profiles (photos, hours, description) get significantly more engagement
  • Reviews matter immensely – Respond to all reviews within 48 hours to boost visibility and trust
  • Maintenance is ongoing – Set monthly reminders to update info, add photos, and post updates

Why Your Google Business Profile Deserves Immediate Attention

Let’s talk numbers for a second. When someone searches for a business like yours on their phone, what do they actually see? They see a map with pins, business names, star ratings, and quick info—all before they ever scroll to regular search results. If you’re not in that map pack, you might as well not exist for that search.

According to Pew Research Center, 85% of Americans own smartphones, and the vast majority use them daily to find local businesses. But here’s the kicker: they’re not just browsing—they’re ready to buy, visit, or call.

Core concepts behind How to Add Your Business to Google in 6 Simple Steps (2024 Guide)
46%
of all Google searches have local intent
Meaning people are looking for businesses near them

Think about your own behavior. When you need a plumber at 10 PM because a pipe burst, what do you do? You grab your phone and search “emergency plumber near me.” You’re not going to page three of Google results—you’re calling one of the first three businesses that show up with good reviews and a phone number you can tap immediately.

That’s the power of a properly optimized Google Business Profile. It puts you in front of people at the exact moment they need what you’re selling. For businesses exploring successful directory website business strategies, your Google listing serves as the foundation that supports all other online marketing efforts.

Pro Tip: Businesses with complete Google Business Profiles receive 7x more clicks than those with incomplete information. That’s not a small difference—that’s the difference between thriving and barely surviving online.

Step 1: Set Up Your Google Business Profile Account Correctly

The foundation of everything starts with creating your Google Business Profile account. This is your command center for managing how your business appears across Google Search, Maps, and other Google properties. Getting this right from the start saves you headaches later.

Head to business.google.com and sign in with a Google account. Now here’s where people make their first mistake—they use their personal Gmail account. Don’t do that. Create a dedicated business email or use one that multiple team members can access. Why? Because I’ve seen businesses get locked out when the employee who set everything up leaves the company and takes their personal Gmail with them.

Step-by-step process for How to Add Your Business to Google in 6 Simple Steps (2024 Guide)

Once you’re signed in, click “Manage now” to begin the setup process. Google will guide you through the basics, but here’s what they won’t tell you: the email you use becomes the primary owner account. You can add managers later, but this initial account has ultimate control. Treat those login credentials like you’d treat your bank account information—store them securely where your team can access them if needed.

Account ElementBest PracticeWhy It Matters
Email AddressBusiness domain emailProfessionalism and continuity
PasswordUnique, complex, stored securelyPrevents unauthorized access
Two-Factor AuthAlways enableAdditional security layer
Backup ManagersAdd 2-3 trusted peopleNever depend on one person

Enable two-factor authentication immediately. I know it’s an extra step every time you log in, but it’s worth it. Business listings are targeted by competitors and scammers who want to change your information, post fake reviews, or even delete your listing entirely. Two-factor authentication makes their job exponentially harder.

Step 2: Check If Your Business Already Exists on Google

Before you start creating a brand new listing, you need to search for your business on Google Maps. This step is critical because there’s a decent chance your business already exists in Google’s system—even if you never set it up yourself. Google automatically creates listings based on data they find around the web, or sometimes customers create them when they leave reviews.

Simply type your business name and city into Google Maps. Look carefully at the results. If you see your business, congratulations—you’re halfway there. You just need to claim it rather than create it from scratch. If nothing appears, you’re clear to add a new business listing.

Tools and interfaces for How to Add Your Business to Google in 6 Simple Steps (2024 Guide)

I worked with a restaurant owner last year who spent an hour creating what he thought was his first Google listing, only to discover later that his business already had a listing with 47 reviews. He’d just created a duplicate, which split his reviews and confused customers who saw two different listings with slightly different information. It took weeks to get Google to merge them properly and consolidate the reviews. Learn from his mistake—always check first.

Important: If you find multiple listings for your business, DO NOT create another one. Flag the duplicates and follow Google’s process to merge them. Multiple listings violate Google’s terms and can result in all of them being suspended.

When searching, try variations of your business name. Search with and without “LLC” or “Inc.” Try abbreviations if your business name is commonly shortened. The goal is to be absolutely certain there isn’t an existing listing before you create a new one.

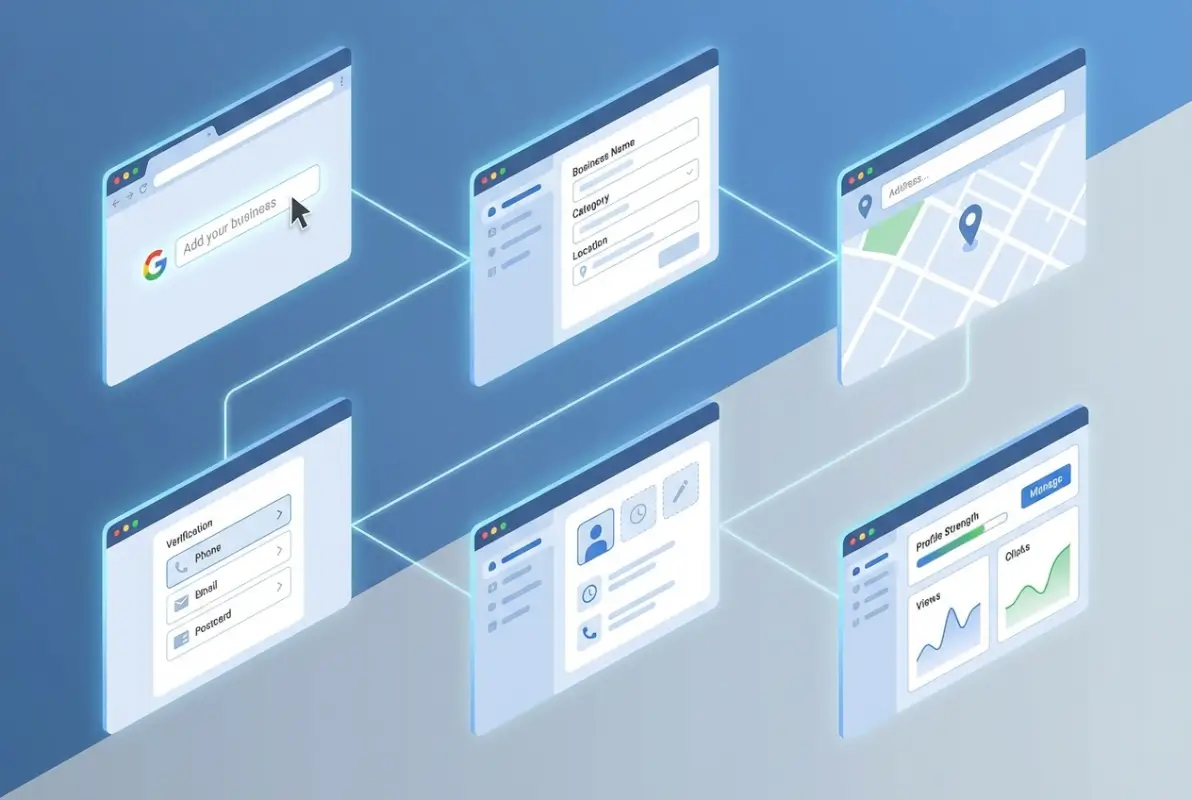
Step 3: Add Your Business Details with Precision

If your search came up empty, it’s time to add your business to Google. This is where details matter more than you might think. Every piece of information you enter should be exactly as it appears on your actual storefront, business license, and official documents.

Start with your business name. This seems simple, but many people try to game the system by stuffing keywords into their business name. Don’t do this. If your business is called “Mike’s Pizza,” don’t list it as “Mike’s Pizza Best NYC Pizza Downtown Manhattan.” Google will likely suspend your listing for violating their guidelines, and even if they don’t catch it initially, competitors can report you.

Best practices for How to Add Your Business to Google in 6 Simple Steps (2024 Guide)

Your business category is surprisingly important for active directory for business environment visibility. Google uses this to determine which searches should show your business. You can select one primary category and add several secondary categories. Choose the most specific option available—not the broadest one.

92%
of consumers choose businesses on the first page of local search results
Your category selection directly impacts these rankings

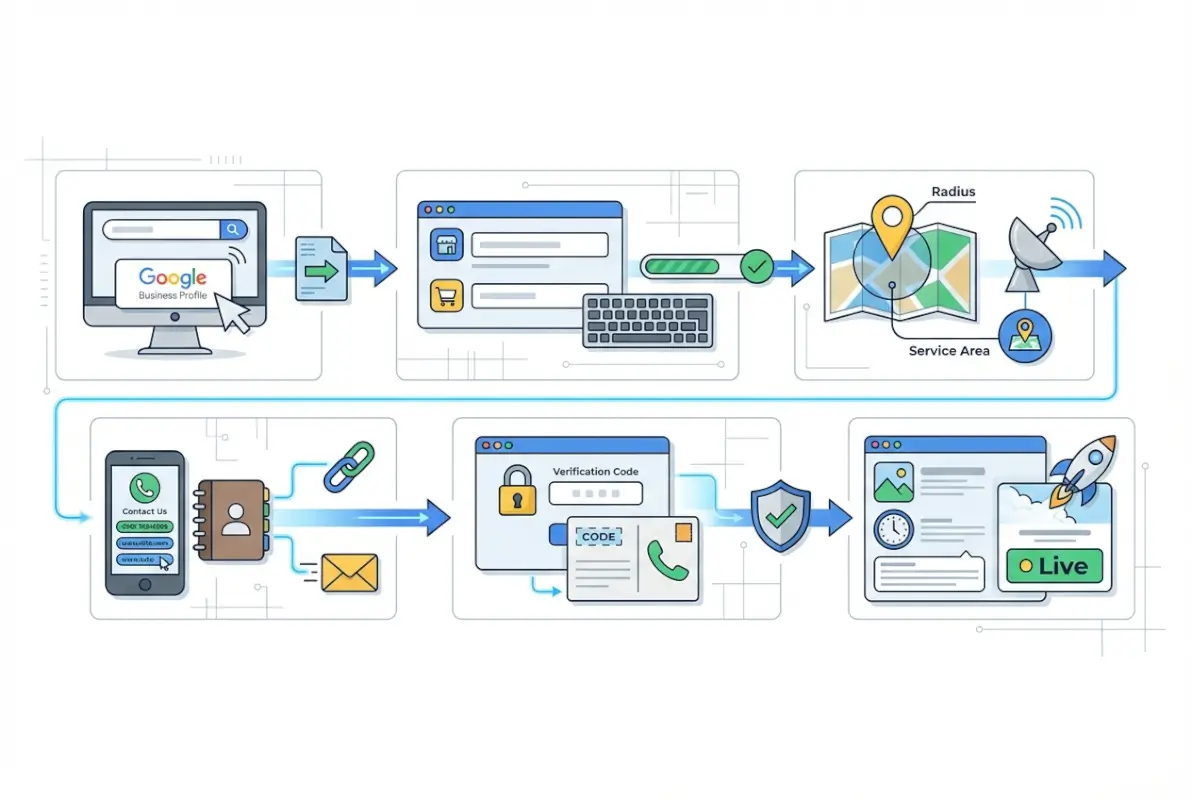
For your address, use the exact format that matches your physical location. If you’re a service-area business without a public storefront (like a plumber or cleaning service), you can hide your address and instead specify the areas you serve. This is perfectly acceptable and actually recommended for businesses that visit customers rather than having customers visit them.

Phone number choice matters more than you’d expect. Use a local number if possible—it builds trust with local customers. Avoid using tracking numbers that rotate or change, as this confuses Google’s verification systems and can impact your ranking signals. A stable, consistent phone number that appears on your website and other directories is ideal.

Step 4: Navigate the Verification Process

Verification is Google’s way of ensuring that only legitimate business owners can manage listings. It’s a necessary step that can’t be skipped, so plan for it taking 5-7 business days in most cases.

The most common verification method is by postcard. Google mails a physical postcard to your business address with a unique verification code. When it arrives, you log into your Google Business Profile and enter the code to verify ownership. Simple enough, but here’s what trips people up: don’t make any changes to your core business information during this waiting period. If you do, Google might restart the verification process from scratch.

Advanced strategies for How to Add Your Business to Google in 6 Simple Steps (2024 Guide)

Some businesses qualify for instant verification or verification by phone/email. This typically happens if Google has high confidence in your business based on existing data from your website and other sources. If you’re offered these options, take them—they’re much faster than waiting for the postcard.

Key Insight: While waiting for verification, you can still fill out additional details in your profile like photos, business description, and services. Just don’t change your business name, address, or phone number until after verification is complete.

According to Google’s verification guidelines, businesses must have a physical location where customers can visit during stated hours, or clear service areas if operating as a service-area business. Virtual offices and PO boxes typically don’t qualify for verification, so plan accordingly.

Step 5: Optimize Your Profile to Stand Out

Here’s where most businesses drop the ball. They get verified, breathe a sigh of relief, and never touch their profile again. That’s a massive missed opportunity. A complete, optimized profile can dramatically increase your visibility and the number of customers who contact you.

Start with your business description. You have 750 characters to tell potential customers what makes your business special. Use this space wisely. Include relevant keywords naturally (don’t stuff them), mention your specialties, and give people a reason to choose you over competitors. This description appears in your Google Business Profile and can influence both search rankings and whether people click through to learn more.

60%
more likely to consider visiting businesses with complete profiles
Including photos, hours, and detailed descriptions

Photos are absolutely crucial. Businesses with photos receive 42% more requests for directions and 35% more clicks to their websites. Upload high-quality images of your storefront, interior, products, team members, and work in progress. Aim for at least 10 photos to start, and add new ones regularly. Authentic photos perform better than stock images—customers want to see the real you.

Your business hours should be meticulously accurate. Nothing frustrates customers more than showing up to a business that’s supposed to be open according to Google, only to find the doors locked. Set your regular hours, but also update them for holidays, special events, and temporary closures. Google makes this easy with special hours features.

For businesses investigating business directory software solutions, your Google Business Profile optimization should align with how you present your business across all directory platforms. Consistency builds trust and helps search engines understand your business better.

Step 6: Claim and Manage Existing Listings Properly

If you found your business already listed on Google during step two, claiming it is slightly different than creating a new listing. The process starts by finding your business on Google Maps, then clicking “Own this business?” or “Claim this business” button.

Sometimes this gets complicated. If someone else has already claimed your business—maybe a former employee or a marketing agency you hired years ago—you’ll need to request access. This typically involves contacting that person to add you as a manager or owner, or going through Google’s support process to prove you’re the legitimate owner.

I remember helping a client who discovered their ex-employee had claimed their business listing and, after a messy termination, changed all the business hours to “permanently closed” out of spite. It took three weeks and multiple support tickets to get control back. This is why adding backup managers to your verified listing is so important—it prevents one disgruntled person from holding your business hostage.

ScenarioAction RequiredTimeline
Unclaimed listing existsClaim and verify ownership5-7 days
Already claimed by youLog in and optimizeImmediate
Claimed by someone elseRequest access or contact Google1-3 weeks
Multiple duplicate listingsReport duplicates, merge data2-4 weeks

After claiming, do a thorough audit of all information. Check every field—address, phone number, website URL, business hours, and categories. Even if the listing existed before, it might contain outdated or incorrect information that needs updating. Make these corrections before you start actively promoting your Google listing.

Advanced Strategies That Make a Real Difference

Once your listing is verified and optimized, there are several advanced features that can give you an edge over competitors who stick with the basics.

Mastering the Review Game

Reviews are the lifeblood of local search rankings. Businesses with more positive reviews rank higher and convert better. But here’s what most people don’t realize: it’s not just about getting reviews—it’s about responding to them.

Google’s algorithm looks at review recency, quantity, rating, and your response rate. When you respond to reviews (both positive and negative), you signal to Google that your business is active and engaged. This can boost your visibility in local search results.

For negative reviews, respond within 12-24 hours. Keep your response professional, acknowledge their concern, and offer to resolve the issue offline. Never argue or get defensive publicly—it looks terrible to potential customers reading the exchange. For positive reviews, a simple thank you mentioning something specific they praised shows you actually read and care about feedback.

Pro Tip: Create a simple system for requesting reviews. After a successful transaction, send a follow-up email or text with a direct link to your Google review page. Make it as easy as possible for satisfied customers to leave feedback.

Using Google Posts Effectively

Google Posts are like mini social media updates that appear directly in your Business Profile. You can share special offers, events, new products, or general updates. These posts appear in your knowledge panel when people search for your business, providing fresh content and another way to engage potential customers.

Posts expire after seven days (or on the date you specify for events and offers), so plan to create new posts weekly. Think of them as free advertising space in your listing—use them to highlight what makes your business special right now.

Q&A Section Management

Google’s Q&A feature allows anyone to ask questions about your business publicly. Here’s the catch: anyone can also answer those questions—including your competitors or misinformed customers. You need to monitor this section regularly and provide official answers to common questions.

Better yet, seed your Q&A section with questions you want to answer. Ask friends or employees to post common questions that give you an opportunity to showcase your expertise and provide helpful information. This both helps potential customers and prevents unhelpful or incorrect answers from others.

For those exploring businesses in fslocal directory tips, the Q&A strategy works across multiple platforms. Anticipate questions and answer them proactively across all your directory listings.

Ongoing Maintenance Nobody Talks About

The biggest mistake I see businesses make is treating their Google Business Profile as a “set it and forget it” task. Your listing needs regular attention to maintain its effectiveness and ranking power.

Set a recurring calendar reminder for the first Monday of each month. During this 15-minute maintenance window, you should:

  • Review and respond to any new reviews
  • Upload 2-3 new photos (recent ones showing current products, team, or seasonal updates)
  • Create at least one new Google Post
  • Check that all business information is still accurate
  • Answer any new Q&A questions
  • Update special hours for upcoming holidays or events
  • Review insights to see how people are finding and interacting with your listing
15min
monthly maintenance can maintain or improve your local search rankings
While neglected profiles gradually lose visibility

Google Insights provides valuable data about how customers find your listing, what actions they take, and how you compare to similar businesses. Pay attention to these metrics. If you notice a drop in calls or direction requests, it might indicate a problem with your listing or increased competition requiring you to step up your optimization game.

According to W3C accessibility standards, keeping business information current across all platforms isn’t just good practice—it’s essential for providing equal access to all users, including those using assistive technologies.


Frequently Asked Questions

How long does it take for my business to appear on Google after I add it?

After completing verification, your business typically appears within 24-48 hours. However, achieving optimal placement in local search results can take 2-4 weeks as Google’s algorithm assesses your listing’s completeness, reviews, and engagement signals. Full optimization happens gradually as you add content and gather reviews.

Can I manage multiple business locations under one Google account?

Yes, Google Business Profile supports unlimited locations under a single account. After adding your first location, click “Add location” to include additional addresses. For businesses with 10+ locations, Google recommends using bulk upload features for efficiency. Each location needs separate verification but shares centralized management.

What should I do if my competitor posts fake negative reviews?

Flag suspicious reviews by clicking the three dots next to the review and selecting “Flag as inappropriate.” Provide evidence if possible when reporting. Google reviews these flags but approval isn’t guaranteed. Focus on generating authentic positive reviews to dilute negative ones, and always respond professionally to maintain your reputation.

How do I improve my ranking in local search results?

Local ranking depends on three factors: relevance (how well your profile matches searches), distance (proximity to searcher), and prominence (reviews, links, citations). Optimize by completing every profile section, maintaining consistent NAP data across the web, actively gathering reviews, adding regular posts, and building local backlinks to your website.

Is there a cost to use Google Business Profile?

No, Google Business Profile is completely free with no subscription fees or hidden charges. Google provides this service because quality business listings improve their search results and user experience. All features including posts, messaging, and insights are included at no cost to business owners.

What’s the difference between a Google Business Profile and having a website?

Your Google Business Profile is a listing on Google’s platform showing your business in Search and Maps. A website is your owned digital property with complete control over design and content. Both are essential—your Google listing captures local search traffic and often serves as the first touchpoint directing people to your website for deeper engagement.

Can service businesses without physical storefronts create Google Business Profiles?

Yes, service-area businesses like plumbers, cleaners, or consultants can create profiles by selecting “I deliver goods and services to my customers” during setup. You’ll hide your street address and instead define service areas by city, region, or radius. This allows local search visibility without displaying a public address.

How do I handle duplicate listings for my business?

Never create additional listings when duplicates exist. First, claim all legitimate listings showing your business. Then use Google’s “Mark as duplicate” feature to flag extras. Google will review and merge them, consolidating reviews and data. This process takes 2-4 weeks but is essential for maintaining accurate information and avoiding penalties.

What happens if I need to temporarily close my business?

Google Business Profile includes a “Mark as temporarily closed” option in your business information settings. This preserves your listing, reviews, and photos while informing customers about your status. The designation appears prominently in search results. Update it immediately when reopening to resume normal operations and visibility.

Should I create separate profiles for different services at the same location?

No, create only one profile per physical location regardless of services offered. Use the services section to detail all offerings comprehensively. Multiple listings for the same address violate Google’s guidelines and risk suspension. The exception is genuinely separate businesses with different names and operations sharing a location—but this is rare.

Your Next Steps to Local Search Dominance

Here’s the reality: your Google Business Profile is probably the highest-ROI marketing activity available to your business. It costs nothing, reaches customers at the exact moment they’re searching for what you offer, and directly drives calls, visits, and sales. Yet most businesses either haven’t set one up or are running on incomplete, unoptimized listings that barely scratch the surface of what’s possible.

The six steps we’ve covered—creating your account, checking for existing listings, adding accurate information, completing verification, optimizing your profile, and maintaining it regularly—aren’t complicated. They just require focus and attention to detail. The businesses that dominate local search aren’t doing anything magical; they’re simply being thorough and consistent with the basics.

Take Action Today

Block out 30 minutes right now to start this process. Don’t wait until next week or next month—your competitors are actively optimizing their listings while you’re reading this.

Create your account, claim or add your business, and begin the verification process today. Then schedule monthly 15-minute maintenance sessions to keep everything current. This small investment pays dividends for years in the form of new customers who found you because you showed up when they searched.

For businesses looking to expand beyond just Google, platforms like TurnKey Directories offer comprehensive directory solutions that complement your Google presence with additional visibility and features. But Google should always be your foundation—it’s where the majority of local searches happen and where your potential customers are looking right now.

The businesses thriving in local markets aren’t necessarily the ones with the biggest advertising budgets or fanciest websites. They’re the ones that made sure they’re visible when customers search. That starts with a properly set up and maintained Google Business Profile. You’ve got the roadmap—now go claim your spot at the top of local search results.

Similar Posts

  • Blog

    How to Find Your Listing ID on Airbnb: A Host’s Guide

    Looking for your Airbnb listing ID but drowning in the platform’s interface? You’re not alone. As a host who’s managed multiple properties across different platforms, I can tell you that finding this crucial identifier isn’t always as straightforward as it should be. Most guides will tell you the basics, but here’s what they won’t mention:…

  • Blog

    Health Coach Directory: How to Find the Right Wellness Professional for Your Goals

    In a world where wellness has become increasingly important, finding the right guide for your health journey can make all the difference. Health coaches bridge the gap between medical advice and daily implementation, offering personalized support that doctors often can’t provide during brief appointments. But with thousands of wellness professionals available, how do you find…

  • Blog

    Free B2B Directories: 5 Best Sites to Promote Your Business in 2025

    In today’s digital marketplace, visibility is everything. For B2B companies especially, getting your business in front of the right audience can be the difference between thriving and merely surviving. While paid advertising certainly has its place, savvy business owners understand the value of leveraging free promotional channels—particularly B2B directories. These specialized platforms serve as digital…

  • Blog

    GoDaddy Pro Pricing: Which Plan Is Right for Your Business in 2025?

    Running a website shouldn’t feel like navigating a labyrinth blindfolded. Yet for many business owners and web professionals, that’s exactly what managing multiple sites feels like without the right tools. GoDaddy Pro aims to simplify this process, but choosing the right plan can be just as confusing as the problem it’s trying to solve. What…

  • Blog

    How to Create an Online Directory for ‘Claim Your Profile’ Functionality

    substring(replace(

    Picture this: a potential customer searches for your business category, lands on a directory listing with outdated hours and a disconnected phone number, and immediately bounces to your competitor. This scenario plays out thousands of times daily across online directories worldwide, and it’s exactly why “Claim Your Profile” functionality has become the cornerstone of modern directory platforms. When businesses take ownership of their listings through a robust claim and verification system, everyone wins—consumers get accurate information, businesses gain control over their digital presence, and directory operators build trust that translates directly into engagement and revenue.

    The stakes have never been higher for getting this right. In an ecosystem where search engines increasingly prioritize verified business information and consumers have zero tolerance for outdated data, directories without sophisticated claim workflows are essentially leaving money on the table. I remember consulting for a regional business directory that didn’t offer profile claiming, they wondered why their engagement metrics flatlined while competitors thrived. The answer was simple: without ownership verification, their listings became digital ghost towns that nobody trusted.

    TL;DR – Quick Takeaways

    • Trust drives discovery – Claimed and verified profiles receive significantly higher engagement and appear more prominently in local search results
    • Verification is non-negotiable – Multi-step ownership verification protects against fraud while building consumer confidence through visible trust badges
    • Data quality compounds value – Systematic approaches to NAP consistency, deduplication, and update workflows separate functional directories from exceptional ones
    • Staged implementation wins – Rolling out claim functionality in phases (foundation → trust signals → automation → optimization) reduces risk and accelerates time-to-value
    • Monetization follows trust – Premium verification features, enhanced profiles, and analytics add-ons only convert when the base claim experience is seamless

    Understanding the Landscape and Why “Claim Your Profile” Matters

    The digital directory ecosystem has evolved dramatically from the static yellow pages model of the early internet. Today’s online directories serve as critical trust intermediaries between businesses and consumers, with claimed profiles acting as verified credentials in an increasingly skeptical marketplace. When you allow businesses to claim their listings, you’re not just offering a feature—you’re creating a verification layer that fundamentally changes how users interact with your platform.

    [KBIMAGE_1]

    The consumer psychology here is straightforward yet powerful. When someone sees a “Verified Owner” or “Claimed Profile” badge next to a listing, they immediately assign it higher credibility than unclaimed competitors. This isn’t speculation; research consistently shows that trust signals directly influence click-through rates, contact attempts, and ultimately conversion decisions. Search engines recognize this pattern too, which is why platforms like Google have made business profile verification a prerequisite for accessing premium advertising features.

    Why Users Trust Claimed Profiles

    Trust doesn’t emerge from nowhere—it builds on concrete signals that users can evaluate. Claimed profiles demonstrate ownership, which implies accountability. If a business bothered to verify ownership and keep information current, users reasonably assume that business cares about accuracy in other areas too. The verification badge becomes a proxy for reliability, even before a consumer reads a single review or examines the services offered.

    This trust mechanism operates at both conscious and subconscious levels. Consciously, users notice badges and updated timestamps. Subconsciously, the completeness of a claimed profile (multiple photos, detailed descriptions, current hours, active response to reviews) signals professionalism. Unclaimed listings, by contrast, often contain sparse information, outdated details, and zero engagement—red flags that drive users elsewhere.

    💡 Pro Tip: The first 48 hours after a business claims their profile represent a critical engagement window. Send automated onboarding emails with completion checklists to maximize profile quality while enthusiasm is high.

    How Search Engines Treat Claimed vs. Unclaimed Listings

    Search algorithms have grown sophisticated at detecting signals of listing authority and freshness. When a business claims ownership and regularly updates their profile, that activity generates positive signals that influence local search rankings. Google’s local search ecosystem, for example, explicitly rewards verified business information through better visibility in Maps results and eligibility for enhanced SERP features.

    The mechanics work through both direct and indirect pathways. Directly, search engines can detect ownership verification status and factor it into ranking algorithms. Indirectly, claimed profiles typically accumulate more reviews, photos, and engagement signals—all ranking factors in their own right. This creates a virtuous cycle where claims drive engagement, engagement improves visibility, and visibility generates more consumer interactions.

    Recent changes in how major platforms handle local advertising have made verification even more consequential. Businesses without verified profiles increasingly find themselves locked out of premium advertising opportunities, a trend that underscores the strategic importance of robust claim functionality for any serious directory platform.

    Competitive Landscape Overview

    Examining successful directory platforms reveals consistent patterns in how they approach profile claiming and verification. The market leaders—whether general directories like Yelp or vertical-specific platforms in healthcare, legal services, or home improvement—all prioritize seamless claim workflows backed by multi-factor verification.

    What separates great implementations from mediocre ones usually comes down to friction points. The best platforms make discovering your unclaimed listing effortless (strong search functionality, business name autocomplete, address matching). They minimize verification hassle through multiple pathway options (email domain verification, phone verification, postcard codes, document uploads). And they immediately deliver value post-claim through analytics dashboards, lead notifications, and competitor insights.

    Platform TypeVerification MethodTime to VerifyTrust Signals
    General BusinessEmail + Phone5-15 minutesBasic badge
    Professional ServicesLicense verification1-3 business daysEnhanced badge + credentials
    HealthcareNPI database checkInstant to 24 hoursCredential verification + specialties
    Local ServicesPostcard + domain5-10 business daysPhysical location verified

    Typical Value Propositions

    Successful directories articulate clear value propositions that motivate businesses to complete the claim process. Visibility tops the list—claimed profiles typically rank higher in on-site search and receive preferential placement in browse categories. Data control comes next; businesses want the ability to correct errors, update hours during holidays, and manage how services are described.

    Review management capabilities provide another compelling hook. Once a business claims their profile, they can respond to reviews, flag inappropriate content, and showcase positive feedback. Analytics and insights round out the value proposition—showing businesses how many people viewed their listing, where traffic originated, and how their profile performs relative to competitors.

    The strongest directories don’t just list these features; they quantify the upside. “Claimed profiles receive 3x more inquiries” or “Verified businesses appear in 75% more search results” transforms abstract benefits into concrete ROI that justifies the time investment required to complete verification.

    Core Product and Platform Architecture

    Building a robust claim system requires thoughtful architecture that balances user experience, data integrity, security, and scalability. At its core, you need a data model that cleanly separates listing entities from ownership claims while maintaining audit trails for every change. This architectural foundation determines whether your platform can handle edge cases like ownership disputes, business relocations, and multi-location franchise scenarios.

    [KBIMAGE_2]

    The technical implementation splits into several interconnected subsystems: the listing database itself, the claim request and verification workflow engine, the ownership and access control layer, and the audit and change management system. Each subsystem needs to operate independently while maintaining referential integrity across the entire architecture. Get this wrong, and you’ll spend months untangling data inconsistencies and ownership conflicts.

    Data Model for Directory Listings

    Your listing data model serves as the foundation for everything else, so it needs to accommodate both simple and complex scenarios from day one. At minimum, each listing requires the core NAP data (Name, Address, Phone), but modern directories demand far more: multiple phone numbers (main line, mobile, fax), email addresses, website URLs, social media profiles, business hours (including special hours and seasonal variations), service area definitions, category taxonomies, multimedia assets, and custom attributes specific to your vertical.

    The challenge lies in structuring this data for flexibility without creating chaos. A common pattern uses a core listing entity with related tables for repeating elements like hours, categories, and media. This normalization prevents duplication while enabling complex queries. For instance, you might structure hours as a separate table with day-of-week, open-time, close-time columns plus flags for special hours (holidays, events), making it straightforward to display current status and handle edge cases.

    ✅ Key Insight: Build your data model to support listing history from the start. Every field change should create a timestamped record showing what changed, who changed it, and when. This audit trail becomes invaluable for dispute resolution and quality monitoring.

    Ownership and Verification Workflows

    The claim workflow represents where rubber meets road—this is the user-facing experience that either delights or frustrates business owners. A well-designed workflow offers multiple verification pathways because different businesses have different capabilities. A solo professional might easily verify via email domain but lacks access to business phone lines during claiming. A retail location might prefer phone verification but operates on a shared domain email system.

    Structurally, each claim creates a pending ownership record that links a user account to a listing while storing verification status, method used, timestamps, and any supporting documentation. The workflow engine then orchestrates verification steps, sends notifications, tracks completion, and ultimately promotes the pending claim to active ownership once verification succeeds. Building this as a state machine (pending → verification sent → verification completed → ownership active) makes the logic explicit and testable.

    Multi-location scenarios add complexity worth planning for early. Should regional managers verify individual locations or do franchisees claim their own? How do you prevent conflicts when different users claim different locations of the same brand? A hierarchical ownership model with organization-level accounts and location-level access rights solves most of these challenges, though implementation details matter tremendously.

    Data Integrity and Synchronization

    Once businesses start claiming profiles and making edits, maintaining data quality becomes an ongoing operational challenge. You need systems that detect and resolve conflicts when user edits contradict external data feeds, identify duplicate listings created by different sources, and flag suspicious changes that might indicate fraud or errors.

    A practical approach combines automated rules with manual review workflows. Automated systems can catch obvious issues (phone number formatting, invalid URLs, category mismatches) and either auto-correct or flag for review. Major changes to verified listings—address updates, business name changes, category shifts—might trigger review queues where moderators confirm legitimacy before publishing.

    External data synchronization adds another layer. If you pull listing data from third-party providers or scrape public sources, how do those updates interact with user-claimed profiles? The typical hierarchy gives claimed profile data precedence over external sources, but with alerts when external data diverges significantly—potentially indicating that the external source has more current information or that someone made unauthorized changes.

    ⚠️ Important: Never silently overwrite user edits with external data feeds. This destroys trust instantly when a business owner carefully updates their profile only to see it revert hours later.

    Verification and Trust Mechanisms

    Verification separates legitimate ownership claims from fraud attempts, making it the security backbone of your entire claim system. The methods you choose directly impact both user experience and platform credibility—too lax and you enable abuse, too strict and legitimate businesses abandon the process midway through. Striking the right balance requires offering multiple verification pathways with graduated trust levels.

    [KBIMAGE_3]

    Email domain verification works beautifully for businesses with company email addresses. The workflow sends a verification link to an email address at the business’s domain, and clicking that link proves the claimer has access to company email systems. This method completes in minutes and feels effortless to users. Its limitation is that many small businesses operate on Gmail or other consumer email platforms, making domain verification impossible.

    Badging, Verification Steps, and Audit Trails

    Trust badges serve dual purposes—they reward businesses for completing verification while signaling credibility to consumers. The badge system should reflect verification thoroughness: basic badges for simple email/phone verification, enhanced badges for document verification, premium badges for paid verification services that include additional vetting.

    Each verification method generates an audit trail entry capturing what was verified, when, by whom, and through what evidence. Phone verification logs the number called, timestamp, and confirmation code. Document uploads store copies of licenses, registrations, or other submitted materials. This documentation becomes essential if ownership disputes arise or if you need to demonstrate compliance with platform policies.

    The visual presentation of badges matters more than many platforms realize. Badges should appear prominently on listing pages, search results, and maps—anywhere a consumer might evaluate credibility. Including explanatory text (“Verified by phone on [date]” or “Document-verified professional”) adds transparency that further builds trust. For an example of how directories implement these features, platforms focused on professional listings have pioneered sophisticated verification displays.

    Handling Multi-Location and Franchise Scenarios

    Franchise and multi-location businesses represent both opportunity and challenge. These businesses need the efficiency of bulk management while maintaining location-specific accuracy. Your architecture should support organization-level accounts with delegated location management—corporate can maintain brand-level information while location managers control hours, photos, and local promotions.

    Verification for multi-location accounts typically happens at two levels. The organization itself undergoes verification (proving corporate identity through business registration documents), while individual locations go through lighter verification (confirming phone access or receiving postcards). This layered approach balances thoroughness with usability at scale.

    Conflict resolution protocols become critical when franchisees and corporate offices both claim the same locations. The typical solution establishes a hierarchy: corporate holds ultimate authority but can delegate day-to-day management to local operators. Building this delegation system into your access control from the beginning prevents painful refactoring later.

    SEO, Discoverability, and Content Strategy

    A directory’s value proposition depends entirely on discoverability—by search engines, by potential customers, and by the businesses you list. “Claim Your Profile” functionality amplifies that value, but only if your directory pages rank well, render correctly in search results, and convert visitors into engaged users. This section outlines the SEO, structured data, content strategy, and measurement practices that turn a directory into a discovery engine.

    [KBIMAGE_4]

    SEO Considerations for Directory Pages

    Directory pages face unique SEO challenges: they’re often thin on unique content, prone to duplication (especially for multi-location businesses or franchises), and compete directly with major aggregators (Google, Yelp, industry-specific platforms). To rank and retain visibility, apply these practices:

    SEO ElementImplementationWhy It Matters
    Structured Data (Schema.org)LocalBusiness, Organization, FAQPage, BreadcrumbList JSON-LD on every listing pageEnables rich snippets, local pack features, and improved click-through rates in SERPs
    Canonical URLsSelf-referencing canonical on primary listing page; avoid duplicate URLs for same businessPrevents dilution of ranking signals and duplicate content penalties
    Unique ContentRequire or encourage business descriptions, service lists, FAQs, photos; editorial oversight for qualityDifferentiates from scraped/thin listings; claimed profiles can provide richer, more rankable content
    Internal LinkingCategory pages, location hubs, related businesses, and “Claim Your Profile” landing pagesDistributes PageRank, improves crawl depth, and reinforces topical authority
    Mobile-First DesignResponsive templates, fast Core Web Vitals (LCP, CLS, INP), AMP or Lite variants if neededGoogle indexes mobile-first; poor mobile UX kills rankings and conversions
    Indexability ControlsNoindex on low-quality/unclaimed listings (or require minimum data); robots.txt, sitemap prioritizationAvoid indexing thin pages that trigger Helpful Content or quality updates; focus crawl budget on high-value pages

    Structured data is non-negotiable. Implement LocalBusiness schema with the following properties at minimum: name, address, telephone, url, geo (latitude/longitude), openingHours, and aggregateRating (if you support reviews). For claimed profiles, add the sameAs property linking to the business’s official website and social profiles—this reinforces entity recognition in Google’s Knowledge Graph and can improve the likelihood of appearing in the local pack.

    💡 Pro Tip: Use Google’s Rich Results Test and Schema Markup Validator during development. Monitor Google Search Console for structured data errors and warnings. A single missing or malformed property (e.g., missing postal code in address) can disqualify your listing from rich results.

    Canonical URL management is critical in directories. If you allow filtering, sorting, or alternate views (map view, list view, paginated results), ensure all variations canonicalize to the primary listing URL. For multi-location businesses, each location should have a distinct URL and its own LocalBusiness schema; use the Organization schema at the parent/brand level and link locations via the location property.

    Content Strategy to Support “Claim Your Profile”

    Your directory’s content strategy should educate, persuade, and guide both searchers and business owners. This means three content layers:

    • Help Center & Documentation: Step-by-step claim guides, verification FAQs, troubleshooting articles, video walkthroughs. Host these on a subdomain or /help/ path with clear internal links from every listing page.
    • Trust & Proof Content: Case studies showing before-and-after metrics (e.g., “Claimed profiles receive 3× more inquiries”), testimonials from verified business owners, badges and trust signals prominently displayed on claimed profiles.
    • Editorial & Topical Content: Blog posts, industry guides, and local area pages that attract organic traffic and link internally to relevant listings. This content can target long-tail keywords (e.g., “best plumbers in [city]”) and drive discovery of your directory.

    The help center is especially important. Business owners often arrive confused or skeptical about verification. Provide clear, jargon-free instructions for each verification method (email, phone, postcard, domain DNS record). Include screenshots, expected timelines (e.g., “Email verification: instant; Postcard: 5–7 business days”), and escalation paths for edge cases (ownership disputes, closed businesses, franchises). This content should be indexed, keyword-optimized, and linked from your main navigation and every “Claim Your Profile” CTA.

    Content TypePurposeSEO/UX Impact
    Claim GuideHow-to for verifying and claiming a listingReduces support burden; ranks for “[your directory] claim profile” queries
    Case StudySocial proof and ROI demonstrationIncreases conversion of listing views to claims; builds trust
    Local/Category HubAggregated listings for a city or verticalTargets head keywords (“dentists in Austin”); funnels traffic to individual listings
    Blog/Industry InsightsEditorial authority and link buildingAttracts backlinks, builds topical authority, drives referral traffic
    Video TutorialsVisual walkthrough of claim processEmbeds on YouTube/help center; ranks in video carousels; improves engagement

    Trust content—case studies, testimonials, success metrics—should be quantified wherever possible. For example: “Claimed profiles on our directory receive an average of 47% more phone calls and 62% more website clicks than unclaimed listings” (source your own analytics or cite comparable directory research). Display these statistics on your “Claim Your Profile” landing page and in onboarding emails. If you have badges (Verified, Premium, Featured), explain their meaning in a dedicated FAQ or glossary page.

    Metrics and KPIs

    Measure the impact of your “Claim Your Profile” functionality across three dimensions: engagement, conversion, and SEO performance. Track these KPIs on a monthly or weekly cadence:

    KPIDefinitionTarget/Benchmark
    Claim Rate% of total listings that are claimed10–25% in first year; mature directories 30–50%+
    Verification Completion Rate% of initiated claims that complete verification60–80% (drops with friction; improve with automation)
    Profile CompletenessAvg % of profile fields filled (NAP, hours, photos, description)Claimed: 70%+; Unclaimed: 30–40%
    Edit FrequencyAvg edits per claimed profile per month0.5–2 (higher indicates engagement and data freshness)
    Organic Visibility (Claimed vs. Unclaimed)Avg Google Search Console impressions/clicks for claimed vs. unclaimed pagesClaimed pages should outperform by 2–5× (due to richer content, schema, signals)
    Conversion Rate (Listing View → Claim Initiation)% of business-owner visits that start claim process5–15% (optimize CTA placement, messaging, and help content)
    Customer Action Rate (Claimed Profiles)Phone calls, website clicks, direction requests per 1k impressionsClaimed profiles typically 1.5–3× higher than unclaimed

    Integrate Google Search Console and your analytics platform (Google Analytics 4, Mixpanel, or similar) to track these metrics. Segment your data by claim status (claimed vs. unclaimed), by verification method (to identify bottlenecks), and by business category or location (to spot vertical-specific patterns). For example, healthcare directories may see higher claim rates but longer verification times due to credential checks, while home-services directories may see faster claims but lower profile completeness.

    SEO impact is measurable. Use Search Console to compare average position, impressions, and click-through rate (CTR) for claimed versus unclaimed listing pages. Claimed profiles with complete NAP data, photos, hours, and reviews should rank higher and attract more clicks. If they don’t, investigate: Are claimed profiles missing structured data? Are they being outranked by aggregators or competitors? Are internal links favoring unclaimed pages? Use this data to prioritize improvements—add schema, improve content quality, or boost internal link equity for high-value claimed listings.

    ⚠️ Common Pitfall

    Directories often index thousands of thin, unclaimed listings to appear comprehensive, but this can trigger Google’s Helpful Content system and degrade overall site quality. Prioritize quality over quantity: noindex low-quality unclaimed listings, or apply a minimum-data threshold (e.g., must have phone, hours, and description) before indexing.

    Monetization, Pricing, and Governance Implications

    A directory with “Claim Your Profile” functionality creates multiple monetization opportunities—but also introduces governance complexity. This section covers revenue models, vendor/partner ecosystems, compliance frameworks, and policy enforcement for claimed listings.

    [KBIMAGE_5]

    Revenue Models for Directory Platforms with “Claim Your Profile”

    Most successful directories adopt a freemium model: free basic claims with paid upgrades for enhanced visibility, analytics, and trust signals. Here are the most common monetization levers:

    Revenue StreamDescriptionTypical Pricing
    Free Basic ClaimClaim, verify, edit NAP and basic info; appears in search results$0 (acquisition funnel)
    Premium/Featured ListingTop placement in category/location results, badge, rich media (photos, videos), extended description$50–$500/month (varies by vertical, competition, traffic)
    Verification Badge/Trust SealEnhanced verification (business license, background check); displayed badge$25–$100/month or one-time $100–$300
    Analytics DashboardProfile views, clicks, lead sources, competitor benchmarksBundled with premium or $10–$50/month add-on
    Lead Generation/CRM IntegrationForward inquiries to CRM, lead scoring, response tracking$50–$200/month or per-lead fee
    Review/Reputation ManagementAutomated review solicitation, response templates, sentiment alerts$30–$150/month (SaaS model)
    Advertising (Display, Sponsored Listings)Banner ads, sponsored placements in search resultsCPM ($5–$20) or CPC ($0.50–$5) depending on traffic and niche

    The key to sustainable monetization is value alignment: business owners will pay only if they perceive a clear ROI—more leads, more visibility, better conversion. Start with free claims to build inventory and network effects (more listings = more traffic = more claims). Once you have critical mass (typically 500–1,000 claimed profiles in your target niche or geography), introduce premium tiers.

    Premium features should be modular and stackable. For example, a law firm might pay for Featured placement ($200/month) + Enhanced verification badge ($50/month) + Analytics dashboard (bundled) = $250/month total. A solo practitioner might pay only for the badge ($50/month). Offer annual discounts (10–20% off) to improve cash flow and reduce churn.

    💡 Pro Tip: A/B test premium pricing and feature bundles on a cohort basis. Track LTV (lifetime value) and payback period by acquisition channel. Businesses acquired via organic search often have higher LTV than paid ads, so tailor your upsell messaging accordingly.

    Vendor Management and Partner Ecosystems

    Directories rarely operate in isolation. You’ll integrate with CRM platforms (Salesforce, HubSpot), review aggregators (Trustpilot, Google Reviews API where permissible), marketing automation tools (Mailchimp, ActiveCampaign), and analytics providers (Google Analytics, Segment). Manage these integrations as a formal partner ecosystem:

    • API contracts: Document rate limits, authentication (OAuth 2.0 recommended), data ownership, and SLAs. Require partners to respect your terms of service and data privacy policies.
    • Revenue sharing: If a partner (e.g., a review platform) drives claims or premium upgrades, negotiate rev-share or referral fees. Track attribution via UTM parameters or partner-specific claim codes.
    • White-label/reseller programs: Some directories offer white-label “Claim Your Profile” flows to franchises, associations, or SaaS platforms. Structure these as licensing agreements with clear branding, support, and data-ownership terms.
    • Data syndication: You may syndicate your listings to Google, Bing, Apple Maps, or vertical aggregators. Ensure you retain ownership of claimed profile data and that syndication partners attribute your directory as the source.

    Vendor management extends to verification services. If you outsource phone or postcard verification, or use third-party identity/business validation (e.g., LexisNexis, Dun & Bradstreet), negotiate pricing, SLAs, and data-handling terms upfront. Build fallback providers to avoid single points of failure.

    Compliance and Policy Governance

    Operating a directory with user-generated content (claims, edits, reviews) means you are subject to platform liability, data protection laws, and advertising regulations. Key compliance areas:

    Compliance DomainKey RequirementsImplementation
    Data Privacy (GDPR, CCPA)Lawful basis for processing (legitimate interest for public directory; consent for marketing); right to erasure; data portabilityPrivacy policy, cookie consent, DSAR request workflow, data retention schedule
    Terms of ServiceUser conduct, content ownership, dispute resolution, limitation of liabilityClickwrap acceptance on claim submission; version control and change notifications
    Section 230 / Platform Liability (US)Immunity for third-party content if you act as a platform (not publisher); good-faith moderation is protectedClear UGC policies, DMCA/takedown process, abuse reporting
    Advertising Disclosures (FTC)Clearly label paid/sponsored listings; disclose affiliate relationships“Sponsored,” “Featured,” or “Ad” badges; separate visual treatment
    Accessibility (ADA, WCAG 2.1 AA)Keyboard navigation, screen-reader compatibility, color contrast, alt textAutomated testing (axe, Lighthouse), manual audits, remediation backlog
    Industry-Specific (HIPAA, FINRA, etc.)Healthcare, legal, financial directories may require professional verification, disclaimers, or licensure checksEnhanced verification workflows, third-party credential checks, legal review of disclaimers

    Privacy is paramount. Even if you scrape or infer business data from public sources (websites, public registries), you must offer a clear opt-out mechanism. Include a “Request Removal” or “Report Inaccuracy” link on every listing page. Process requests within 30 days (GDPR standard) and log all actions for audit trails. For claimed profiles, the business owner is the controller of their profile data; your role is processor. Document this in your Terms of Service and data processing addendum (DPA) if required.

    Conflict resolution is inevitable. You will encounter ownership disputes (two parties claim the same listing), impersonation attempts, and requests to remove negative (but accurate)


    Frequently Asked Questions

    How does claim your profile functionality work in online directories?

    Users search for their business listing in the directory and click a “Claim” button. The system sends a verification code via email, phone, or postcard. After verification, the business owner gains dashboard access to edit information, add photos, and respond to reviews.

    What verification methods should I implement for profile claims?

    Implement email verification as the baseline method, phone verification via SMS for higher security, and postcard verification for maximum authenticity. Use domain verification for corporate claims and document uploads for regulated industries. Multi-factor authentication adds an extra security layer.

    Can I monetize claim your profile features in my directory?

    Yes, you can offer free basic claims with paid premium tiers. Charge for enhanced listings, priority placement, advanced analytics, removal of competitor ads, and additional photos or content. Many directories generate significant revenue through freemium models where basic claims remain free.

    How do I prevent fraudulent profile claims?

    Require multiple verification methods for valuable listings, implement manual review for high-risk claims, and monitor for duplicate claims from different users. Use IP tracking, check business registration databases, and establish a clear dispute resolution process for contested claims.

    What features should I include in the claimed profile dashboard?

    Include business information editing, photo and video uploads, review management, performance analytics, appointment booking integration, and social media links. Add special offers or promotions posting, team member profiles, business hours management, and contact inquiry tracking for comprehensive management.

    Should I allow multiple users to manage one claimed profile?

    Yes, multi-user access benefits businesses with marketing teams or multiple locations. Implement role-based permissions where owners have full control, managers can edit content but not billing, and staff can only respond to reviews. Include activity logs to track changes.

    How long does profile verification typically take?

    Email verification completes instantly, phone verification takes under five minutes, and postcard verification requires seven to fourteen days. Manual reviews add one to three business days. Set clear expectations during the claim process and send status updates to reduce support inquiries.

    What happens if someone claims the wrong profile by mistake?

    Implement an unclaim feature allowing users to release ownership, establish a dispute process where the legitimate owner can challenge false claims, and maintain an audit trail of all ownership changes. Manual intervention by your support team resolves complex disputes effectively.

    Can I import existing business data for users to claim?

    Yes, seed your directory by importing data from public databases, business registries, or APIs like Google Places. This creates a foundation of listings for businesses to claim. Clearly mark profiles as unverified until claimed, and ensure imported data complies with terms of service.

    How do I encourage businesses to claim their profiles?

    Send personalized email invitations to business owners, display prominent “Claim This Business” buttons on listings, and highlight benefits like increased visibility and customer engagement. Offer limited-time incentives for early claims and showcase success stories from businesses with claimed profiles.

    Start Building Your Directory Today

    Creating an online directory with claim your profile functionality transforms a simple listing site into a dynamic platform that businesses actively want to join. The verification systems, dashboard features, and engagement tools you implement will determine your directory’s credibility and growth potential. Whether you’re targeting local businesses, professional services, or niche industries, the claim functionality gives you a competitive edge.

    Start small with email verification and basic profile editing, then expand features based on user feedback. Test your verification workflows thoroughly to prevent fraud while keeping the process smooth for legitimate business owners. Monitor which features drive the most engagement and iterate continuously.

    The businesses in your directory are waiting to take control of their online presence. Give them the tools to succeed, and your platform will grow organically as satisfied users recommend it to peers. Take the first step by mapping out your verification process and building your minimum viable product. Your directory has the potential to become the go-to resource in your industry.

    Ready to Launch?

    Choose your technology stack, set up your verification systems, and design a user-friendly dashboard. Focus on solving real problems for business owners—accurate information, customer connections, and performance insights. When you prioritize user value over quick monetization, success follows naturally.

    Document your processes, establish clear policies, and prepare for growth. The claim your profile feature is just the beginning of building relationships with thousands of businesses who will help your directory thrive.

    ; <[^>]+>; ); 0; 155)