How to Change Your Comcast Business Auto Attendant Directory: Complete VoiceEdge Guide

Generating summary...
Most business owners never realize their phone system is silently costing them customers until it’s too late. I once consulted with a regional law firm that discovered they’d lost three high-value clients simply because those clients couldn’t navigate their outdated Comcast auto attendant directory to reach the right attorney. The callers gave up, assumed the firm was disorganized, and hired competitors instead. The partners were shocked—they had no idea their phone system was creating this impression.
Your Comcast Business VoiceEdge auto attendant isn’t just a technical tool; it’s often the first human interaction customers have with your brand. When someone calls your business, they’re making a judgment about your professionalism within the first 30 seconds. A well-configured directory system routes calls efficiently, presents a polished image, and ensures customers reach the right person without frustration. Whether you’re updating employee extensions, reorganizing departments, or customizing greetings for seasonal changes, understanding how to modify your comcast business voice portal settings is essential for maintaining that professional edge.
TL;DR – Quick Takeaways
- Access the Comcast Business Voice Portal – Log in with admin credentials to reach VoiceEdge settings
- Navigate to Auto Attendant configuration – Find directory settings under Voice Services menu
- Update employee listings systematically – Add, remove, or modify directory entries with correct spelling
- Configure dial-by-name and extension search – Enable caller-friendly directory navigation options
- Test thoroughly before going live – Call your business number from external lines to verify routing
- Maintain regular audits – Schedule quarterly reviews to keep directories current and accurate
Understanding Comcast Business VoiceEdge Auto Attendant Architecture
Before diving into configuration changes, it helps to understand what you’re actually working with. The Comcast Business VoiceEdge (BVE) platform offers a sophisticated auto attendant system that functions as your virtual receptionist—answering calls, playing customized greetings, and routing callers based on their selections or search criteria. According to Microsoft’s research on business communication, companies with properly configured phone systems see up to 40% improvement in customer satisfaction scores.
The auto attendant handles multiple layers of call management. It answers incoming calls instantly (no more rings going unanswered during lunch breaks), presents professional menu options that guide callers to the right department, and provides directory search capabilities so callers can find specific employees by name or extension. For businesses with multiple locations or complex organizational structures, this becomes invaluable for maintaining a cohesive customer experience.
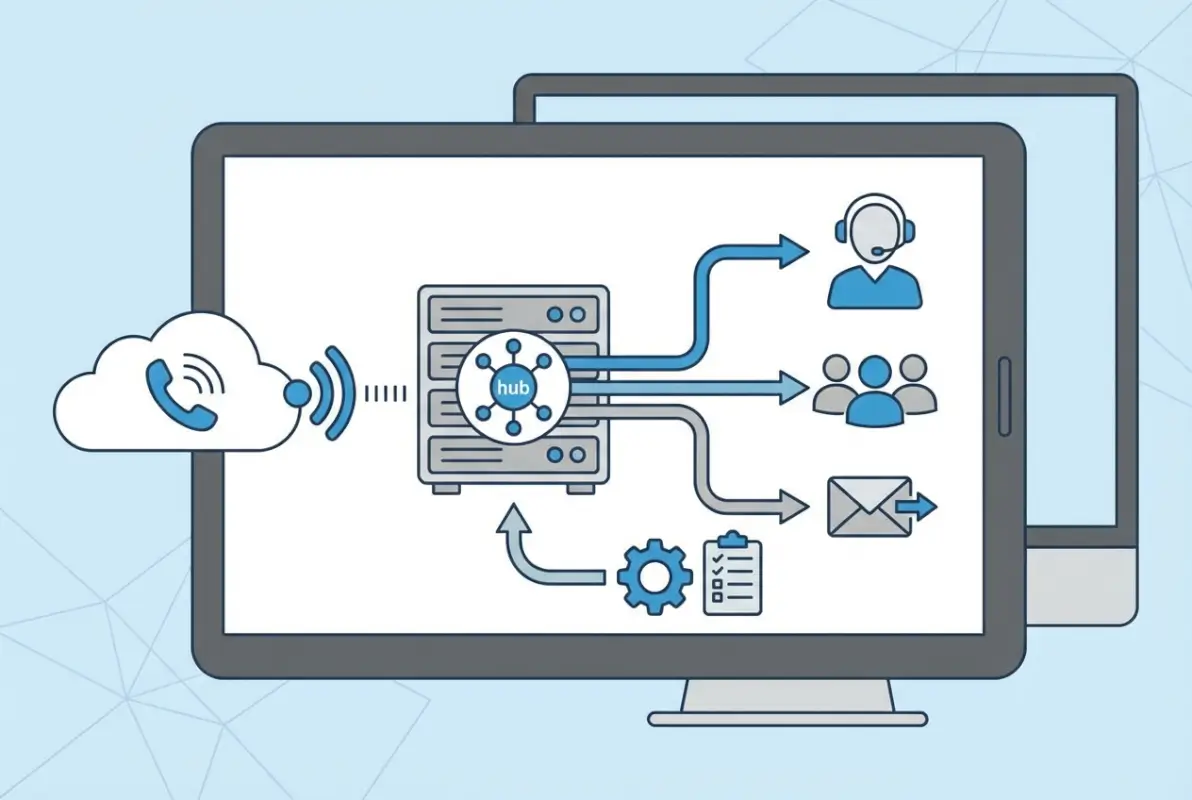
Within the VoiceEdge ecosystem, you’ll encounter several key components that work together. The main directory is your company-wide employee listing that callers can search when they select the directory option from your menu. The company directory specifically refers to dial-by-name functionality, where callers spell out an employee’s name using their phone keypad (2=ABC, 3=DEF, etc.). Extension search allows callers who already know a four-digit extension to dial it directly, bypassing menus entirely.
Terminology matters when you’re navigating the admin console. An Auto Attendant is the automated menu system itself. Hunt Groups are collections of extensions that ring simultaneously or in sequence (useful for sales teams or support departments). The Directory encompasses all searchable employee listings. Understanding these distinctions prevents confusion when you’re clicking through settings screens, trying to figure out why a change isn’t taking effect where you expected.
How Directory Visibility Works for Callers
Not every employee needs to be in your public-facing directory. VoiceEdge allows you to control visibility, so executive assistants, IT staff, or part-time employees can have extensions without appearing in dial-by-name searches. This prevents callers from accidentally reaching support staff who aren’t customer-facing, while still allowing internal teams to dial those extensions directly.
When callers access your directory, they typically hear a prompt like: “To search our directory by name, press 1. If you know your party’s extension, you may dial it now.” The system then listens for either keypad input (spelling a name) or a direct four-digit extension. If multiple employees match the search criteria (two people with the last name “Smith,” for example), the system announces each match and asks the caller to select the correct one.
Preparing to Access Your Comcast Business Voice Portal
Before you can modify anything, you need the right access level and a clear plan. Not everyone on your team can edit auto attendant settings—you’ll need Service Manager or Administrator credentials for your Comcast Business account. If you’re unsure whether you have these permissions, check with whoever originally set up your VoiceEdge service or contact your account representative.
Start by gathering information you’ll need during the update process. Create a spreadsheet or document listing current employees with their full names (spelled exactly as they should appear), assigned extension numbers, department affiliations, and whether each person should be visible in the public directory. Also note any employees who’ve left recently—their extensions need removal to avoid confusion.
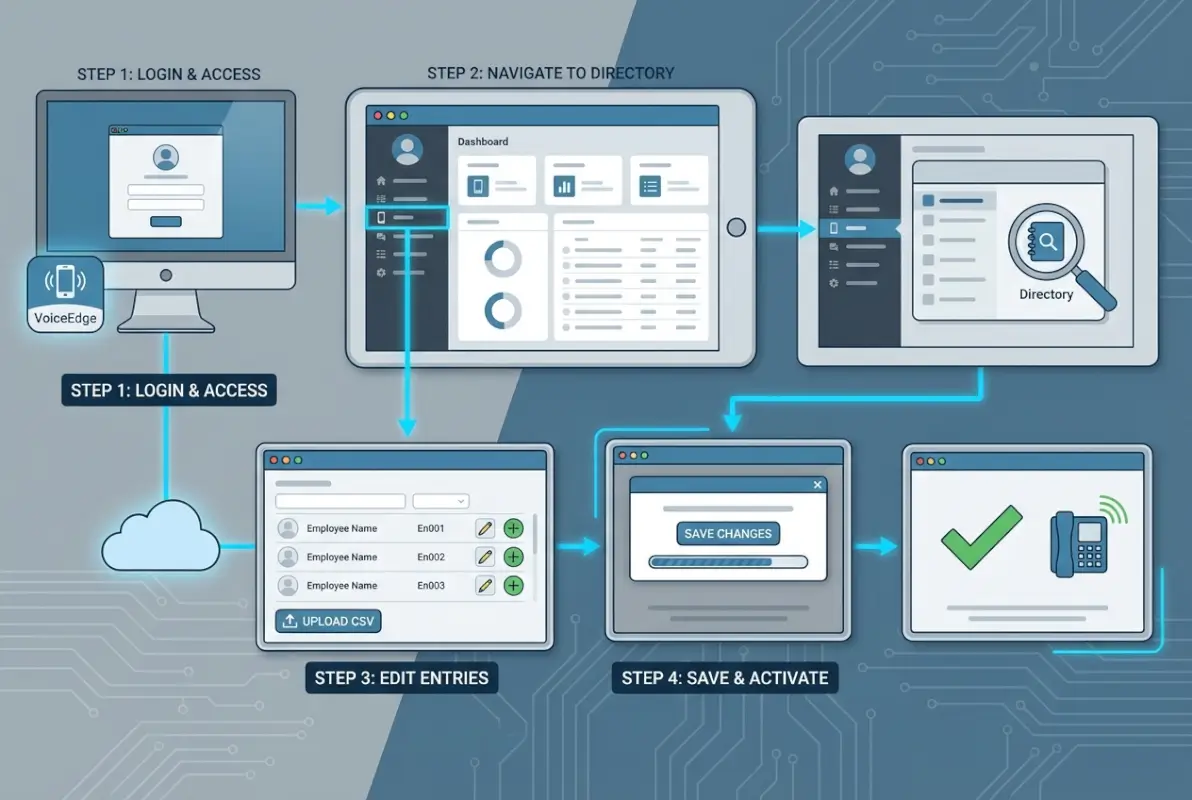
Log into the Comcast Business portal using your admin credentials. The interface has evolved over time, so depending on when your account was created, you might see slightly different navigation paths. Generally, you’ll find a “Voice Services” or “Phone” section in the main dashboard. Click into that area, then look for “Business VoiceEdge” or “VoiceEdge Select” options.
The admin console provides access to multiple configuration areas. You can manage individual user settings (voicemail, call forwarding), group settings (hunt groups, shared lines), and system-wide settings (auto attendants, company directories). For directory updates, you’ll primarily work in the Auto Attendant section, though you may occasionally need to verify extension assignments under individual user profiles.
Understanding Site vs. Site Group Scope
If your business operates multiple locations, Comcast Business VoiceEdge allows configuration at different organizational levels. Site-level settings apply only to a specific physical location—useful when different offices have different operating hours or menu structures. Site group settings apply across multiple locations simultaneously—ideal for maintaining consistent branding and directory structure across your entire organization.
When editing directories, pay attention to which scope you’re working in. Changes made at the site group level will propagate to all locations within that group, while site-specific changes only affect that individual office. This becomes particularly important for multi-location businesses where you want some consistency (company-wide directory) but also local flexibility (location-specific hours or greetings).
Complete Step-by-Step Directory Update Process
Now for the practical work. This expanded process covers everything from initial audit through final verification, ensuring nothing gets overlooked during your update.
Step 0: Audit Your Current Configuration
Start by documenting what exists today. From the VoiceEdge admin console, navigate to your Auto Attendant settings and review the current menu structure. What options do callers hear? How many menu levels exist? Where does the directory option appear in the call flow? Write this down or screenshot it.

Next, export your current directory if the system allows it (look for an “Export” or “Download” button in the directory management screen). This creates a backup and gives you a reference list of all current employees, their extensions, and directory visibility settings. If export isn’t available, manually document this information—it’s tedious but necessary for comparison later.
Check your after-hours configuration too, many businesses forget that after-hours callers might have different routing needs. Does your after-hours greeting mention the directory? Do those searches still work outside business hours, or do they route to a general voicemail? Understanding the complete caller journey prevents surprises when customers call at 7 PM and can’t reach anyone.
Step 1: Review and Clean Directory Settings
In the VoiceEdge admin console, locate the Directory or Company Directory section (usually under Auto Attendant settings or as a standalone menu item). You’ll see a list of all employees currently in the directory, typically displayed in a table format showing names, extensions, departments, and directory visibility status.
Verify the basics first. Is “Dial by Name” enabled for your directory? This setting controls whether callers can search by spelling names. Most businesses want this enabled, but some prefer extension-only dialing for security or simplicity. Check whether directory search is available during business hours only or also after hours—adjust based on your operational needs.
| Directory Field | Purpose | Best Practice |
|---|---|---|
| First Name | Given name for pronunciation | Use full legal name, avoid nicknames |
| Last Name | Surname for dial-by-name search | Primary search key—spell carefully |
| Extension | 4-digit direct dial number | Use sequential numbers by department |
| Department | Organizational grouping | Standardize names (Sales vs. sales team) |
| Directory Listing | Public visibility toggle | Hide support staff, show customer-facing roles |
Now clean up outdated entries. Remove any employees who’ve left the company—nothing frustrates callers more than reaching a disconnected extension or someone who hasn’t worked there in months. Also remove duplicate entries if you find them (sometimes employees get listed twice with slight name variations). This business directory boosts local marketing by ensuring customers always reach active, helpful staff members.
Step 2: Add and Update Directory Entries
For new employees, click the “Add Entry,” “New Employee,” or “+” button in the directory management screen. You’ll be prompted to enter several fields. Fill in the first name and last name exactly as they should be pronounced by the system—if someone goes by “Bob” but their legal name is “Robert,” use whichever they prefer for business calls.
Assign an available extension number. Most organizations use systematic numbering: executives in the 1000s, sales in 2000s, support in 3000s, etc. This makes extensions easier to remember and helps you identify which department someone belongs to at a glance. Enter the department name using consistent capitalization and spelling (don’t mix “Customer Service,” “customer service,” and “CS” across different entries).
Set directory visibility appropriately. Customer-facing employees (sales, account managers, executives) should typically be visible in the public directory. Back-office staff (accounting, IT, administrative assistants) might be hidden from public search but still reachable by direct extension. This prevents callers from accidentally reaching someone who can’t help them, while preserving internal accessibility.
To edit existing entries, select the employee from the list and click “Edit” or the pencil icon. You can modify most fields except the extension number—changing extensions typically requires creating a new entry with the new number and deleting the old one. When removing someone permanently, select their entry and click “Delete” or the trash icon, then confirm the removal.
Step 3: Configure Menu Trees and Call Routing
Your directory doesn’t exist in isolation—it’s part of your overall call flow. Navigate to the Auto Attendant menu structure settings (sometimes called “Call Flow” or “Menu Options”). Review how callers reach the directory option. Common structures include:

- Simple structure: “Press 1 for Sales, Press 2 for Support, Press 3 for our Directory”
- Directory-first: “If you know your party’s extension or name, you may dial it now. Otherwise, press 1 for Sales…”
- Departmental sub-menus: Main menu routes to departments, each department has its own directory
Ensure the directory option is clearly announced and easy to find. Research from Forrester shows that callers abandon calls if they can’t find what they need within three menu levels, so keep navigation shallow and intuitive.
Configure timeout behavior—what happens if someone doesn’t make a selection within a certain time period? Common options include repeating the menu, routing to a general operator, or sending to voicemail. Set this based on your staffing: if you have dedicated receptionists, route to them; if not, a helpful voicemail greeting works better than endless menu repetition.
Step 4: Set Business Hours and After-Hours Routing
Different greetings and routing for business hours versus after hours creates a more professional experience. In the Auto Attendant schedule settings, define your business hours by day of week. Most businesses have consistent Monday-Friday hours, but you might need special settings for weekends or holidays.
Create an after-hours greeting that acknowledges the time and sets expectations: “Thank you for calling ABC Company. Our office is currently closed. Normal business hours are Monday through Friday, 8 AM to 6 PM Eastern. You may leave a message after the tone, or press 1 to access our directory and leave a message for a specific team member.”
Decide whether directory search should work after hours. Some businesses disable it entirely (routing all after-hours calls to a general voicemail), while others keep it active so callers can leave messages for specific people. There’s no wrong answer—it depends on your team’s preferences and how they manage voicemail.
Step 5: Test Thoroughly with Real Scenarios
Testing isn’t optional—it’s the most critical step. Use your mobile phone or a landline outside your business to call your main number. Don’t test from an internal desk phone, as that often bypasses the auto attendant entirely and won’t show you what customers experience.
Run through multiple test scenarios:
- Navigate to the directory option and try searching for employees by last name
- Dial known extensions directly to verify they connect properly
- Test directory searches for recently added employees
- Verify removed employees no longer appear in searches
- Try searching for employees with common names to see how the system handles multiples
- Test transfers to ensure calls connect (not just ring endlessly)
- Check voicemail activation if transfers go unanswered
Listen critically to audio quality. Are greetings clear and professional? Can you understand all menu options easily? Is the volume consistent throughout the call flow? Poor audio quality undermines professionalism just as much as outdated information does.
Step 6: Save, Publish, and Monitor
Once testing confirms everything works correctly, finalize your changes. Look for a “Save,” “Apply,” or “Publish” button—terminology varies by interface version. The system will typically confirm that changes have been saved and may show an estimated time for full propagation (usually 5-30 minutes).

Don’t consider the job done once you click “Save.” Monitor your phone system for the next few business days. Ask employees if they’re receiving calls properly. Check voicemail for messages from callers who couldn’t reach someone they were searching for. This real-world feedback catches issues that testing might miss.
Step 7: Document Changes and Create a Rollback Plan
Professional IT management includes documentation. Create a simple change log noting the date, what you modified, and why. This becomes invaluable when troubleshooting future issues or onboarding new administrators who need to understand your system’s evolution.
Your change log might look like: “March 2024 – Added extensions 2105-2108 for new sales team. Removed extension 3012 (former support manager). Updated after-hours greeting to reflect new weekend hours.” Simple notes like these save hours of confusion later.
Keep your pre-change screenshots and configuration exports in a “Phone System” folder. If something breaks catastrophically after an update, you can reference these materials to restore previous settings. I once helped a client who’d accidentally deleted their entire directory (yes, it’s possible)—having a backup export meant restoration took 20 minutes instead of rebuilding from memory over several days.
Advanced Customization: Greetings, Menus, and Routing Rules
Beyond basic directory management, VoiceEdge offers sophisticated customization that can significantly improve caller experience. Your main greeting is the first impression, so invest time to get it right. Professional greetings are clear, concise, and welcoming without being overly chatty.
Effective greetings include your complete company name (as customers know it), a brief welcoming phrase, primary menu options in logical order, directory access instructions, and a fallback option for speaking to a person. For example: “Thank you for calling Premier Accounting Services. For new client inquiries, press 1. For existing client support, press 2. To reach a specific team member, press 3 or dial their extension now. To speak with our receptionist, press 0 or stay on the line.”
Recording quality matters enormously. If recording yourself, find a quiet room with minimal echo, use a decent microphone (even a good headset beats a speakerphone), speak clearly at a moderate pace, and maintain consistent distance from the microphone. Here’s a trick: smile while recording—it genuinely affects vocal tone and makes you sound more welcoming.
Alternatively, consider hiring professional voice talent. Services like Voices.com or Fiverr offer professional recordings starting around $50-100, which is surprisingly affordable for the polish it provides. A professional recording immediately elevates your brand perception, especially if you’re in industries where credibility matters (legal, financial, medical).
| Greeting Type | When to Use | Key Elements |
|---|---|---|
| Business Hours | Monday-Friday during operating hours | Menu options, directory access, operator fallback |
| After Hours | Evenings, weekends, outside business hours | Operating hours statement, voicemail options |
| Holiday | Major holidays (Thanksgiving, Christmas, etc.) | Holiday acknowledgment, return date, emergency contact |
| Emergency | Weather closures, system outages | Situation explanation, alternative contact methods |
Creating Multi-Level Menu Structures
For complex organizations, multi-level menus help organize options logically. Your main menu might route to departments, and each department has its own sub-menu with specific options or directory access. For example: Main menu → Press 2 for Sales → Sales submenu: Press 1 for New Business, Press 2 for Existing Accounts, Press 3 for Sales Directory.
However, be cautious about menu depth. Each additional level adds friction and increases abandonment rates. According to research from Statista on VoIP usage trends, businesses with menus deeper than three levels see significantly higher call abandonment. If you find yourself designing a fourth or fifth level, consider whether you really need that much complexity or if simpler routing would serve customers better.
Advanced Routing Rules and Hunt Groups
VoiceEdge allows sophisticated routing based on various conditions. You can route calls based on time of day (different destinations for morning vs. afternoon), caller ID (VIP customers bypass menus entirely), or queue status (overflow to voicemail when all lines are busy).
Hunt groups are particularly useful for teams. Instead of routing to a single extension, you route to a hunt group that tries multiple extensions in sequence or simultaneously. For example, your “Press 1 for Sales” option might ring extensions 2001, 2002, and 2003 all at once—whichever salesperson picks up first gets the call. This ensures someone answers quickly without callers needing to know which specific salesperson to ask for.
This approach to creating a php business directory simple steps or following a business directory website complete guide can complement your phone system by providing customers multiple contact methods.
Troubleshooting Common Auto Attendant Issues
Even with careful configuration, issues sometimes arise. Here’s how to diagnose and fix the most common problems with your Comcast Business auto attendant directory.
Directory Names Not Recognized
If callers report they can’t find employees via dial-by-name search, first verify the spelling in your directory entries. The system matches based on how you spelled the name, not how you think it should be spelled. Check for common issues like including middle initials (which can confuse searches), using nicknames instead of legal names, or inconsistent formatting (some entries with periods after initials, others without).
Also confirm that “Dial by Name” is actually enabled in your Auto Attendant settings. This sounds obvious, but I’ve troubleshot systems where this feature was accidentally disabled during a previous update. If the feature is off, callers hear “directory not available” regardless of how perfectly your entries are spelled.
Transfers Failing or Dropping Calls
When directory searches connect but then immediately disconnect, the issue is usually with the destination extension. Verify that the extension number listed in your directory matches an actual active extension on your system. Go to the individual user settings and confirm that extension is assigned and active.
Check whether the destination extension has voicemail properly configured. Some systems fail transfers if the endpoint can’t accept the call—so if voicemail is full or disabled, transfers may drop instead of completing. Ensure all extensions in your directory have functional voicemail boxes as a fallback.
Changes Not Appearing After Saving
Configuration changes typically propagate within 15-30 minutes, but occasionally take longer. If you’ve saved changes but they’re not reflected when you test, first wait the full 30 minutes before assuming something’s wrong. Clear your browser cache and log out/back in to ensure you’re seeing current data, not cached information.
If changes still haven’t appeared after an hour, verify that you actually clicked the final “Save” or “Publish” button. Many interfaces require multiple confirmation steps, and it’s easy to miss the final commit. Check your change log or audit trail (if available) to confirm the system recorded your modifications.
Poor Audio Quality or Volume Issues
Audio problems usually stem from the recording itself rather than system settings. If greetings sound muffled, echo-y, or too quiet, you’ll need to re-record them. Use VoiceEdge’s recording guidelines: .wav format is preferred, 8kHz or 16kHz sample rate, mono channel, 16-bit depth. Keep files under 5MB and greetings under 2 minutes for optimal performance.
When re-recording, eliminate background noise, maintain consistent microphone distance, and normalize audio levels using free tools like Audacity. If you’re uploading files rather than recording through the portal, test them on your computer first to ensure quality before uploading.
When to Contact Comcast Business Support
Some issues require professional assistance. Contact Comcast Business Support if you encounter system errors you can’t resolve, service outages affecting your phone system, configuration options that seem unavailable or grayed out, or billing questions about Auto Attendant features.
Before calling, gather your account number, detailed symptoms (what you’re trying to do, what’s happening instead), when the problem started, and what troubleshooting you’ve already attempted. This information helps technicians diagnose issues faster and gets you back to normal operation more quickly.
Frequently Asked Questions
How do I access the Comcast Business Voice Portal to change my auto attendant?
Log into business.comcast.com with your admin credentials, navigate to “Voice Services” or “Phone” in the main dashboard, then select “Business VoiceEdge” or “Auto Attendant.” You’ll need Service Manager or Administrator access level to modify settings. If you don’t have login credentials, contact your account representative or the person who originally set up your VoiceEdge service.
What is the difference between an Auto Attendant and a company directory in Comcast VoiceEdge?
An Auto Attendant is the complete call management system that answers calls, plays greetings, and routes callers based on menu selections. The company directory is a specific feature within the Auto Attendant that allows callers to search for employees by name or extension. Think of the Auto Attendant as the entire phone tree, while the directory is one branch of that tree.
Can I have different Auto Attendant settings for business hours versus after hours?
Yes, Comcast Business VoiceEdge supports schedule-based configurations. You can create separate greetings, menu options, and routing rules for business hours, after hours, weekends, and holidays. This is configured in the “Schedule” or “Business Hours” section of your Auto Attendant settings, where you define operating hours by day of week.
How long does it take for Auto Attendant directory changes to go live?
Most configuration changes take effect within 5-15 minutes after saving. More complex changes like adding new extensions or modifying routing logic may require up to 30 minutes to fully propagate through Comcast’s network. Plan accordingly if making changes during peak business hours, and always test after the propagation window to confirm changes worked as expected.
Why can’t callers find certain employees when using dial-by-name directory search?
Common causes include misspelled names in directory entries, the employee’s directory visibility being set to “hidden” instead of “public,” dial-by-name feature being disabled in Auto Attendant settings, or the extension number being incorrect or inactive. Verify spelling matches exactly how callers would search, and confirm the feature is enabled and the employee is marked as visible.
How many employees can I add to my Comcast Business directory?
Comcast Business VoiceEdge directories typically support 100-150 individual employee listings depending on your service tier. For organizations with more employees, you can organize them into department-based sub-directories or use extension ranges to accommodate larger teams. Contact Comcast Business directly to discuss enterprise-level directory solutions for very large organizations.
Can I route calls based on caller ID or create VIP caller lists?
Advanced VoiceEdge configurations support caller ID-based routing, allowing you to create VIP lists that bypass the main menu or route priority customers directly to specific departments. Location-based routing capabilities depend on your specific service package. Contact Comcast Business to discuss advanced routing options available for your account tier.
What audio file formats does Comcast Business accept for custom Auto Attendant greetings?
Comcast Business typically accepts .wav and .mp3 audio files for custom greetings and announcements. For best quality, use .wav format with 8kHz or 16kHz sample rate, mono channel, and 16-bit depth. Keep file sizes under 5MB and greeting length under 2 minutes for optimal performance and faster upload times.
How do I remove an employee from the directory after they leave the company?
From the VoiceEdge admin console, navigate to your Auto Attendant directory settings, find the employee in the listing table, select their entry, and click “Delete” or the trash icon. Confirm the removal when prompted. The change typically takes effect within 15 minutes. Always remove departed employees promptly to prevent caller frustration from reaching disconnected extensions.
Can I test Auto Attendant changes before they go live for customers?
While VoiceEdge doesn’t offer a formal staging environment, you can preview some changes using the “Preview” or “Test” function if available in your interface version. The most reliable testing method is calling your main business number from an external line (mobile phone or non-business landline) after hours or during low-call periods to verify everything works as expected before high-volume periods.
Take Control of Your Business Communication
Your Comcast Business auto attendant directory isn’t a “set it and forget it” system—it’s a living tool that should evolve with your organization. Regular maintenance ensures callers always have a smooth, professional experience that reflects well on your brand and helps them reach the right person efficiently.
Schedule a quarterly review of your Auto Attendant configuration. Listen to your greetings with fresh ears from a customer’s perspective. Are they still accurate? Professional? Easy to navigate? Are all current employees listed correctly? Do routing options make intuitive sense? Small improvements here create substantial impacts on customer perception and satisfaction.
Remember to document your changes, maintain backups of working configurations, and test thoroughly before considering any update complete. The fifteen minutes you invest in proper testing can save hours of frustration when something breaks during your busiest business period.
If you’re looking for comprehensive solutions that integrate both phone directory functionality and web-based employee listings, consider TurnKey Directories—a WordPress-based platform that creates professional business directories with seamless contact management features. Learning how to start profitable business directory steps can complement your phone system strategy by creating multiple customer touchpoints across digital channels, and understanding the business directory key benefits for your business helps you see the bigger picture of integrated communication systems.
Was this article helpful?