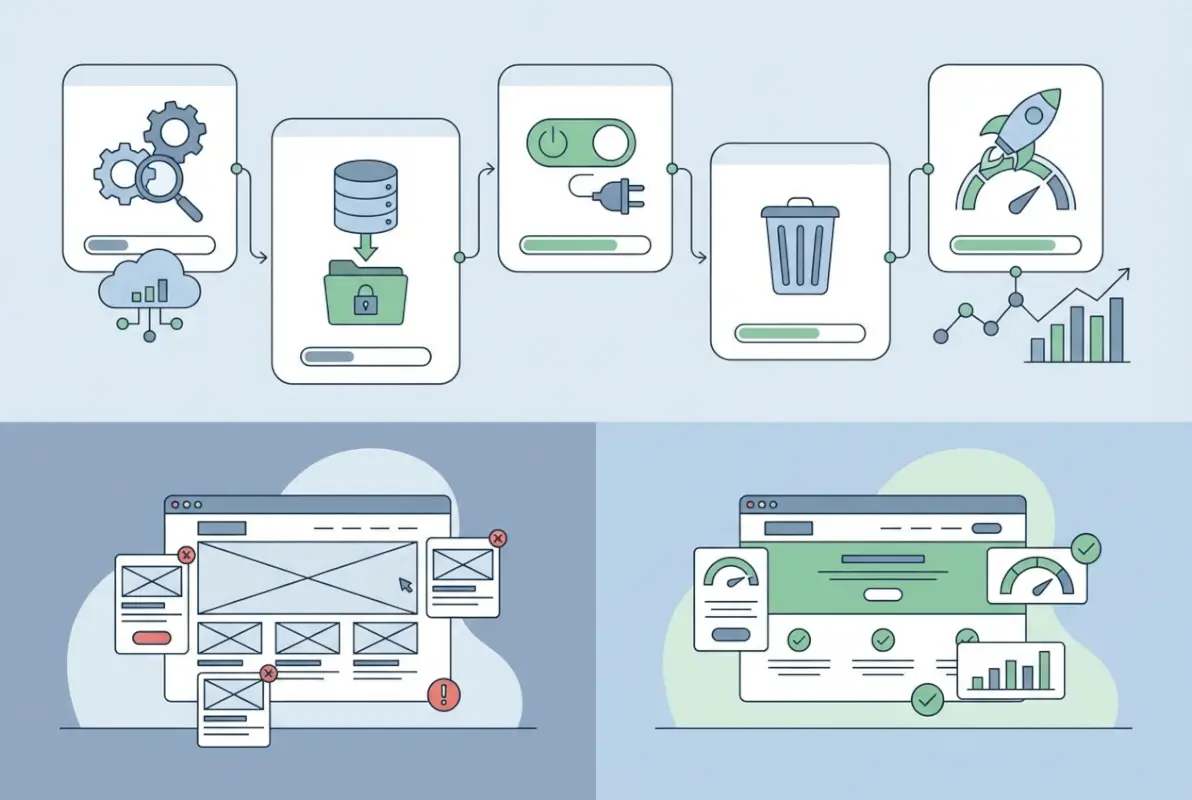
How to Remove a Business Directory Plugin from WordPress: 5 Simple Steps
Removing a WordPress directory plugin might sound straightforward—just click “Delete,” right? Not quite. I’ve seen too many site owners skip the cleanup steps and end up with database bloat, broken shortcodes littering old pages, and even security vulnerabilities from orphaned plugin code. The truth is, most WordPress plugins don’t fully clean up after themselves when you hit delete. Directory plugins, in particular, often leave behind custom post types, taxonomies, media libraries full of listing images, and database tables that can quietly drain your site’s performance for months. This guide walks you through a methodical, safe process to remove a business directory plugin from WordPress without leaving a trace—so your site stays lean, secure, and fast.
TL;DR – Quick Takeaways
- Always back up first – Database and file backups prevent catastrophic loss if removal breaks your site
- Deactivate before deleting – Prevents active code from interfering during file removal
- Clean database remnants manually – Most plugins leave options, transients, and custom tables behind
- Check for orphaned content – Remove or replace shortcodes and custom post types before they cause 404 errors
- Run a post-removal health check – Verify front-end and admin functionality to catch conflicts early
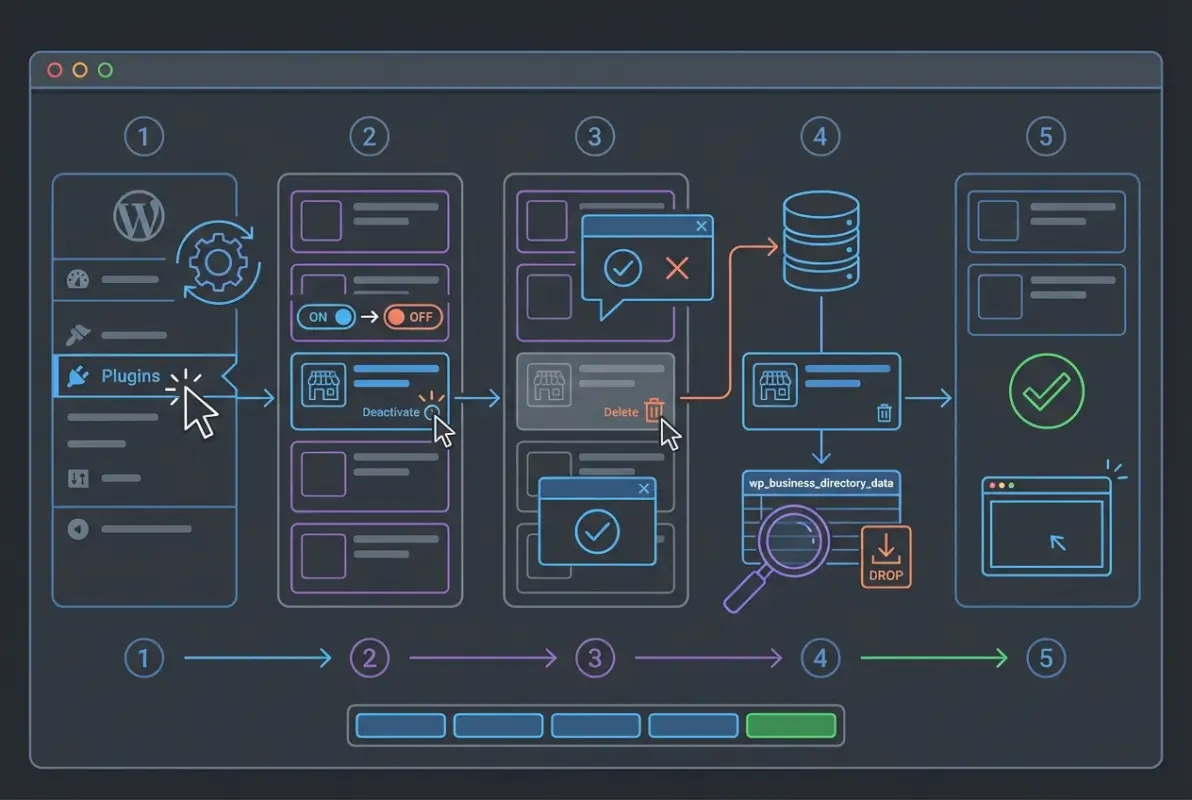
Step 1 — Safely Prepare Before Removal
Before you touch a single file, make a complete backup of your WordPress site. I mean everything—your database, your wp-content folder, your theme files, the whole works. You can use a plugin like UpdraftPlus or BackupBuddy, or ask your hosting provider to create a snapshot. Why? Because directory plugins often hook into core WordPress functions, and removing them can trigger unexpected conflicts with your theme or other plugins.
Next, confirm exactly which plugin you’re removing. Log into your WordPress dashboard, navigate to Plugins > Installed Plugins, and note the plugin’s exact name and folder. If you’ve used business directory plugins for WordPress, you might have multiple directory-related tools installed—make sure you’re targeting the right one. Cross-check the plugin’s folder name by connecting via FTP or your hosting file manager and looking inside wp-content/plugins/.
Once you’ve identified the plugin, document what it does on your site. Does it power your entire listings page? Does it inject shortcodes into your posts or custom page templates? Knowing this upfront helps you plan replacements or content edits after removal, especially if you’ve built custom functionality around it.
Finally, check your database for plugin-specific tables. Use a tool like phpMyAdmin (available in most hosting control panels) to scan for table names that match your plugin’s prefix. For example, if you’re removing a directory plugin called “BizDir,” look for tables like wp_bizdir_listings or wp_bizdir_categories. Write down these table names—you’ll need them later for cleanup.
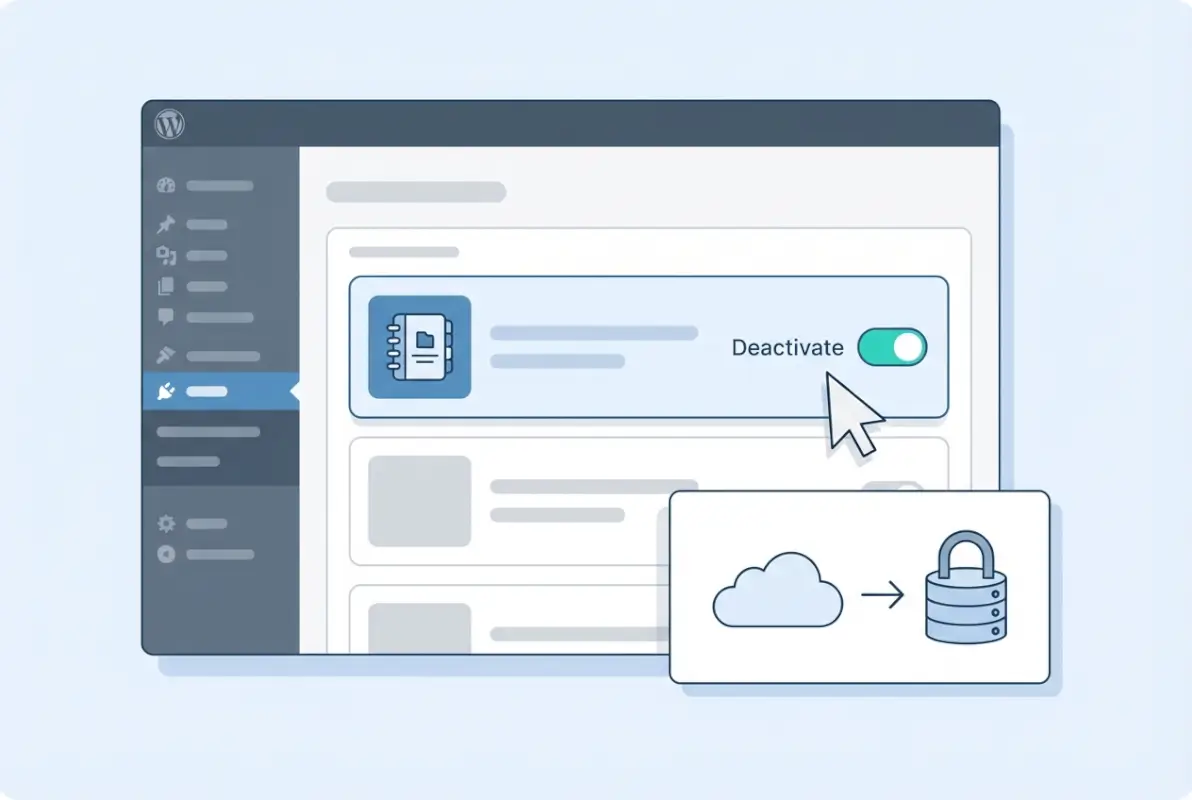
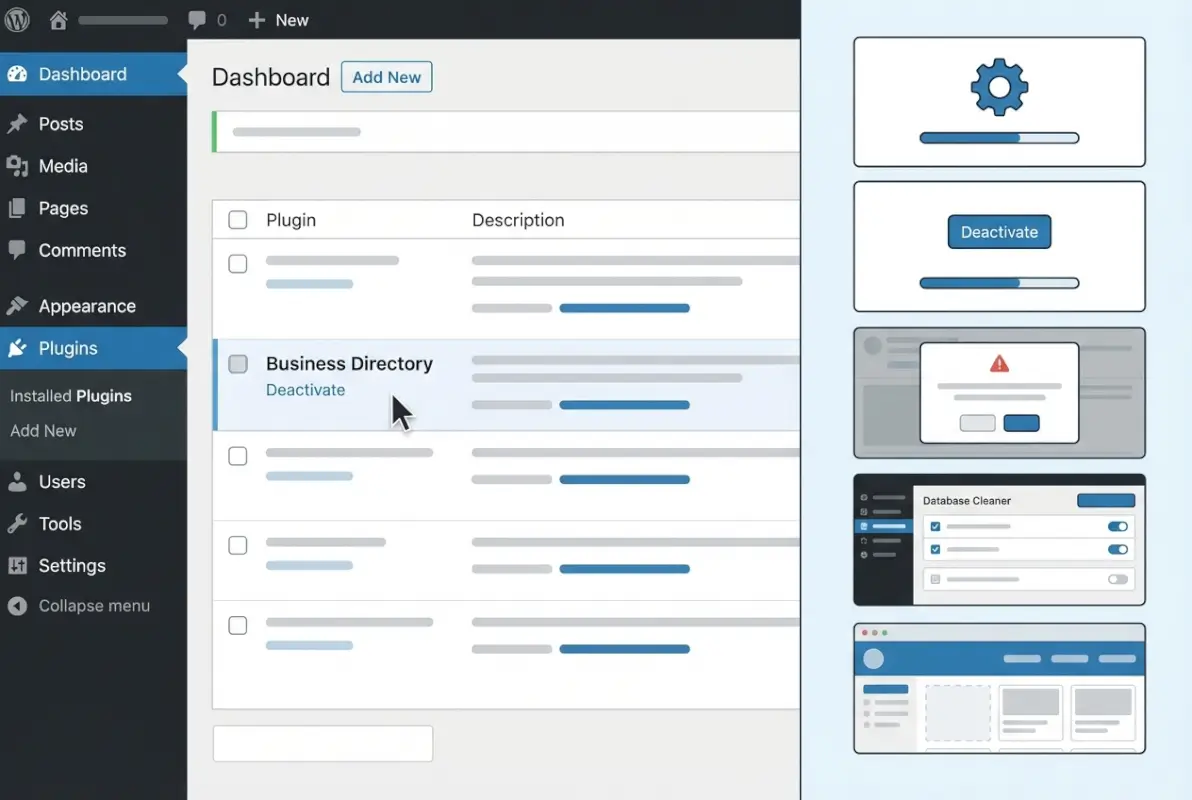
Step 2 — Deactivate the Plugin
Deactivation is your safety switch. It stops the plugin from running any code or hooks without deleting its files yet, which gives you a chance to see if your site breaks before you commit to full removal. Go to Plugins > Installed Plugins, find your directory plugin, and click Deactivate. After deactivation, visit your site’s front end and admin dashboard to check for errors or layout issues.
If your dashboard is broken or inaccessible after a plugin conflict, you can force deactivation manually. Connect to your site via FTP or your hosting file manager, navigate to /wp-content/plugins/, and rename the plugin’s folder (for example, change bizdir/ to bizdir-disabled/). WordPress won’t recognize the folder anymore and will automatically deactivate the plugin, letting you regain admin access. You can also consult what business listings are to understand how directory data might still appear even after deactivation.
Once deactivated, test critical pages—especially any that displayed directory listings, maps, or search filters. If you see blank sections or PHP errors, note them down. These clues tell you which shortcodes or widgets relied on the plugin, and you’ll need to remove or replace them in Step 4. For more context on maximizing directory plugin potential, consider how deactivation affects SEO-optimized listing pages.
If everything looks stable after deactivation, you’re ready to delete the plugin files. If errors appear, don’t panic—your backup and the forced-rename method give you an easy rollback. Just remember: deactivation is reversible, deletion is not (unless you restore from backup).
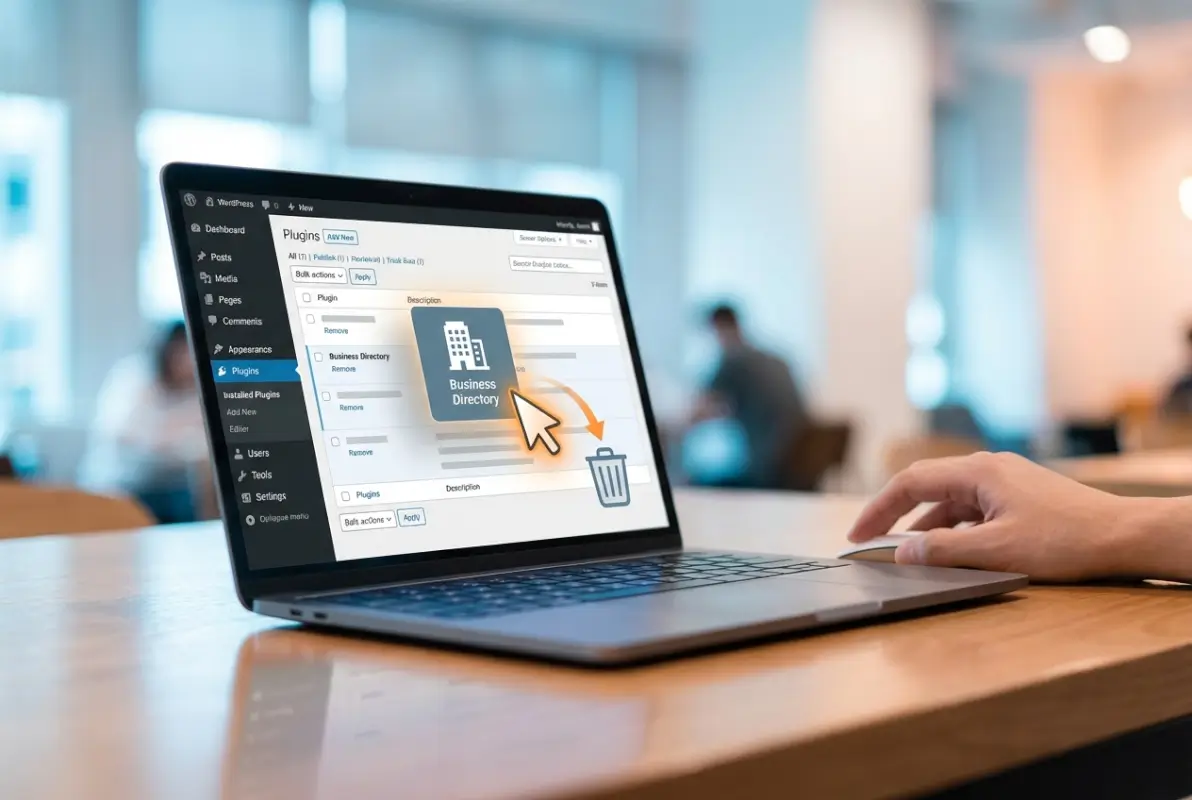
Step 3 — Remove the Plugin Files
Once you’ve successfully deactivated the business directory plugin, the next step is to delete its files from your server. From your WordPress admin dashboard, navigate to Plugins > Installed Plugins, locate the deactivated plugin, and click the Delete link beneath its name. WordPress will remove the plugin’s entire directory from wp-content/plugins/ and display a confirmation message.
If you cannot access the WordPress dashboard or the Delete button fails, use FTP or your hosting control panel’s file manager to manually remove the plugin folder. Connect to your site via FTP, navigate to wp-content/plugins/, and delete the directory that matches your business directory plugin’s name. This method ensures file removal even when the admin interface is unavailable or throws errors.
After deletion, verify that no leftover files or subdirectories remain in wp-content/plugins/. Some plugins create additional folders or cache directories outside their main plugin folder, so perform a quick scan of the entire plugins directory. Check for any folders with names similar to the deleted plugin or containing the plugin’s slug in the folder name.
Finally, confirm the deletion by refreshing your Installed Plugins page in the WordPress admin. The plugin should no longer appear in the list, and its name should not show up when you search for it. If remnants persist or you see error messages referencing the old plugin, double-check the file manager to ensure the plugin directory was fully removed from the server.
wp-content/plugins/ directory via FTP to prevent orphaned files.Step 4 — Clean Up Leftovers (Database and Media)
Deleting a business directory plugin’s files does not automatically remove all traces from your WordPress database. Many directory plugins create custom tables, add entries to wp_options, store transients, or insert metadata into posts and pages. To ensure a complete cleanup, inspect your database for leftover entries that can bloat your site and slow performance over time.
Access your database through phpMyAdmin in your hosting control panel or use a dedicated database management tool. Look for tables prefixed with the plugin’s name or slug (for example, wp_business_directory or wp_bd_listings). Review the wp_options table for rows where option_name contains the plugin’s identifier, and carefully delete these entries if you’re certain they belong to the removed plugin.
| Database Location | What to Look For | Action |
|---|---|---|
wp_options | Rows with option_name containing plugin slug or identifier | Delete matching rows |
| Custom tables | Tables prefixed with plugin name (e.g., wp_bd_listings) | Drop tables if not used elsewhere |
wp_postmeta | Meta keys related to plugin custom fields or data | Delete orphaned metadata rows |
wp_posts | Custom post types created by the plugin | Trash or delete orphaned posts |
Next, search your posts and pages for shortcodes or embed codes inserted by the plugin. Use the WordPress admin search or a plugin like Search & Replace to find any remaining shortcodes (e.g., [business_directory] or [bd_listing]). Replace these shortcodes with static content, alternative shortcodes from a new plugin, or remove them entirely to prevent broken output on the front end.
Finally, review your media library and uploads folder for images or files uploaded through the business directory plugin. Some directory plugins store listing images or user-submitted files in custom subdirectories within wp-content/uploads/. Decide whether to keep these files for archival purposes or delete them to free up server space and keep your uploads folder organized.
Step 5 — Verify Site Health and Security Post-Removal
After removing all files and cleaning up database remnants, verify that your WordPress site remains fully functional and secure. Navigate to Tools > Site Health in your WordPress admin dashboard to run an automated check for errors, warnings, or configuration issues introduced by the plugin removal. Address any critical or recommended improvements flagged by the Site Health tool to ensure optimal performance.
Test your site’s front end by visiting key pages, especially those that previously displayed business directory listings or used plugin shortcodes. Check for broken layouts, missing content, or error messages on pages where the plugin’s output was embedded. If you discover issues, consult your backup to identify which pages or templates relied on the plugin, then update those areas with alternative content or a replacement directory solution.
Run a security scan using a plugin like Wordfence or your hosting provider’s built-in security tools. This scan will detect any leftover files, outdated code, or vulnerabilities that may have been introduced during the removal process. Review your site’s error logs (accessible via your hosting control panel or a plugin like WP Debugging) for PHP notices or warnings related to the deleted plugin.
If you encounter persistent errors or your site becomes unstable, restore your pre-removal backup and re-attempt the deletion process more carefully. Identify which specific files or database entries are causing the issue by comparing your current site state to the backup. For complex directory plugins with deep integrations, consider consulting the plugin’s official documentation or support forums for recommended uninstallation procedures and known cleanup steps.
Frequently Asked Questions
Can removing a plugin also delete its data from the database?
Deleting a plugin typically removes its files from the wp-content/plugins directory, but database entries often persist in wp_options or custom tables. Many plugins leave behind settings, transients, and orphaned data. A targeted cleanup using phpMyAdmin or a database optimization plugin ensures complete removal and prevents bloat.
What if I can’t access the WordPress admin to delete a plugin?
Use FTP, SFTP, or your hosting file manager to navigate to wp-content/plugins and rename or delete the plugin directory. This immediately deactivates the plugin and often restores dashboard access. Once you regain control, you can complete the removal process through the WordPress admin interface or finalize cleanup via file manager.
Are there any risks when deleting a WordPress plugin?
Yes. Removing a plugin without preparation can break site functionality, leave orphaned shortcodes on pages, or cause layout issues if the plugin powered critical features. Leftover database entries may slow performance. Always back up your site before deletion, test thoroughly afterward, and remove any shortcodes or references manually to avoid display errors.
Should I delete the plugin’s database tables manually?
Only delete custom tables if you’re confident the plugin created them and they’re no longer needed. Inspect table names and prefixes carefully—removing core WordPress tables will break your site. Use phpMyAdmin to identify plugin-specific tables, verify they’re safe to drop, and always keep a recent database backup before proceeding with manual deletions.
How can I verify that removal didn’t break my site?
Run WordPress Site Health under Tools, test critical pages and functionality on the front end, and review your error logs for PHP warnings or database errors. Check that navigation, forms, and any features the plugin supported still work correctly. Monitor site speed and uptime for 24–48 hours to catch delayed issues.
What happens to shortcodes after removing a directory plugin?
Shortcodes left in posts or pages will display as plain text or render broken output once the plugin is deleted. Search your content using Plugins like Better Search Replace or manually via the WordPress editor to find and remove or replace these shortcodes. Failing to clean them up creates a poor user experience.
How do I remove leftover plugin options from wp_options?
Access your database via phpMyAdmin, navigate to the wp_options table, and search for rows with option_name values matching the plugin’s prefix or slug. Delete those entries carefully, ensuring you don’t remove core WordPress options. Database cleanup plugins can also automate this process, removing orphaned rows and transients safely.
Can I reinstall a plugin after deleting it completely?
Absolutely. Reinstalling a plugin is straightforward through the WordPress admin or by uploading the plugin files via FTP. However, previous settings and data will be lost unless you backed up the database beforehand. If you need the same configuration, restore your database backup or manually reconfigure the plugin after reinstallation.
Conclusion
Removing a business directory plugin from WordPress is straightforward when you follow a methodical, safety-first approach. By backing up your site, deactivating and deleting the plugin files, cleaning up database remnants, and running post-removal health checks, you protect your site’s performance, security, and user experience. Each step builds on the last, ensuring nothing breaks and no orphaned data lingers to slow your database or confuse visitors.
The five-step process outlined in this guide equips you to confidently remove any directory plugin—whether you’re switching to a better solution, consolidating features, or simply decluttering. Remember that leftover shortcodes, database entries, and transients can persist long after the plugin is gone, so allocating time for thorough cleanup pays dividends in site speed and stability.
Ready to Clean Up Your WordPress Site?
Apply the five steps today to safely remove your directory plugin and reclaim database space. Back up first, deactivate cleanly, delete thoroughly, scrub the database, and verify your site health. Your faster, leaner WordPress install is just a few clicks away.
Bookmark this guide for future plugin removals and share it with your team to standardize best practices across all your WordPress projects.
Regular plugin audits—quarterly or biannual—help you identify unused extensions before they become security liabilities or performance bottlenecks. Treat plugin removal as a routine maintenance task, not a crisis response. With the right preparation and a checklist mindset, you’ll keep your WordPress environment secure, performant, and free of technical debt for years to come.